In some of our classes and research and development projects we are forced to pour 1 1/2-inch concrete panels on top of plastic inside our warehouse. Although we try and get as much use as possible with these slabs between classes, testing products as well as techniques, inevitably at some point the concrete needs to be demoed out and disposed of. What a waste, especially in instances where past classes have produced beautiful art work on these panels.
After watching a few videos on a friend's website (Nathan Giffen of The Vertical Artisans) on how to produce concrete boulders it dawned on me - what a great way to get rid of what was once thought of as waste. Not only were we saving money on disposing of these slabs, the broken concrete rubble actually becomes a great foundation (base) for one-of-a-kind boulders.
One might ask, "Why would you want to make boulders out of concrete"? There are many answers to that question; however, the main reasons consisted of economics and convenience. If you have ever worked on a commercial decorative hardscape project in which the landscape crews are placing actual rocks and boulders you probably noticed that these rocks weigh a ton (really they do in some cases) and heavy-duty equipment, straps and harnesses are needed, not to mention the actual cost of these boulders. I have paid more than $500 for one large boulder where for less than $50 in materials I could have produced my own unique boulder. Also, in locations difficult to access, equipment simply can't get to these areas making the placement of actual boulders impossible.
Let's take a look at how to make your own concrete boulders and have some fun while doing it; not to mention expanding your company's capabilities while making money at it.
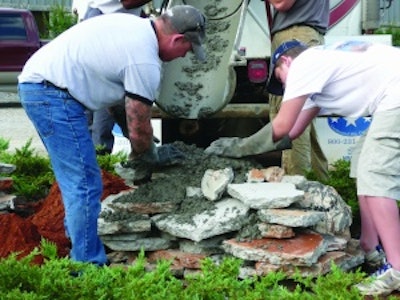
The first thing you should consider is having a ton of reference material. I have collected a bunch of pictures of rocks in various shapes and sizes to refer to. Start off by stacking your rubble (if you don't have broken concrete, use old bricks or cinder blocks) to form the rough shape. To keep an organic look, try and stack the sides of the rubble vertically with the top being a little wider than the bottom portion as opposed to the opposite. In other words, don't make it look like a pyramid unless of course your client is asking for that and is willing to pay you for it.
Once you have your shape, wet the rubble, cleaning any debris left behind. Using fiber reinforced concrete (mixed yourself or ready mixed), place it on to the rubble filling all of the nooks and crannies. I found that throwing it on by hand (use rubber gloves) is probably the most efficient way and allows you to shape it nicely. Make sure you fight the temptation of smoothing out the surface. Leave it extremely coarse, which helps the texture coat adhere.
Once the concrete has dried (the next day), apply a bonding agent by spraying, brushing or simply splashing it on with a splash brush. Now it is time to apply our texture coat. Although, a pre-bagged vertical wall mix works great, you can have good success by using a standard 3:1 (3 sand to 1 cement) plaster mix. If you mix the plaster too dry, the mix will not adhere properly; and if it is too wet, the mix will sag when applied. Shoot for a thick oatmeal consistency (without the brown sugar of course) as a starting point.
Once mixed, apply the mortar by throwing it up by hand, although a small square point shovel stacks the mix up nicely as well (don't smooth out the mix).
After all of the mix is applied, broadcast a variety of dry shake color hardeners over the entire surface. Using 6-inch paint brushes (worn out course brushes are desirable) stipple the color hardener in to the mortar. In other words, your texturing tool is the paint brush. Have a bucket of water to keep your brush wet. Don't be afraid to create deep texture by pushing your brush deep in to the mortar. Traditional texture skins can be used as well during this step.
To give your boulder a sense of realism, once you have the desired color and texture take a mixture of two parts sand to one part color hardener and aggressively throw it on to the entire surface and "wallahh", you have created your first boulder.
The fun is certainly not over with a variety of optional coloring techniques. Acid stains and water-based stains can help take your boulder over the top. Artisans use a variety of techniques such as throwing wet peat moss on to the boulder acting as a barrier for stains creating a very natural look. With some creativity you can design your boulders as a sitting feature in which to enjoy a cool beverage with family and friends.
Rock on!