Making concrete match stone
Decorative concrete contractors are always looking for their next source of inspiration. For Kevin Percy and Percy Concrete & Design, Inc., Wrentham, Mass., he found it in a homeowner's stone fireplace and exposed stone chimney. Percy, who was creating a vertical stamped concrete overlay on an outdoor barbecue, came up with the idea to match the overlay on the barbecue to the stonework on the homeowner's chimney to carry the stone theme throughout the backyard.
This was Percy's first outdoor barbecue, which he says he approached in a design-and-build-as-you-go manner. But that doesn't mean he didn't start the job without planning and research. Percy used a computer software program to lay out the project and determine the basics of design. From there he moved on to the physical work.
The outdoor barbecue included a grill, sink, wood box and wood burning fireplace. The whole piece was 22 feet long and between 4 feet and 8 feet tall.
Percy's first step was to pour a 1-foot-deep concrete footing. He then used 8-inch concrete masonry blocks to build the structure. "We laid the blocks out in a semi-arc design. We drilled rebar into the footing in every cell of the block, and then we stacked the block around the perimeter to the exact heights that we wanted," Percy says. He then filled the blocks with concrete to create one structure.
He used a hopper gun to spray Butterfield Color T1000 Sprayable Overlay over the block as a scratch coat. "Sometimes block lines will profile through so we put the scratch coat on to hide everything and give a monotone color all the way around prior to applying anything else," Percy says. He then sprayed Butterfield's T1000 Primer over the scratch coat.
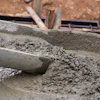
For the actual overlay, Percy used Butterfield's Cantera Vertical Wall Mix - about 25 bags total, Percy says. He used an electric paddle mixer to mix the Cantera with water before troweling a thin layer over the whole wall.
To create a unique look, Percy used five different Butterfield Uni-Mix Integral Dry Colorants, mixing each in its own bucket. The color was added to water and then mixed with the Cantera using the paddle mixer. Percy says for this type of overlay you want a "thicker than pudding" consistency with your mix. The colors used included Santa Fe Buff, Sandstone, Autumn Oak, Salt Marsh Gray and Pewter. Some stones were left just the gray of the Cantera mix.
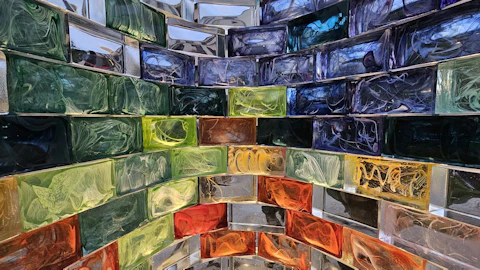
Percy and his crew hand applied the colored Cantera to the wall. "I'd completely walk around the unit with one color and place it randomly all the way around," Percy says. Once all five colors were placed, he went back and filled in the rest of the stones being careful not to have too much of one color in an area. Percy also embedded black glass in some of the concrete stones to give them a quartz look.
Following behind Percy were two crew members with Butterfield stamping skins. They pressed the skins to the recently applied colored Cantera to create the stone shape and texture. A third crew member followed, carving the details to make the stones look like they were embedded into the scratch coat. To do this hand carving Percy suggests using a wooden dowel and a chipping brush to chip off any extra concrete.
After drying for a day, Percy mixed Butterfield's Elements water-based, transparent stain in Stygian (sort of a chocolate brown) with the sealer and sprayed it on the concrete. This applied a protective sealer and gave the stones an aged look, he says.The total project took Percy and his crew about nine days to complete, and the result was a custom vertical stamped overlay that is almost impossible to duplicate.
Creating a concrete Italian villa
How do you get an Italian villa outdoor kitchen in Florida? With a vertical stamped concrete overlay, that's how. Decorative Designs, Ocala, Fla., recently completed a vertical concrete overlay on both walls and columns for a homeowner's outdoor kitchen, says Decorative Designs president Laura Howard. The job involved lots of color, lots of drama and little limitations or restrictions.
The concrete overlays took about a week to complete. Howard used a total of 10 gallons of Architectural Enhancements' Tru-finish and Mediterranean-finish on the walls and about 25 gallons of Architectural Enhancements' Vertex on the columns to create a brick look.
For the Italian-inspired walls, Howard started with a clear coat of polymer followed by a troweled-on scratch coat of the Tru-finish. After drying, she applied another coat of polymer this time followed with a troweled-on coat of the Mediterranean-finish. Howard applied the thicker coat of the Mediterranean-finish with a skip trowel technique to leave open areas across the wall.
To add detail to the wall, Howard dipped plastic grapes and leaves into a watered-down Mediterranean-finish and adhered them directly to the wall. "What's great is with the Mediterranean-finish you have the ability to artistically place your vines and grapes. By thinning down the product it allows you to hand place your design without worrying about it adhering to the wall or sliding down," Howard says.
Once dry, she stained the wall tans and browns using a sprayer, chip brushes and a combination of mineral- and water-based stains. Howard used artist brushes to stain and detail the grapes and leaves. A water-based Architectural Enhancements' sealer finished the Italian villa walls.
To add more detail to the outdoor kitchen, Howard added vertically stamped concrete bricks to the lower portion of the structural columns in the kitchen. She used a process similar to the one she used on the walls, starting with a clear coat of polymer followed by an "aggressive scratch coat" of Tru-finish. "The aggressive scratch coat has deeper indents for a better hold," Howard says.
After another layer of polymer, Howard applied a thick layer of Architectural Enhancements' Vertex, which is a vertically stamped texture concrete mix designed for faux looks such as brick. After letting the Vertex set for only a short time, she used texture tools to create and sculpt the bricks. Using the sprayer and chip brushes she stained the bricks with six different colors, including white and black for an aged look. She finished with the same water-based sealer. "The key is to not put all the accent colors on too heavy and too even. Having the variety in colors with no definite pattern is what makes the wall and bricks look so realistic," Howard says.
"This was definitely a project for two people," she says. "It would have been difficult to do by yourself because the concrete needs to be mixed constantly." Howard had one person on site mixing the concrete while she applied, sculpted and stained.
"Vertical stamped overlays are a part of the industry that is overlooked," Howard says. "It's an untapped resource that hasn't had its full exposure yet." As a decorative concrete contractor, it's easy to add vertical overlays to jobs you are already quoting, she adds.
A concrete fireplace to warm up to
Cast-in-place and precast concrete fireplace surrounds are becoming popular with home¬owners, but another option - one which Unique Decorative Concrete, Ionia, Mich., recently completed - is creating a concrete fireplace surround using a vertical stamped overlay.
Unique Decorative Concrete built a 101/2-foot-long hearth, an 8-foot-tall fireplace surround and a 10-inch-wide mantel around a ventless gas fireplace. The project took president Jeff Szalony approximately one week to complete.
Szalony's first step on the job was to build a cast-in-place hearth, which he stamped and textured using a slate texture and integral colors and stains to create the look he wanted.
With the hearth completed, Szalony was able to move on to the overlayed fireplace surround and mantel, on which he used 12 bags of Increte's Thin-Crete Vertical Stamped Overlay Mix. He framed the fireplace using conventional lumber then covered the frame with 2-inch expanded polystyrene (EPS). Using a hot knife, he cut joints into the EPS to create faux stones. He added more EPS to some of the stones to create depth.
After sanding and shaping the EPS, Szalony applied a scratch coat of Thin-Crete. He troweled fiberglass mesh into the scratch coat to serve as reinforcement. A coat of Bond-Crete covered the scratch coat followed by another layer of Thin-Crete.
Szalony used four different integral colors in the second layer of Thin-Crete. He mixed the overlay with one color and applied it to the stones individually. Whatever was left in the bucket was then mixed with either more of the same color or a different color so the next stone would have a slightly different shade. In addition, Szalony had a separate container with a small amount of yet another color. "As we would trowel on one stone we would take a little bit of that color and just dab it on there so when we troweled we were blending two colors," Szalony explains.
He sprayed the integrally colored overlay with liquid release prior to using textured skins to stamp each stone, one at a time. "By doing this we can make it look like they were real, individual stones," he says. "And by doing this we could get a different type of texture on each different rock and mix up different colors so they weren't all the same."
Finally, Szalony created a 10-inch-wide mantel using five pieces of EPS. He applied the Thin-Crete overlay mix to the mantel and then stamped and stained the piece to look like one large rock.
Szalony used multiple techniques to apply a final coat of stain to the three fireplace elements, including spraying with an HVLP gun as well as applying the stain with sea sponges and rags.
Finally, he used a spray bottle to apply a water-based sealer which protects the overlay while enhancing the color of the natural-looking stone, he says.