Once contractors have ceased sealcoating, the most important thing they can do is take care of the sealcoating equipment that has been so productive for them all summer.
?Cleaning and inspection is the single most important thing a contractor can do,? says Gordon Rayner, president of Rayner Equipment Systems. ?Be it a paver covered with a season of asphalt particles or a sealcoat machine covered with splattering, they all need to be cleaned to see what you really have.?
Rayner says that more than just being unsightly, dirty sealcoating equipment hides problems that need to be taken care of, including worn bushings, chains, cracked brackets, leaking hydraulics, and chaffed hoses.
?Pretend your equipment is an airplane and you are betting your life on its condition,? Rayner says. ?It?s not an airplane but as a contractor you are betting your business on the performance of your equipment, so clean it so you can see it.?
Once the equipment has been cleaned he suggests a full inspection, complete with written notes, to inventory any problems and the condition of each part of the unit. Then make any and all repairs necessary.
?If you see a problem that seems to re-occur every year, try and find a way to improve the system so it doesn?t happen again next year,? Rayner says. ?Having no downtime is like money in the bank.?
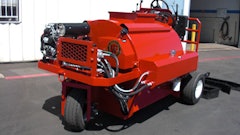
Eric Humphries, sales manager at Neal Manufacturing Co., says the best way to protect sealer application equipment is to keep it indoors throughout the winter to prevent having to winterize it. But if keeping the machine indoors is not possible, here are essential steps to take to keep your sealcoating equipment lasting longer and working more efficiently for you in 2009.
Clean the tank
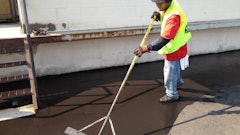
Start by thoroughly cleaning the outside of your equipment, including scraping dried sealer from the unit. SealMaster?s Mike Bechtel says this is also a good opportunity to sandblast and repaint the machine.
Then turn to the inside of the tank, which accumulates sealer throughout the season. Humphries says the sealer builds up inside, sticking to the insides of the tank, the agitator shaft, and blades and gets hard to the point of brittle when the tank gets hot and when it gets very cold.
If you can?t keep your sealcoating tank warm all winter you need to drain the material from the machine.
Humphries recommends cutting off the main valve (at the bottom of most tanks), then introducing raw sealer through the ball valve at the bottom of the unit. Allow the system to suck in between 5 and 10 gallons of raw sealer ? sealer without sand ? into the system to remove all sand from the pump. Place the wand into the sealer tank and recirculate the sealer back into the tank
After you?ve run the raw sealer through the system, use the same procedure to flush the system with water. Place the hand wand into the tank and run water through the system to clean everything out. ?Two, three ,or four gallons of water should be plenty to clean out the system,? Humphries says.
Bechtel says once the tank has been emptied of sealer, the next step is to fill the tank with about 50 gallons of water, agitate it well, then pump the water out through the spray wand and spray bar. This cleans the agitator shaft and inside walls of everything but the baked-on material.
?There?s almost always some type of buildup inside the tank, and the material will harden to a clay-like texture over the winter,? Humphries says. ?If there?s too big a buildup the agitator might not work at the start of the next season, or it could clog the filter basket.?
He says some contractors opt to ?suffer through? the first few tank loads at the start of the next season, as the buildup falls into the strainer basket and clogs the system, causing delays in the work and slowing production so they can get away without cleaning the tank properly during the winter.
?The best practice is to get it cleaned out if you have someone to get inside the tank,? Humphries says.
When scraping the inside of the tank the dried sealer often comes off in big chunks, which can be removed by hand. Smaller chunks fall to the bottom of the tank, so use a 5-gallon bucket to put those pieces in.
Working in enclosed spaces is tricky, so proper ventilation is essential, as are rubber boots, coveralls, and good gloves. Humphries says a respirator is not necessary, though a mask and goggles should be worn.
Protect pump and plumbing
Once the tank is cleaned contractors need to turn their attention to the unit?s pump and its entire plumbing system. Humphries says these are the parts of the sealcoating system that can experience the most damage over winter if they?re not taken care of properly.
?If sealer freezes in the plumbing it will crystallize and take on a consistency a little thicker than peanut butter,? Humphries says. ?If that happens you will have to take every single piece of plumbing apart and physically remove the thick sealer out of every piece by hand.?
Or replace the entire plumbing structure. To avoid that time-consuming, difficult, and costly process, find the lowest point on the plumbing system and remove the plug (or open the drain valve).
Bechtel recommends completely disassembling the pump, allowing all water to drain out, and leaving the pump disassembled throughout the offseason. With the pump disassembled it?s easy to examine components for wear and repairs and replacements can easily be made.
Among the components to take a close look at and repair or replace are the leathers and the ball valves. ?The single biggest killer of leather seals is flushing sealer and sand out with water. The sealer leaves and the sand stays,? Humphries says. ?The next time you start the pump you have raw sand scratching the inside of the pump and premature wear on the leathers. You should not wash the pump and plumbing out until you introduce raw sealer through the pump first to remove the sand.?
Pump leathers generally will last through between 150,000 and 200,000 gallons of sealer, but Humphries recommends replacing them during the offseason instead of waiting until they require repair in mid season.
The ball valves also should be checked and replaced if needed. ?The main key to longevity of ball valves is to regulate the material through the pump. If you?re regulating material through the ball valve the material is coming into direct contact with the ball valve, bouncing off the side of the ball valve at 80 to 100 psi,? Humphries says. ?When that happens the material blasts a hole in the side of the ball valve.?
The anti-freeze alternative
Manufacturers know many contractors don?t like to take their entire pump and plumbing system apart, so another option is to fill the system with antifreeze. Pour roughly 2 gallons into the basket strainer then turn on the pump to distribute antifreeze throughout the system.
Though not all manufacturers make this suggestion, most do because it provides an extra level of protection for the equipment for relatively little extra work. Humphries cautions when putting the anti-freeze in make sure to keep the recirculating valve turned off going into the tank so you don?t put antifreeze into the sealer tank.
Bechtel and Humphries say it?s essential to completely flush the system in the spring to remove all antifreeze.
?But the best idea is to find a place inside to store the tank,? Humphries says. ?It?s inside the plumbing more than the tank you have to worry about.?


![Screen Shot 2023 01 04 At 5 23 30 Pm[35]](https://img.forconstructionpros.com/files/base/acbm/fcp/image/2023/01/Screen_Shot_2023_01_04_at_5.23.30_PM_35_.63bc42696de27.png?auto=format%2Ccompress&fit=crop&h=135&q=70&w=240)