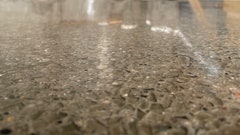
We’ve all see that twinkle of freshly fallen snow; that reflective sparkle ice crystals give off when light hits the flakes in a certain way. Now try to envision that same effect on a polished concrete floor. That was the challenge an architect presented to Roy Bowman, president of Concrete Visions, Inc., Tulsa, Okla., for 5,200 square feet of floor on two levels at the AT&T Innovation Center in Plano, Texas. Bowman and his team delivered on that challenge with a polished concrete overlay seeded with mirrored glass.
Making an idea reality
When Bowman first heard of the architect’s idea to have polished concrete that twinkles like snow, he took a hard look at the existing building’s concrete floors and knew he couldn’t achieve the desired look with what he had to work with. He turned to a polishable concrete overlay, testing various products to ensure the process could actually be done. He ultimately chose CTS Cement’s Rapid Set TRU self-leveling overlay.
From there, the Concrete Visions crew polished several 12-foot by 12-foot mock-ups using different amounts and various sizes of mirrored glass seeded on top of the overlay. The mirrored aggregate was painted on all sides, and the mirror finish was exposed only after it was ground. The architect chose the mock-up that best made her idea a reality and gave Concrete Visions the job.
The overlay process
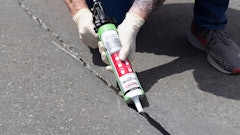
Bowman says the most challenging part of any overlay project is planning and preparation. Because a self-leveling overlay is a highly flowable liquid working to seek out any and all nooks and crannies, a contractor has to seal all penetrations on the floor and install transition strips at doorway thresholds. This prevents an overlay from running through cracks, between the floor and walls, and even out the door. Bowman and his crew used a floor patch and foam spray to seal penetrations, and he recommends zinc transition strips for thresholds and starting and stopping points.
Before an overlay placement starts, Bowman says a contractor needs a placing plan with well thought out points on the floor for where the pour can stop and/or start. An overlay placement should start in one area with a crew working its way to an exit point, being careful not to double back on any of the overlay that has been placed. A contactor also needs to plan starting and stopping points if the overlay application stretches beyond one day and have an idea for stopping points in the case of an unexpected event or if the application process stalls. Bowman says after taking in all these considerations, he decided to hire a subcontractor to pump the overlay.
“Without the pump, we wouldn’t have been able to place this overlay in one day. That means we would to have had stopping and starting points and transitions which can lead to more problems,” he explains.
Bowman adds that using the pump, which took four hours to place the overlay, also saved him a day on labor and the costs of having four additional men on the job. The pump also allowed Bowman to create a placing plan that included a scissor lift for the second-floor overlay process, allowing the pump hose to enter and exit through an upstairs window.
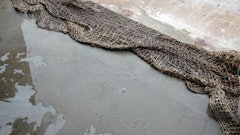
With the overlay plan set, Bowman’s crew first needed to create a bonding plane, or a textured surface to which the overlay could bind. This can be done with a shot blaster or grinder and the application of a primer, but Bowman chose an epoxy and sand method. “We knew we had good absorption on the floor to soak up that epoxy. Because of the space constraints on this job and some tight areas, this was the best way to go. It was probably an overkill step, but it eliminated the need for a primer and would help us avoid any moisture issues,” Bowman explains.
His crew ground a 2-mil profile on the floor to bring up any previous coatings and to leave a texture. Crew members then applied 10 mils of epoxy and covered it with 2,000 pounds of sand; they removed excess sand the next day. This process allowed the epoxy to bind to both the floor and the sand and left an extremely textured “bite” for the overlay to bind to, Bowman explains.
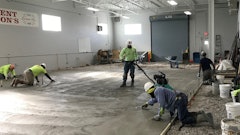
The overlay process itself was a challenge in timeliness. Bowman’s crew members only had 15 minutes of working time to seed the overlay after the material started to pump. “We needed to have plenty of people on site and they had to know their jobs,” Bowman explains. “I also had someone on site to step in and take over if something happened or got held up. And before the pour started we walked through the job with the crew on a dry run.”
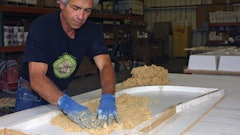
The crew used a 3/8-in. gauge rake to ensure the overlay was placed to the proper depth. Bowman says about 1/8 inch of this would be ground off during the polishing process. Crew members then ran over the material with a spiked roller, also known as a “porcupine roller,” which is a tool on a long handle that looks like a 2-foot-wide paint roller covered with tiny spikes. Bowman explains the tool’s spikes draw out air bubbles from the overlay. Then the crew members seeded the 1/8-inch and smaller mirrored glass chips on top of the overlay using hand-held grass seeding equipment. Then crews smoothed the top of the overlay very gently with a flexible, rubber blade trowel.
Once poured, Bowman let the overlay sit an extra day before beginning the grinding and polishing process.
The polish
With the concrete overlay placed and seeded, the Concrete Visions crew set out on an eight-day polishing sequence. Bowman’s crew struggled with working around other contractors, but found a compromise everyone could agree to. “We wouldn’t let other trades on the floor during wet polishing steps,” he says. “But during the dry polish we told them they could use the floor as long as their feet were clean.”
Bowman says the key to this overlay project was wet grinding. “The main reason we water ground was the glass,” he explains. “If we heated up the floor too much the glass could have fractured. The best way to keep the diamonds and glass cool was to water grind.” He adds that the wet polishing process also helped remove many of the polymers in the overlay itself; the issues with the polymers in a dry grind is that the polishing process can polish the polymers instead of the concrete, a situation that should be avoided.
Bowman’s crew started the polishing process with 120-grit metal bond abrasives. “If we started with 70-grit metal abrasives we could have ground through our small glass pieces too quickly,” Bowman explains. “We ran multiple passes with the 120-grit metal abrasives in order to reach full refinement with that grit.”
From there, crews moved up to 220-grit metal bond abrasives, then dropped back to 200-grit resin bonded abrasives. The 200-grit resin bonded abrasives were the last wet step in the polishing sequence. It was also after this step that the crew densified the floor. From there, Bowman’s team used a 400-, 800- and 1,500-grit resin bonded abrasives sequence. Then the crew followed up with a 3,000-grit Vortex pad on a burnisher, cleaned the floor, and applied a stain guard as specified.
Bowman’s crew performed edge work right along with the main floor polishing sequence. Crews also auto scrubbed between each grit sequence and utilized a slurry compressor on the job, which recycles the polishing water and forms slurry into semi-dry cakes that can be disposed of in the regular trash.
Bowman adds that a polishing project isn’t finished unless a contractor leaves the owner a maintenance plan. The plan Bowman presented the owner was tailored to the products used in the project. Bowman says it’s important to consider the products used in writing a maintenance plan and emphasize to an owner that good maintenance can help a floor retain high traction levels.
Despite the many challenges Bowman and his crew faced on this project, the end result produced the effect the owner was looking for.