"Concrete waits for no man" was a slogan on bumper stickers that were plastered on the back of one of the local concrete contractor's trucks in the town where I grew up. Most people never gave it much thought, unless you actually placed concrete. That bumper sticker slogan really couldn't have been more accurate. With every placement, the contractor is working with plastic concrete, trying to accurately place it, and get a good finish on it before it hardens.
Plastic concrete is a perishable product that has a small window of workability. Within that window of workability are many factors that may be out of your control (humidity, temperatures, wind, weather, etc.). Other factors are within your control, and it is in your best interest to have a handle on as many of these items as possible. The more factors you can control and prepare ahead of time will leave you better equipped to offer a successful placement even if difficulties arise.
Build the Job on Paper
Whenever I am awarded a job, I begin with a review of the contract, in particular the "scope of work" section and compare it to our bid. We also review the job specifications for each and every job. Even though we may have worked on a particular large retail job before, this does not mean that the specifications on this new job are the same. We have done jobs where almost every detail, structural drawing and architectural drawing were virtually identical, but the specifications were different. This does not happen often, but it does happen.
 Build your job on paper using a blank copy of the project plans and highlighters. Map out placements and include square footages, projected dates of placements and cubic yardages required for each placement.
When reading through the specifications, pay particular attention to the concrete mix design. One would think that this should go without saying, but more often than not I amaze clients when I make recommendations, or critique the design that is proposed for use. The basics are not rocket science either, once you start keeping track of mix designs and track trends of success with different mixes. You can quite often tweak the mix designs to your advantage for a successful job.
The next step in the planning process should be to get a copy of the plans, all your paperwork (scope of work, bid, specifications, project schedule, etc.) and open up the plans. First you should identify from your scope of work any and all materials that you would need to purchase. Cross reference those materials with the specifications to see if they are products that you are familiar with, and cross reference that to what you carried in your bid. This is when you would prepare any Requests For Information (RFIs) for clarifications, and assemble your submittals, site specific safety policies and Material Safety Data Sheets for your client. Get this information over to your client as soon as possible; not only is this the professional thing to do, if you are trying to convert some materials or practices to ones that you prefer, it will go a lot smoother if your client has time to digest what you propose.
Now that you have re-familiarized yourself with the plans and project schedule, plan a quick pre-job meeting with your client. This is when you should take time to identify their target points and critical paths for their success. Quite often this is the office area of a building, where the bulk of the trade work is entailed, or a truck turnaround slab has to be placed by such and such a date to receive truck shipment on this date, etc. This is what is important to the customer. We have done flawless slabs and had a client not happy because a critical date was missed.
After this initial meeting, set a follow-up meeting to present your "plan of attack." Once you identify the critical areas of completion from your initial meeting, you re-open up the plans with this information and build the project in your mind. Plan each and every placement within your capabilities, factoring in manpower, equipment, concrete supplier capabilities, working hours and site conditions. Take care to include the entire scope of your work in your plan — staging areas for ride-on power trowels, starting point of each placement, truck access or pump access, etc. Once you have this in your head, you need to put it on paper. What usually works well is if you print up a blank copy of the building and mark it up. Draw out the placements on the fresh copy with hi liters and mark up square footages, projected dates of placements and cubic yardages required for each placement. Make at least three copies of this: one copy for you, one for your clients' superintendent and a copy for your clients' project manager. This initial "plan of attack" may change, but once you have mentally built the building and mapped out how you would like to do the job, modifications to your plan are relatively easy.

Plan for the Pour
At least a solid week before your first substantial placement, you should schedule and hold a pre-slab meeting. This is crucial to any job's success. Key points that must be identified and addressed include but are not limited to:
- Common benchmark location for all trades to pull from
- Any and all mix design concerns (air entrainment, excessive cement, etc.)
- Slump
- Person who is authorized to reject trucks
- Expectations for placing environment, including roof tightness, air quality, minimum ambient temperatures, lighting, embedded plumbing, and sub grade.
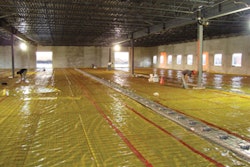
- Curing method and its logistics
 Store your materials and equipment in a neat and orderly fashion. An organized jobsite represents professionalism and makes products easy for your crews to find.
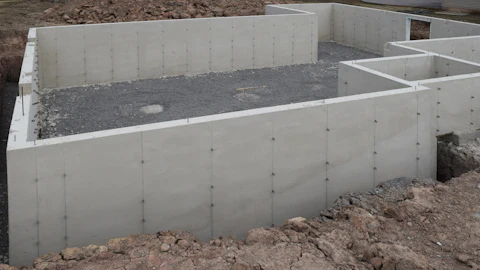
The moment a flatwork contractor starts his prep, he owns the subgrade. Our superintendents are taught not to form a single pour stop or lay an inch of vapor barrier, rebar or wire until the subgrade is verified. Next you should verify the agreed-upon placing environment. Roof tightness, lighting and temperatures are all key components to a successful placement. After this is satisfactory, take a look at the plumbing and if there are any electrical conduit or embeds. Pulling from the previously specified common bench mark, assure that all these items are at proper elevation. Once you are satisfied with the placing environment, and satisfied that the other trades have given you good conditions to work with, you should start your prep. We actually use an in-house pre-pour checklist, and I recommend you develop some kind of similar worksheet. It provides you with a simple reminder on key points in your prep of any slab.  Use marking paint to mark locations of embedded rebar, underground hazards, a pour-to location for truck drivers, safety items and any other points of interest that could be overlooked.
A simple and easy way to mark out items of interest around the jobsite is the use of marking paint. We use it to mark locations of embedded rebar, underground hazards, pour to location for truck drivers, safety items, and any other items of interest that could be overlooked. It is especially helpful in marking out embedment locations on the ground for installation during placement.
The Day Before
The day before the placement, there are a few things you can do to make sure your ducks are in a row.
Call the concrete supplier to double check your order. Make sure the correct mix is ordered and that you have an adequate amount of yardage per hour ordered. At this time you should make sure you have your cure product on site and all required apparatuses for its successful installation. Also ensure you have adequate equipment on site, from placing to finishing to saw cutting. I would recommend backups for each.
On each job I am directly involved with, I send an "ammo box" to the site. This is a simple job box that contains a spare set of every trowel blade that we use, a ½-inch wrench to change those blades, extra chalks for saw cutting, an extra chalk line, a dry line, joint protectors, saw blades and other similar items. Past experiences have proven that this is a very helpful item to have on site.
Great care should be taken when planning your crew. Quite often we stagger start times for the placing, finishing and cutting crews. This can assure a steady stream of fresh legs and help to control your labor costs. A poor plan can greatly impact your efficiency and cost you a lot of money in overtime. Document the details. Taking a photo of the readout from a laser thermometer is an excellent way to prove your readings if a question arises down the road.
A few other final keys to success include:
- Maintain a clean and organized jobsite - this not only exemplifies your professionalism, but promotes safety.
- Be clear with everyone from the beginning with any and all expectations, and hold people accountable if they do not meet those expectations.
- Take pictures and document as much as possible. Little details often add up to a large problem, and accurate documentation of these details can prevent issues.
We have all worked with people that plan, and people who fly by the seat of their pants. Think back to a few of the "horror show" placements you have been witness to. I am certain the majority of jobs gone bad were run by someone who did not take the time to try to eliminate as many potential foul ups as possible. And remember … concrete waits for no man.