By Dan Zurcher
There are basically two types of striping machines. One uses air and it's called a "conventional" machine. The other does not use air and it's called…you guessed it…an "airless" machine. First, let's take a look at the conventional.
How Air Stripers Work
The major components of this type of machine are a 7-gal. paint pot that can be sealed shut, a small engine and a small air compressor. The air compressor feeds air to four places.
- The first place air is fed is into the sealed paint pot. This air pushes down on the paint and forces it out of the bottom through a hose to the paint gun.
- The second place air is fed is into the actual gun. This air turns the paint into a spray. If air weren't introduced here paint would come out of the gun like water comes out of a squirt gun.
- The third place air is introduced is into a little can that holds one of two types of liquid: paint thinner if you're spraying oil-based paint or water if you're spraying latex paint. This air forces the paint thinner or water through a hose right down to the tip of the gun. Why? To clean it out. This paint thinner or water completely bypasses the paint line and goes directly to the tip of the gun. After lines are sprayed for a time the operator can open the small valve for one or two seconds, then close it. Paint thinner or water will go to the gun and clean it out. Now the operator can start painting again with a clean tip.
- The conventional (air) machine also has two hoses coming from the back of the machine -- one for paint and one for air. This is the fourth place air can be fed. These lines feed a separate gun -- like the one you would use to paint a car -- and this gun is for stencils. If you want to use it simply open a valve that directs the paint flow to that gun. Open another valve to direct the flow of air.
Another important aspect of the conventional machine to consider is that these machines require two separate striping guns to accommodate two different types of paint. One gun is used for oil-based paint, the other for latex.
Why Use an Air Machine?
I like this machine because of all of the air adjustments I can make on the job. You can adjust air pressure pushing on the paint. You can also adjust the air going to the gun, which helps to make the perfect mix and perfect stripe.
It is also easy to travel with a conventional machine. Remember the sealed paint pot? When you're finished with a job, you simply roll the machine onto your trailer and drive away without worrying about paint spills. There's also no waste after cleaning and it takes about a 1/2 qt. of thinner or water to clean. Mix that with the next 5 gal. and move on.
Another added benefit is that the conventional machine is forgiving. You're spraying paint through an orifice the size of a pencil lead. If there's a foreign object in the paint, chances are it'll pass through. Conventional units are also a little heavier than an airless machine. You could "hit a dog" and still paint a straight line!
Lastly, they're easy to work on and repair - especially for the beginner. Why? Because any trouble with these machines will be on the outside and simple to fix. In other words, there are a couple of valves to direct air or paint, a couple of hoses to direct air or paint, and a couple of gauges measuring pressure on air or paint. All of these parts are on the outside and simple to work on.
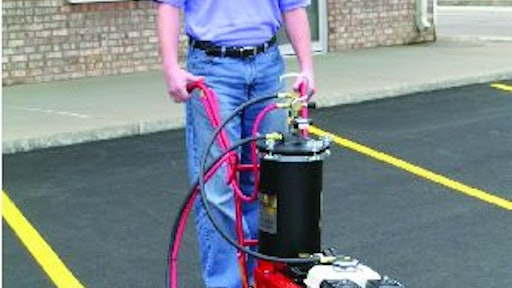
How Airless Stripers Work
The other type of striping machine is the "airless" machine. This type of machine operates on the principle that if you squish the paint hard enough and force it through the tiniest little slit of an orifice…it will come out like a "spray." It works no differently than if you place your thumb over the end of a garden hose to make the water "spray." No air has to be introduced here -- you just have a smaller orifice.
There are many reasons to recommend these types of machine as well. First of all they're lighter because there is no paint pot. You simply use the 5 gal. bucket that the paint comes in and set it right on the machine. There's no air compressor, either, because you don't need air to "push" the paint. Instead a suction tube placed right into the paint bucket sucks the paint up - i.e. "draws" the paint - to the pump. This paint gets pumped so hard it's forced to go through a 25-ft. hose and into the gun. That's it; an engine, motor, pump, and one gun.
The airless machine has no paint pot and is lighter weight. But that doesn't mean you can just roll the machine up onto the trailer and drive away like you can with a conventional machine. If you do, paint will splash (you're spraying from an open 5 gal. bucket of paint) causing a huge mess.
The solution is to either clean the machine before you travel - even if you have two "yellow" jobs back to back, five miles apart - or simply cut a hole in the plastic lid that came with the paint bucket. Snap this lid back onto the paint bucket - around the suction tube - and then drive away. I do this. I love it. I'll clean it later. Because an airless machine has no air compressor you cannot adjust for the thickness of the paint. But rarely is the paint too thick or too cold. Without the introduction of air the paint is "stuck to itself" and won't "break up." This means it won't fan out and produces a maximum line width of 2 in. And don't try lifting the gun higher…it won't work. It doesn't matter if you hold the gun 2 ft. off the ground, you're only going to get a 2-in.-wide line. And don't buy a tip that will spray an 8-in.-wide line just to get a 4-in. wide line. Save your money.
The fix? I've heard that adding a couple of cups of thinner to oil-based paint or a couple of cups of water to water-based paint will do the trick. Read the paint can on how much you can "reduce" or "thin" the paint.
Don't get me wrong, I love that the airless is lighter, but on a conventional machine you can adjust the air pressure to the gun, introducing more air to the gun - not the paint pot. This atomizes, or "breaks up" your paint, allowing you to produce a wider line. You can also simply "reduce" this paint, just like on the airless machine.
Did you notice that to get an 8-in. line with an airless machine you need a different tip? This cost can be somewhere between $20 and $40. To save some money spray two 4-in. lines side by side for an 8-in. line and six 4-in. lines side by side for a 24-in. Stop Bar. Conventional spray machines don't have different tips. The widest line for a conventional unit is about 6 in. (so spray lines side by side to get widths from 8 to 24 in.).
The lighter weight of an airless machine also means that if you do hit a small dog or a small walnut while striping, the machine is not as forgiving…it will wiggle. Not a big deal but this wiggle will translate out to the gun and shake. Make sure the gun is tucked close to the machine and is as low as possible to alleviate almost all shake...and keep an eye out for small dogs.
A Stenciling Difference
Stenciling with an airless can be tricky because there's no way to spray "easy"...pull the trigger and it's all on. Spray five handicap stencils in a row with all-on power and the stencil itself is sloppy and paint will drip from it. The fix?...spray a few stencils then let the stencil dry. Go spray some lines. Come back and spray some more stencils or wipe the stencil off.
But spraying stencils is a little easier with a conventional striper because you can pull the trigger half way and control the volume of paint. It's also easier when you have to touch up a curb with your stencil gun. Try touching up a curb with all-on power!
Maintenance and Cost
In general, airless machines aren't as easy to work on as conventional striping machines and the replacement parts can be a little pricey. The hydraulic motor, for example, could cost $1000 to replace. Mine, however, is 12 years old, I use it almost every day and it is still going. If it breaks I will spend the $1000.
But I couldn't spend $1000 repairing a conventional machine if I tried. Engines are $400 and compressors are about the same. Everything else is either a valve, hose, or gauge and these are only $5 to $40.
Also, airless machines have an hydraulic pump, which is different than the motor. It has a piston and seals inside. I have had the piston replaced, but generally speaking all you need to do is replace the seals. I replace mine almost every spring; this is probably more often than necessary, but I feel good about it.
I want to say this, too: I have replaced my own seals on the job. I have also taken the bottom half of the pump off to clear a clog on the job (I found a "paint skin" and put it all back together in 30 minutes.) But I'm not bad with a wrench and I believe that anyone can do anything. So…don't be afraid to work on an airless, they're just not as easy to work on as a conventional.
What To Buy?
Everyone wants to know which type of striping machine to buy. The answer is simple: Buy either one you want! They cost about the same. Both the conventional and airless striping machines certainly have a place in the market, but neither of them is the "be all…do all." They're just different.
But if you're in the market for a striping machine try this first: Call every good-sized paving contractor in your city. Why? Because I stripe for two different paving contractors and both of them have striping machines sitting in their shop. I could buy a machine from either contractor and pay half price.
Spray Tips Tip
Each spray tip has a tiny little slit of an orifice. If a flake of paint tries to get through it will clog and spray sideways. You'll hear some contractors say "just turn the tip around and pull the trigger!" Where? On my parking lot? SPLAT.
Instead, be wise and don't move the machine. Simply turn the tip around and bump the trigger for a split second. Turn the tip back and pick up where you left off. But that gets old. The best solution is to buy an in-line filter. I did. Now I don't have any clogs and I never strain paint. Done.
Dan Zurcher, owner/operator of American Striping Company, owns and operates both conventional and airless striping machines. In addition to writing "How I Stripe a Parking Lot…16 Years…By Myself," Dan has produced numerous "how-to" striping videos, offers his "Mr. Box" Kit for stripers, and distributes stencils and other striping-related products through http://www.americanstriping.com.