It's All in the Elements
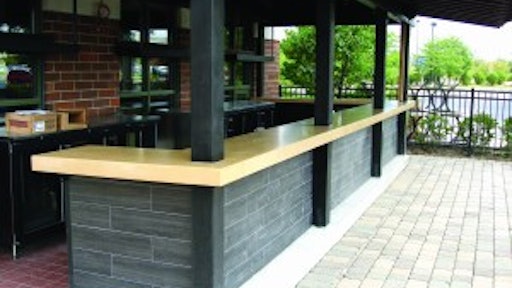
In the fall of 2009, Tom Fischer of Fishstone Studio, Huntley, Ill., created a concrete countertop for a restaurant's outdoor bar. Although the countertop looks simple enough, it did not come without challenges. The precast countertop project took Fischer two weeks from templating to installation, he says. The project involved creating a Glass Fiber Reinforced Concrete (GFRC), custom color countertop that had to be placed around four roof support columns.
Even though the countertop was constructed from a lightweight, GFRC mix, extra supports were needed to reinforce the bar's thin walls. The general contractor on the project created and installed custom metal supports that would be invisible to the restaurant's patrons prior to Fishstone installing the countertop, Fischer explains.
Fischer precast the countertop in five separate pieces that would make up the 85-square-foot bar top. The longest section was 28 feet long, consisting of three pieces, while the shorter sections measured 10 and 5 feet long.
After templating the job to ensure the countertop would fit tightly, Fischer used steel tables and melamine boards to create the molds in shop. The client chose a custom color made of yellow and red iron oxide pigments and white portland-based cement. Prior to applying the backer coat, Fischer mixed the custom integral color into the concrete mix.
Fischer sprayed the GFRC mist coat into the mold and then hand placed the backer coat to create the 3/4-inch-thick countertop. The apron front was 41/2 inches thick, he says.
After 48 hours, Fischer used Flex North America's handheld three-headed interplanetary wet polisher to hone the concrete to a 400 grit and a smaller, single-head wet polisher to polish the edges and details of the countertop. The corners were hand sanded. After curing, Fischer applied a topical sealer using a HVLP sprayer. The sealer was UV resistant, which Fischer had to consider because the countertop is outdoors.
Once complete, Fischer transported the countertop to the site and installed it with another crew member. The pieces were caulked at the seams.
Color and Glass Create a Unique Finish
Carl DeSouge of Cade Construction, Bakersfield, Calif., created this precast 11/2-inch-thick concrete countertop using a combination of integral color, colored glass and yellow serpentine rocks.
Prior to pouring, DeSouge mixed a Solomon Colors' yellow integral color along with yellow, white, amber and beach glass and shells into the concrete mix. The chipped glass measured between 1/4- and 3/8-inch in diameter, DeSouge says. The serpentine rocks were placed in the forms to create the edges and corners of the countertop.
DeSouge added a fine fiber mesh to his concrete mix and aluminum corrugated tile wire mesh to his forms for reinforcement. Where the countertop seams were, he cut and placed rock so when the countertop was put together the rocks would match up at the seams. After pouring, he used a vibrator to remove any air holes and then gave the countertop a hard trowel finish. It was then time to polish the top and route the edges.
DeSouge started with a 100-grit polishing pad on his Intertool 3-wheel grinder. After moving to a 150-grit pad DeSouge applied a densifier to the countertop. He then continued the polishing process moving from 100 to 200 and then 400 grits before slurrying to fill any new voids. The polishing finished with a process from 800 to 1,500 to 3,000 grit. DeSouge also routed the edges during this process. "I used Intertool's router to create a waterfall finish on the serpentine rock edge. It has three little half-inch rounds coming down at the bottom," DeSouge adds.
Finally, DeSouge applied a sealer before buffing the counter with a diamond twister pad and applying a final coat of beeswax.
Get Leather with Concrete
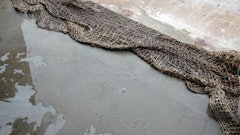
Bayard Fox, owner and president of Cement Elegance, Bend, Ore., recently completed a residential concrete countertop with the benefits of concrete but the texture of leather. "The client wanted a leather texture finish, and that was our biggest challenge," Fox says. The client also asked Cement Elegance to match the color of a leather sample they brought in.
The 55-square-foot countertop consisted of 2-inch-thick upper and lower bars, both done in a radius. The upper bar also featured a chiseled detail on the outside edging.
After creating several samples to find the right color and texture, Fox created a template onsite to get the exact curvature, sink placement and location of the seam. He took the template back to his manufacturing facility where he laid it out on his 7-foot-wide by 20-foot-long metal casting tables. At that time, Fox added a vinyl-like material to the forms which would give the countertop the leather texture. The material was attached to the form so it would be tight, flat with no wrinkles or imperfections but could still be released when finished. Fox also added a rubber edge mold he makes himself for the edging details.
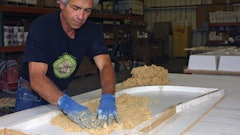
Fox used a Glass Fiber Reinforced Concrete mix for the countertop, which he spray applied in six to eight layers. Every layer included integral pigments so the entire countertop would have the custom color throughout - this was especially important because part of the underside of the top bar is visible, Fox says.
After curing for one day, the molds were removed and the sanding and detailing process began. Because of the leather texture, Fox had to modify his typical sanding method. He used a fine sand blasting method and fine sanding for the details to ensure the leather texture was not lost. Finally, the countertop was moved to the finishing room where a water-based epoxy sealer was spray applied. Fox sprayed three layers of sealer, each made up of a different customized epoxy.
A Countertop that Fits Right In
Tony Tyner, owner of Custom Concrete Countertops of Oklahoma, recently completed a concrete kitchen countertop where the goal was to match the color of the countertop with the backsplash, stained floor and antiqued kitchen cabinets.
The project consisted of 113 square feet of countertops between an L-shaped counter, a two-piece counter by the stove and a bar countertop, Tyner says. It took Tyner four days to complete the countertops.
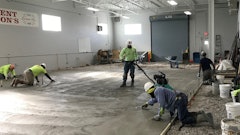
Although Tyner was creating three separate countertops, the process for all three was the same. He started by placing 3/4-inch-thick plywood on top of the lower cabinets and then built a form to set his side forms on. The side forms were flush with the top of the lower cabinets. Tyner used 2-inch Plexiglas to form the sides of the countertop.
With the forms in place, Tyner added wire mesh and 3/8-inch rebar on the edges and then poured the countertops, which were made from enCounter's countertop mix. He followed with a hard trowel and let the countertop cure. The next day Tyner acid stained the countertops with a combination of tan and black stain. Each stain was in its own spray bottle but Tyner sprayed them on at the same time to get color variation. After sitting for a day to let the stain blush out - to help the countertop match the backsplash color - Tyner then neutralized it with water and ammonia.
The next day he used a paint brush to apply a thick coat of Stamp Store acrylic sealer. After drying, he used the same paint brush application technique to apply a self-leveling epoxy coating over the sealer. "The epoxy creates a hard surface that is durable, easy to clean and helps to really pop the color of the stain," Tyner says. He used a heat gun to pop the bubbles in the epoxy coating to get the perfect finish. Applying the epoxy while the sealer still held some moisture allowed Tyner to get a blushing effect from the seal as well, he says.
Finally, he brushed on a thin coat of polyaspartic and then used a rag to wipe it around on the countertop. The polyaspartic makes the epoxy coating much harder, Tyner points out.
It's All in the Finish
J&M Lifestyles LLC, Randolph, N.J., focuses on the decorative precast market. In 2010, the company created a precast concrete countertop that won a Cheng Circle of Distinction Award for Best Decorative Concrete Finish.
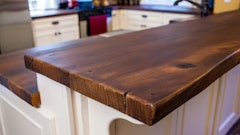
The countertop was designed for the owner of an old farmhouse in Pennsylvania, says J&M Product Manager Jeff Kudrick. The house was built in the 1700s but had an extension added. The homeowner wanted to keep the existing cabinets but was looking for something that would add more character to the kitchen. The result was a precast concrete countertop with a wood decorative finish and custom edging details.
It took J&M about two weeks to design, mold, cast, finish and install the countertop, Kudrick says. "We had to accommodate the sink and windows," he says. The edge of the countertop had to wrap around a copper farm sink. J&M also decided to incorporate the seams into the design. "Instead of just putting the countertop together and trying to seal the seam, we made it look more purposeful. We took a hand hammered iron plate, screwed it in to the seam, and gave it more of a decorative appeal," Kudrick says.
The kitchen also included a 31/2-in.-thick radius free-form island countertop featuring a texture process that created an edge that looked like flamed blue stone, Kudrick says. He also drilled hand forged iron nails into the edge to give the island character and detail. Instead of a wood finish, Kudrick acid stained the island to replicate the color and look of the home's existing stone fireplace.