More than ever before, homeowners are tackling projects themselves rather than calling a professional. The reasons range from a need to save money to a desire to achieve the satisfaction that comes from doing the work and seeing the results.
Floor care is a good example of an area that homeowners are trying their hands at. Whether it's old, wooden floors to new vinyl tiles, your customers are willing to get the job done themselves, but they need help, and that's where you come in.
"The rental store must be the local expert," says John Goddard with Essex-Silver-Line. "This means the counter people have to be comfortable explaining the processes and determining the right equipment to use. Every rental store should be a one-stop shop for floor care."
What's good for the wood?
The process of refinishing wood floors takes patience, as there are many steps and they must be done with care. By properly explaining the process to customers and directing them toward the right piece of equipment, however, the results can be stunning.
"Asking the right questions will help the rental employee suggest the right equipment and procedures to their customers," Goddard says. "What is the customer trying to achieve? How big is the room or rooms? Are the floors waxed?"
According to Brian Strickland, director of rental sales at Clarke, division of Alto U.S. Inc., the very first question that rental personnel should ask is what type of wood floor the customer has. Tongue-and-groove solid-wood flooring - common in homes built before the 1980s - is typically 3/4" thick and can be sanded several times in its life. Factory-finished, engineered wood flooring, however, has a thin layer of solid wood at the surface which can't be sanded more than once. Laminate wood flooring - which is artificial - cannot be sanded at all. If the customer isn't sure which type of floor they have, tell them to remove one of their heating vents and look at the cross section of the wood. It should be obvious what is solid wood and what is not. Also, engineered wood floors often have a "micro bevel" which is visible where two pieces of wood come together. This is not often found on solid-wood pieces.
| RELATED ARTICLES |
| Wood floors in really bad shape? |
Goddard notes, "There are times that a complete floor sanding is not necessary or desired. If the customer just wants to bring back the shine to their polyurethane floor, a simple screen and recoat may be all that's required. If the floor did not have any wax applied, and there are no bare spots through to the wood, this is the easy way out. Rent the customer a polisher, either rotary or orbital, and sell them a white pad and sand screens. The customer lightly abrades the old finish, vacuums and tacks the floor and applies a new coat of poly. His or her floors are brought back to a clean finish."
On the other hand, if the polyurethane has been worn down to the wood, wax has been applied to the poly or the customer wants to change the color of the wood (by applying stain), then the only choice is a complete sand and finish or refinishing of the floor.
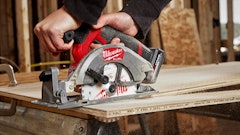
Once the type of floor has been determined, the next step, according to Strickland, is to choose the right machine for the job. Drum sanders, he says, are highly effective at making the rough cut - which removes the old finish and levels the floor - but are large and don't fit into very tight spaces. Drum sanders must be used with the grain of the wood and, if used carelessly, can also leave stop marks or dips in the wood surface if the operator stops the machine in one spot while it's running.
Orbital or rotary sanders, Strickland says, are easier to use than drum sanders but they are not designed for heavy sanding. They can fit into tight spaces, so are good options for areas where a drum sander can't fit. Orbital sanders can be used against the grain of the wood. Keep in mind these machines must be kept moving. Stopping in one spot can leave imperfections that can be tough to correct.
Getting back to the refinishing process, instruct customers to first empty the room of all furniture, rugs, etc. and to remove the shoe mold or quarter round, if present. Nails must be set at least 1/16" below the wood surface.
The floor should be cleaned with a mop to remove all hard debris, such as tiny rocks or pebbles, which could get caught under the sanding pad and create deep scratches.
It's then time to make the rough cut. "Use a heavy grit sand paper (usually 40 grit or lower) on a drum, orbital or rotary sander to remove all old finish down to bare wood in the open spaces in the room," Strickland says. "Use the same grit sand paper on an edger to remove all old finish down to bare wood along wall lines and in tight spaces that could not be reached with the bigger sanders."
The rough cut will leave significant scratches in the wood surface. The intermediate cuts will smooth these scratches out and continue to level the floor.
"We suggest you carry the following sand paper for the sanders and edgers: 20 grit, 40 grit (or 36g), 60 grit and 100 grit," Goddard says. "These four grits of abrasives will sand most floors and follow the idea of not skipping too many grits while sanding."
Rental businesses should offer tools for scraping the corners where the machines can't reach. "A 1-inch scraper will do the trick," Goddard says. "Most stores do not offer this. Complete the rental package with the scraper or your customers will not finish these areas properly."
Finally, the floor is ready to be screened, using a rotary or orbital polisher, before finish is applied. "This process is sometimes ignored or the rental store is unaware that this will give their customers a better finish," says Goddard. "Contractors always screen the floor to blend the different sanding patterns made by the sander and the edger. The store should sell a white pad and 100-grit screen if the customer is going to use oil-modified poly or 120-grit screen for water-based poly."
Before applying finish, instruct customers to thoroughly vacuum the floor to remove any remaining dust and debris, says Strickland. They should then use a damp cloth or towel to tack the floor, which will remove any dust caught in the wood grain.
"According to finish manufacturer's instructions, apply the first coat of finish on the floor," instructs Strickland. "After the first coat is dry, the finish will feel a little rough. Use an orbital or rotary sander and a very fine grit of sand paper or screen (120 to 180 grit) to lightly buff the coat of finish. This will give the finish a smooth feel and will prepare the floor for the next finish coat. Thoroughly clean the floor and apply the second and third coats of finish in accordance with the manufacturer's instructions."
Strickland offers a helpful hint for applying chemicals to a finished floor. "Plot your exit out of the room," he says, noting that doing this ahead of time will help prevent becoming trapped in a corner with no way of getting out besides stepping on newly applied finish.
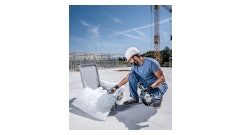
Resilient floor refinishing
Not all customers have wood floors. Some have a need to care for or refinish their resilient floors, which include tile, linoleum and sealed concrete.
According to Joe Crowder, product manager at Powr-Flite/CFR, the first step in caring for this type of floor is to determine whether or not it has a wax on it. If it does and the customer wishes to refinish his or her floor, it's necessary to first remove the wax. This is done using a floor stripper.
Much like the process of refinishing a wood floor, it starts with cleaning up all debris. Then, liberally apply the floor stripper to a portion no larger than 10' by 20', Crowder says, so the stripper won't dry. Allow to dwell according to the manufacturer's recommendations.
"Begin scrubbing the floor using a floor machine with a stripping pad or brush," Crowder says. "Be sure to clean all of the finish off. This may take several passes with the floor machine or additional applications of stripper. The corners and sides of the room can be scrubbed using hand stripping pads or 'doodle bug' cleaners."
Once an area has been thoroughly scrubbed, use a wet/dry vacuum and squeegee to recover the stripper solution. Crowder says to be careful to recover the stripper before it dries or it will require restripping to remove it. Continue applying stripper, scrubbing and recovering until all of the finish has been removed from the floor.
"Thoroughly clean the floor using a neutral cleaner," Crowder says. "Recover the neutral cleaner in a wet/dry vacuum."
He continues, "Rinse the floor using a clean, new cotton or rayon mop and clean water in a mop bucket and ringer. Be sure to frequently rinse the mop and change the water once it becomes cloudy. Rinse the floor until the water in the mop bucket doesn't become cloudy, usually within two to three passes."
Instruct customers to allow the floor to dry completely. They can then begin applying the new finish, using a new nylon or rayon finish mop. All efforts should be made to prevent contaminating the finish. "Allow the finish to dry between coats, according to manufacturer's
recommendations," Crowder advises. "Apply four to six coats of finish and polish with a high-speed burnisher after one week."
Hard tile and concrete
According to Crowder, there are two recommended methods of refinishing hard tile and sealed concrete floors: using a high-pressure washing and recovery system and using a floor machine, brush and wet/dry vacuum.
"High-pressure washing and recovery systems utilize a wand tool that simultaneously pressure washes and then recovers the water. This tool is attached to a truck-mounted or high-pressure portable machine," Crowder says.
The first step is to thoroughly dust mop the floors. Then, apply heavy-duty cleaner/degreaser to the floor using a pump-up sprayer. Be sure to match the strength of the cleaner to the amount of the soil on the floor, Crowder notes. Allow the cleaner to dwell on the floor according to manufacturer's recommendations.
"Next, begin pressure washing the floor," he explains. "Be careful to recover as much water as possible. Rinse the floor using a clean, new cotton or rayon mop and clean warm water, in a mop bucket and ringer. Apply sealer, if necessary."
When using a floor scrubber, follow the same procedure, but instead of pressure washing the area, use a floor machine with brush to thoroughly cleanse the entire area. Recover the cleaning solution with a wet/dry vacuum, rinse with a clean, new cotton or rayon mop and clean warm water in a mop bucket and ringer.
Tools of the trade
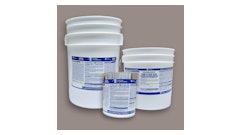
In addition to offering the machines used in floor refinishing, a rental business should also stock the full assortment of tools and supplies needed to complete a floor refinishing project. "Stores should stock thick nylon pads (either round or rectangular), white nylon pads for buffing, green pads for scrubbing and black for stripping," he says. "It would be a good idea to carry floor waxes and strippers."
For wood floors, the rental store needs to carry polyurethane and applicators to apply it, says Goddard. "We suggest that the store carry oil-modified poly in gloss, semi-gloss and satin sheens. Oil-modified finish is applied using lamb's-wool applicators and bristle brushes. We suggest 10-inch genuine lamb's wools and inexpensive brushes."
He continues, "Water-based finishes are applied with nylon-backed applicators and or 'T' bar floor coaters. Water-based poly is applied in a different fashion than oil-modified poly and that's why you need the different applicators."
Goddard adds, "Wax strippers and waxes also round out a complete floor care section in the rental store."
The most useful tool
You can have all the right equipment and supplies, but without the knowledge and expertise to back them up, you can't effectively assist your customers with their floor refinishing project. Often, homeowners with little experience have nowhere to turn for help when tackling a project for the first time, so take advantage of the opportunity to be the expert. Show your customers that their most useful tool is you and your rental business.