Unfortunately, most concrete has a tendency to crack, usually as a result of improper design or poor construction practices. As an overlay installer, you have no control over these factors. You are responsible for repairing any cracks in the existing concrete before resurfacing. Keep in mind that using the best products and techniques are not always assurance that a crack will not reappear in your cement-based topping. Understanding these types of cracks and their causes will help you choose the best fix for the job. It is important to spell out in your contract that you will take all necessary steps to repair the cracks, but cannot guarantee the results.
Anatomy of a crack
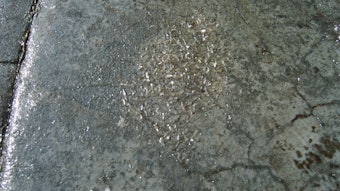
In general, cracks in concrete fall into two categories -- static and moving. Static cracks are hairline flaws that only affect the concrete surface. These cracks are sometimes referred to as crazing or random map cracking and in most cases require little or no repair. Moving cracks, also called active cracks, are more serious and should be addressed. These cracks are often structural in nature and continue through the entire depth of the concrete, usually as a result of insufficient spacing or sequencing of contraction joints or improper subgrade compaction. If you encounter moving cracks, you typically must repair them before you resurface the slab. In some cases you can simply incorporate the cracks into the overlay design, such as a large random flagstone pattern. A general rule when trying to distinguish between static or moving cracks involves a credit card. If the crack is equal to or wider than a credit card, it is most likely a moving crack and needs to be repaired. For a crack that is borderline or not quite the width of a credit card, consider taking the time to treat it as a structural crack for insurance.
Repairing a crack
Making repairs on a cracked surface usually starts with a technique called crack chasing. I like to start off by using a 4-in. diamond blade on a grinder and cutting the crack as deep as possible, which is typically about 1 in. Once I have precut using this blade, I then switch blades to a crack chase blade, which is a v-grooved diamond blade. This widens the saw curf allowing for better adhesion of the fill material. It is imperative that once you have finished the crack chasing process, all debris and dust be vacuumed or blown out with compressed air prior to the next step.
With many different crack-filling materials available in today's market, it is important to check your overlay manufacturer's recommendation on how to address crack repair. Three commonly used methods are with a flexible material such as an elastomeric caulk, a semi-rigid material such as a polyurea or a rigid epoxy. The severity of the crack will determine the appropriate material to use. In extreme cases of crack repair, injecting epoxy is a very effective way of making a structural repair. This can be a time-consuming and costly endeavor which requires drilling port holes roughly every 6 inches or so, and injecting an epoxy filler into the hole until it percolates up through the next port hole. On minor cracks that are not exhibiting major movement, we have had great success using polyurea-based crack fillers because they dry rigid, but yet exhibit some flexible properties allowing for slight movement of the joint. Typically an elastomeric caulk exhibits too much flex and can have your overlay topping de-bond when flexing that much.
Crack stitching has also been very effective for us. Stitching a crack requires drilling a hole on each side of the crack then spanning the affected area with wires or "U" shaped metal strips, which are then grouted or epoxied in place. I like to saw cut a wide curf across the crack and then epoxy rebar into the area to fuse the two sides together. Some overlay installers prefer to install new contraction joints after filling the cracks using some of the mentioned methods. If using this method, you should consider saw cutting a new contraction joint in your topping, close to the crack to help relieve expansion and contraction stresses in the slab. If you unfortunately come across a slab that has gaping cracks, simply consider not installing your overlay topping or it may require complete removal or replacement of the existing concrete.
On one extreme project I encountered a concrete substrate that was in extremely poor condition. The cracks and holes were very unstable and the concrete was not a good candidate for a topping. I adhered an anti-fractured membrane to the substrate and then in addition to that pneumatically applied expanded metal lathe attached to the concrete surface with an air-driven nail gun. Once this was complete I used a self-leveling compound to encapsulate the reinforcing wire. And once this was dry, I came back over that surface with our decorative overlayment. After going back to evaluate this job one year after the installation, my crew and I were surprised to see a crack-free surface. Despite all of the repairs made, we did inform the client before proceeding that they could possibly see some hairline cracks reappear.
Take the time to make the appropriate repairs prior to your topping installation. Remember, your overlayment is only as good as the substrate to which it is applied.
Good luck.
More decorative concrete articles are available at www.ForConstructionPros.com under the Concrete tab.