Two questions I get often are “How do you stripe straight?” and “How do you stop and start exactly where you want?” And because the answers are connected I can answer both questions at the same time.
One of the first keys to striping is keeping your head still. This is essential in striping but it’s also essential in sports. I coach baseball and when I coach pitchers I tell them “don’t move your head.” When a right-handed pitcher steps back with his left foot his head remains motionless, directly above his right foot. The same thing applies for coaching batters. When the pitcher steps back with his left foot…the batter also “coils” back – but his head never moves, either.
Next, when the pitcher strides forward, so does the batter – but only about 6 in. Why? Because if the batter would stride forward 18 in. his head would drop to a different level -- and so would his eyes. You don’t want that. Just like a batter a striper needs to keep his head still and take normal strides.
And, just like a batter, a striping contractor needs move smoothly, or glide. Runners and Olympic walkers don’t move their heads. They glide along the same “plane.” Everything from their neck down moves -- but not their head. There’s no bouncing around, no swaying side to side, no up and down stuff; just glide.
So while striping keep your head still, take normal strides, and glide – that way your eyes can focus.
But where do you focus your eyes? I once took a couple of speed reading courses at California State University, Northridge. I learned that reading fast doesn’t depend solely upon peripheral vision, it depends on the right balance of “hard focusing” and “soft focusing.” Think of it as also focusing on what you see out of the corner of your eye.” Keep that in mind.
“Lining up” your machine
Getting your machine where you want it, involves getting the tip guard, which houses the tip, just off to the side of your chalk line; and getting the machine to travel straight. Here’s how to do that:
First, “hard focus” on the chalk line and at the same time “soft focus” on the tip guard (or vice versa, you decide). Remember, there isn’t any paint flow yet. When it does flow, you want the side of you paint stripe to land exactly on that chalk line. (I snap chalk lines to the side of where the stripe actually belongs -- not down the middle.) Again, when the paint starts flowing, you want the side of your stripe to land exactly on that chalk line; not “over it” and not ¼ in. away from it, either. (If you miss, don’t make a correction. You’ll learn why a few paragraphs.) To get “lined up” you might have to perform a “test shot” on a piece of cardboard, just for practice. You’ll get the idea.
Now, push the machine forward. Make sure you’re traveling parallel to the chalk line by staying hard focused on that chalk line and soft focused on the tip guard. If you’re traveling parallel, you’re ready to go.
“Starting Out”
Two things are important to know when starting to apply paint: First, you don’t need a “running start” so don’t think that. If full speed for you is 3 mph, fine. You can put the gun directly over the starting point and just start walking. Second, don’t try to “drag race” up to speed, either. Just start walking. Think of your striper as a grocery cart. So what if the customer gets 24 mils of paint during the first 12 in.? You won’t go broke. You don’t even have to add this into your paint costs! And it looks great. And it’ll last. Relax and just start walking. You’ll get up to your speed in probably one stride.
All that said, back to starting out. Remember, the machine is already “lined up,” which means when the paint flows, the side of your painted stripe will land right on your chalk line, which you snapped along the side of where the stripe belongs.
1. Roll the machine back to about 6 in. before your starting point. That’s all you need.
2. Hard focus on the starting point -- the starting point. That’s what’s important, right now.
3. At the same time, get soft focused on the tip guard. (Remember, you’re only 6 in. back.)
4. Stay hard focused on the starting point and soft focused on the Tip Guard, simultaneously.
5. Start walking, normally. When you see the tip guard,from the corner of your eye, directly over the starting point, pull the trigger. You’re hand will know when. Just stay relaxed and focused.
6.Get up to speed. This should take one, two or possibly three normal strides. That’s it. Now you’re movin’.
Now that the paint is flowing
Once you’ve lined it up and have started spraying, only focus right where the paint hits the pavement. That’s where you’ll remain hard focused for the remaining length of the line. (And…if you missed the chalk line by a ¼ in. -- don’t correct. Keep going straight but stay ¼ in. off the chalk line…or over the chalk line, whichever the case may be! The chalk line is a guide. Just go straight.)
Stopping right where you want
First, remember that now that the paint is flowing and hitting the chalk line, you’ll have that point to hard focus on. You don’t need to hard focus or soft focus on the tip guard any longer.
Let’s say you’re coming to the end of a 36-ft. line. Keep a hard focus on the paint hitting the chalk line; then, when the stopping point comes into your peripheral vision, slow down, at least a little, and ”soft focus” on it…simultaneously.
* Don’t only hard focus on the paint hitting the chalk line; You’ll miss the stopping point.
* Don’t only hard focus on the stopping point either; You’ll sway off the chalk line.
* Don’t hard focus back and forth between the two! That’ll drive you nuts.
Now, let me see if I can make this even easier. When you see the stopping point coming into your peripheral vision think to yourself, “there you are, I see you.” Stay hard focused on where the paint hits the chalk line. Your hand will know when to let go of the trigger, and -- this is important -- you can slow down. You don’t have to stop the paint flow while traveling at full speed.
There are times, even after spraying thousands of jobs,that you will “miss” (I do). When it happens it’s usually because I'm either hurrying or because I glance away at the wrong time. It’s just human error. You’ll have that so be easy on yourself -- but you’ll also get better so keep going.
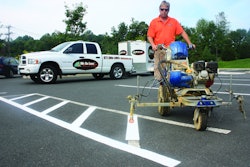
Dan Zurcher is owner/operator of American Striping Company. In addition to writing "How I Stripe a Parking Lot 16 Years By Myself,” Dan has produced numerous "how-to" striping videos, offers his "Mr. Box" Kit for stripers, and distributes stencils and other striping-related products through http://www.americanstriping.com. He will present Improving Efficiency on Your Striping Jobs” Feb. 16 at National Pavement Expo in Memphis. For more information visit www.nationalpavementexpo.com.