The most commonly used microtopping is put down by trowel or squeegee. This type usually requires a minimum of two coats, and in some cases three to four coats depending on the condition of the subfloor and the desired look. The first coat — called the body or structure coat — will contain courser sand. The next application will be a finer-sanded version of the same product. Some manufacturers even have superfine mixtures for use as a finish coat.
The second type of microtopping — sometimes called a semi self-leveler — is a cross between the traditional trowel- or squeegee-applied version and a self-leveling overlay. These products have self-leveling properties but are usually applied at a maximum thickness of only 1/8 in. (vs. 1/4 to 1 in. thick for the typical self-leveling overlay). A semi self-leveling micro topping is typically applied in one lift rather than two or more separate coats, but the finishing process requires a high degree of skill during the troweling process with the ultimate goal being a polished look similar to that of hard troweled concrete. Bond or primer coats are important for several reasons when using these types of systems. If you install a microtopping on unprimed or prewet concrete, the overlay system could dry instantly. That's because the porous, unsealed concrete would absorb the moisture in the topping, causing it to flash set and jeopardizing its workability and adhesion. In lieu of a primer, some manufacturers recommend applying the micro topping to concrete that's prewetted to a saturated surface dry (SSD) condition to minimize absorption of moisture from the fresh topping. When the substrate has been totally sealed off with the proper amount of primer or is saturated surface dry, the moisture in the microtopping is not absorbed into the substrate. Instead, moisture bleeds to the surface of the topping, which facilitates troweling.
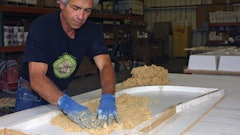
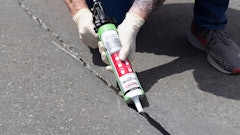
After all of the necessary surface preparation has been accomplished (profiling, crack repair, priming), the next step is to apply the material to a depth of about 1/8 in. with a gauged roller or a gauge rake set at 1/8 in. These tools help to spread the topping evenly while ensuring a uniform depth, but they aren't designed to move large volumes of material. When pouring the freshly mixed topping from the bucket onto the floor, apply it in a uniform ribbon rather than dumping it in one area. This will make it easier to spread properly. (It's best to have one person do the pouring while another person uses the gauge roller.) Try to spread the semi self-leveler in sections 2 to 4 ft. wide, making sure to avoid cold joints (distinct lines that form between sections that dry at different times).
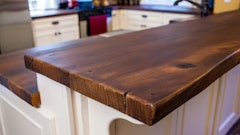
Once applied, these systems generally require troweling, usually in two stages. The first troweling should begin within 10 minutes after you spread the microtopping. If you want to produce a hard-troweled surface similar to the look and feel of smooth, hard-troweled concrete, then a second troweling will be necessary. The timing for the second troweling varies depending on the size of the project and temperature conditions. I find that the most opportune time to second trowel is when 75 percent of the surface bleed water has evaporated, leaving behind patches of damp areas on the surface. Be sure to kneel on spiked kneeboards or wear cleated shoes when troweling to avoid leaving foot or knee prints in the fresh topping.
Remember, the warmer the temperature conditions, the faster the material will set. For this reason, try and apply your toppings in the coolest part of the day.
It is also imperative to keep any source of air from moving across the surface when you're applying the topping to avoid rapid drying — especially with a semi self-leveling product. This caution applies to both indoor and outdoor projects. On one interior flooring project, for example, I installed 1,500 sq. ft. of microtopping that went down beautifully, except in an area where I had left two doors open on either side of the building. The cross draft caused the material to skin over in that area. Fortunately, I discovered the problem in time to avert disaster.
As a last resort in a situation like this, you can lightly mist the surface with water to help provide enough cream for finishing. If you are working in a newly erected building that is not completely enclosed, you may need to erect temporary windbreaks of plywood or plastic at doorways and windows.
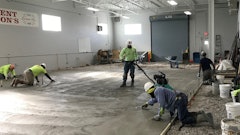
How much labor is required? A microtopping has a longer pot life in the bucket than other overlays, but a relatively short dry time once it hits the substrate. On small to moderately sized projects (300 to 1,500 sq. ft.), one to two people mixing is usually sufficient. With two workers, one can mix with the paddle drill while the other dumps the dry ingredients into the bucket. To apply material on small jobs, usually one person can effectively work the area. If you're covering larger floor surfaces, you may need to mix a couple of batches at a time, and have several people troweling to get the material down without delay.
Sometimes, even the best troweler gets behind and despite being as meticulous as possible during the troweling process, you can end up with distinct lines left behind from the trowel. If this is not the desired effect, once the material has dried (the next day) the use of a palm sander or orbital sander can help smooth out these imperfections. On large areas, the use of a buffing machine with a 100-grit sanding screen can be used, assuming the material is sufficiently cured.
Coloring options
To achieve distinctive multitonal finishes with microtoppings, I like to combine different coloring mediums such as integral color, stains, dyes and tints. A few manufacturers offer water wettable pigments that can be used in the mix as well as broadcast into the fresh topping for interesting effects.
If you plan to use chemical or water-based stains or dyes, check with the supplier of the microtopping as well as the supplier of the coloring product for any compatibility issues and for recommendations on the best time for application.
Warning: Dilute the stain first. If you're applying a traditional acid-based chemical stain, a little goes a long way on microtoppings, and straight stain can produce colors that are too bold. I recommend diluting the stain with water. The rations will vary depending on the desired effect. Generally, adding two to three parts water to one part stain will work, but I have used as much as 30 parts water to one part stain to achieve the desired color level. If the microtopping is highly absorbent, I recommend lightly misting the surface with water (leaving no standing water) prior to stain application to help slow down the rate of stain absorption so the color won't be overly intense.
When applying stain, a simple method is to use a pump sprayer to mist it onto the surface, while simultaneously brushing with a soft- or medium-bristled push broom. Follow with one last mist of stain over the area to soften any broom marks. To avoid leaving a spray pattern, I use a sprayer with a conical tip rather than a fan tip and move the sprayer in a random fashion.
With any new product or technique, practice makes perfect. Start off slow on sample boards to perfect your troweling technique. Once you have established confidence, consider moving on to a smaller sized project for additional experience before tackling too large of an installation.
Bob Harris is the founder and president of the Decorative Concrete Institute, Douglasville, Ga., which provides hands-on training seminars in architectural concrete. He can be reached at (877) DCI-8080.door projects.