Stampable overlays are an excellent option when resurfacing of an existing interior or exterior concrete substrate is needed.
One of the most critical aspects of properly installing a stampable overlay is knowing what - and what not - to expect from the material. Regardless of the system that meets your individual requirements, in order for the system to meet certain performance criteria, it is absolutely necessary to properly prepare the concrete substrate. This includes taking into account any moisture-related issues, addressing existing cracks, or profiling the concrete either through chemical or mechanical means, to name a few.
Let's review the installation process of a stampable overlay. You will never just mix material and apply it to a raw concrete surface. If the system you are using requires a bonding primer or slurry coat, this will need to be applied in accordance with the technical data sheets prior to the installation of the stamp overlay.
Bond or primer coats are important for several reasons. If you were to install a stampable overlay to unprimed or prewet concrete, the overlay system could dry instantly. Once applied, the moisture from the overlay would be absorbed into the concrete causing it to flash set, jeopardizing not only the workability, but the adhesion as well.
If you are to obtain a saturated, surface dry substrate as opposed to a bonding primer, this requires constant wetting of the surface to totally saturate the concrete. I have worked with many installers that think a light mist coat of water prior to the installation of their topping is sufficient, only to find that the material is setting in less than 10 minutes. In order to truly obtain a saturated substrate, constant wetting for a minimum of eight hours is necessary. The use of a soaker hose or sprinkler is an effective way to keep the surface wet.
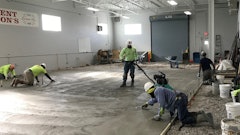
Like any topping, mixing is a critical step in the successful execution of a stamp overlay installation. The proper volume of liquid (water or polymer) is needed to assure a consistent mix. Too much liquid in the mix could promote shrinkage cracking and a weak surface, while not enough could jeopardize the adhesion and the workability. The size of the installation will determine the best method of mixing. On small to moderately sized projects (2,000 sq. ft or less), the use of industrial type drills and mixing barrels are an effective way of mixing. Make sure you have back-up drills in case one burns out during the mixing operation. On larger applications, the use of a mortar mixer is a very effective way to mix material, enabling you to apply material more expeditiously.
Stampable overlays are usually applied between 1/4 and 3/4 in. thick. The thickness applied is dictated by the profile of the texture skin or stamp mat. As a general rule, whatever the deepest part of the texture is, you would apply the topping two times that thickness. (If the texture is 1/4 in. deep, apply overlay 1/2 in. thick).
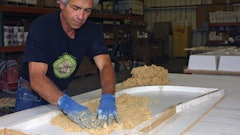
Application usually starts with a gauge rake. This distributes the material to the needed area while gauging it to the required thickness. Depending on the consistency of the stampable overlay, you will usually see the tracks left behind from the gauge rake. These will be taken care of in future steps. It is critical to perform this step in a timely fashion, making sure the material is still viscous enough to wet out the substrate allowing for greater adhesion. If a mix is too dry or setting quickly, when you gauge rake the material it will have a tendency to drag along the surface in a clump as opposed to adhering to the surface.
Once the material has been applied at the proper depth with the gauge rake, the next step is to trowel and/or float. Keep in mind, if the surface is not perfectly smooth, it is OK because during the stamping or texturing phase these trowel lines will be imprinted out. If overworked, stampable overlays can produce density blisters where air or moisture has become entrapped underneath the layer of surface mortar causing raised domes. If you do experience density blisters, you can usually cut the surface back open with a resin hand, or bull float allowing any entrapped air or moisture to escape. When troweling by hand or fresno, a slow continuous motion is needed to consolidate the fine aggregate while bringing a layer of paste to the surface. Overworking will produce these blisters. Warm and windy conditions will make the whole installation process difficult. Read the technical data sheets for minimum and maximum temperature requirements to install the overlay system you are using.
The next step would be to apply a release agent to both the stamping mats and the surface to be stamped. Release agents are packaged dry or in the liquid form. Be careful if using a powdered release agent. They do a wonderful job of breaking the bond between the stamps and surface mortar; however, cleanup can be quite a task, especially if stamping in an interior environment.
Liquid release also provides good bond breaking capabilities. Liquid release is packaged clear, which does not provide any antiquing. What many applicators will do is take roughly ½ to 1 cup of powdered release mixed into 5 gal. of liquid release to create their own tinting agent. If tinting a liquid release, I will usually add the powder at least one day before the installation to help it dissolve. When spraying the release, be sure to agitate the sprayer by gently shaking so the pigment does not settle to the bottom, creating dark splotches.
Learning the proper timing to start the stamping phase is crucial. Some applicators will gently press down with their finger into the surface and suggest that if no material sticks to their finger, the time is right. The proper time really is a function of the depth of the pattern you are using and the area to be covered. Once the overlay is placed, stand on top of the stamping mat. There should be some slight resistance to help support the weight of the workers. Sometimes a suctioning effect where the stamping tool becomes stuck to the surface of the overlay occurs. If this happens, never lift the tools straight up from the handles. This could lift material from the substrate while adhering to the bottom of the mat. Always break the bond at one corner of the mat and then, once the vacuum effect has been released, lift the mat.
Having enough tools to cover the area you are stamping is also very important so you can keep your pattern aligned while moving across the surface in an expeditious manner. As a general rule, you would need enough tools to span the widest area, plus a minimum of two additional tools to start the second row. Another good practice is to have a worker pretexture the perimeter edges before pattern stamping. This assures that sufficient texture and color (from the release) has been worked in to the edges. It is also necessary to have a sufficient amount of workers on-site to perform the given tasks.
Knowing when and where to start your stamping process is key. When starting, the easiest method of creating texture is through the use of seamless texture skins. I like to recommend beginning contractors start off using this method. Once their skill level increases, they can then move to pattern stamping.
When cleaning the release from the surface, always conduct a small test section making sure the surface is hard enough. Some applicators use commercial detergent and push brooms to scrub powdered release while others prefer pressure washing. If using a liquid release, many manufacturers suggest that the liquid release will evaporate from the surface and no cleaning is necessary. Conduct a test by dribbling water on the surface. If the water beads up and does not absorb into the surface, a light cleaning should be performed. If a residual is left behind from insufficient cleaning of the powdered or liquid release, this could jeopardize the adhesion of the sealer.
With enough practice and confidence, you can transform your unsightly gray concrete into a natural looking masterpiece.
Bob Harris is the founder and president of the Decorative Concrete Institute, Douglasville, Ga., which provides hands-on training seminars in architectural concrete. He can be reached at (877) DCI-8080.