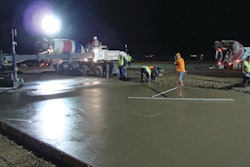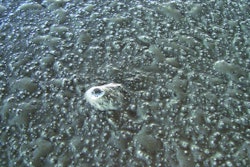
Areas along and adjacent to floor edges, walls and construction joints, and around columns and bollards, are difficult to burnish or repeatedly trowel using a ride-on trowel. Consequently, these areas can suffer from poor gloss, pinholes and non-uniform color, and they sometimes have unsightly float and trowel marks. These blemishes distract from the overall quality of the floor, and many times owners consider them surface defects.
The job of a ride-on trowel
In addition to producing a glossy finish, repeated troweling also improves the surface smoothness and abrasion resistance of the floor surface. Essentially, proper troweling densifies the surface mortar by applying blade pressure to the surface expelling water and air from within the surface paste. Blade pressure is progressively increased by gradually increasing the blade angle or pitch of the individual steel trowel blades. As the blade pitch increases, the contact area between the blades and the floor surface decreases resulting in more blade pressure and more compaction of the surface mortar.
Densifying the surface mortar reduces the water-to-cementitious material ratio near the top surface of the floor. As the surface becomes denser, it becomes darker in color because of the lower water-to-cementitious material ratio. The darker surface color can vary from uniform to a mottled appearance and typically extends below the surface about 18 inches. Of course, the final surface color, gloss, overall appearance and depth of the surface densification depend on the number of passes with the ride-on trowel and blade pitch.
Standard ride-on trowels cannot finish or burnish surfaces adjacent to walls, door jambs, columns, bollards and other floor obstacles because of the clearance required for the ride-on trowel frame and spinning blades. Unless finishers take extra time and effort to hand finish these areas, surface color, texture and gloss will not match the burnished floor surfaces, and most likely these areas will contain various surface blemishes or defects.
Surfaces adjacent to construction joints are also problematic because crossing joints with steel trowel blades will scratch and damage the surface of the hardened floor. Trowel scratches are unsightly and not repairable. Therefore, construction joints are typically banded with a zone of lighter colored and duller concrete as compared to the burnished surfaces.
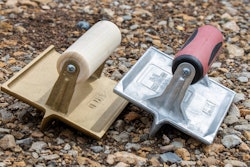
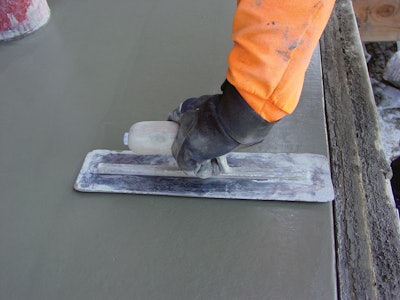
How to hand trowel
Hand trowels vary in width from about 3 to 5 inches and in length from about 10 to 20 inches. For the first troweling use a wide-blade trowel (at least 4½ inches) and keep the blade as flat as possible against the surface. For subsequent trowelings, use smaller blades and progressively increase the blade pitch to increase blade pressure against the surface. Repeated hand trowelings with decreasing blade sizes and increasing blade pitches will enhance gloss and darken surfaces.
It may not be possible to produce the same color and gloss achieved by using a ride-on trowel, but repeated hand troweling can help reduce obvious color and gloss differences. Hand troweling surfaces that are inaccessible to ride-on trowels improves the overall appearance of floors but more importantly, ensures these areas are free of surface blemishes and defects.
Clean and edge your joints
Edging is typically not required on commercial and industrial floors. However, cleaning and edging isolation joints improves the appearances of the overall floor, especially for column and other isolation joints exposed to view. Traditionally, joints are edged to create rounded edges and to densify the concrete making edges more durable and less prone to spalling and chipping. Edge durability of isolation joints is typically not a concern, but edging these joints produces neater and straighter looking joints and improves the overall appearance of floors.
If construction joints are designed to perform as contraction joints, specifications commonly require construction joints to be sawcut similar to sawcut contraction joints. For these types of joints, finishers should edge along the edge form so joints are easily visible for accurate sawing. Saw cutting construction joints encourages the formation of clean, straight cracks along the joints. Also, consider applying a curing compound or bond breaker to the face of construction joints to discourage bonding of the adjacent concrete to the existing joint faces. This also helps ensure a straight crack forms along the construction joint. Typically, sawcut construction joints are filled with semi-rigid joint fillers, especially when joints are exposed to hard-wheeled traffic.
Stoning or lightly grinding is an alternative to edging construction joints. After stripping edge forms or bulkheads, a carbide stone can be used to round the edges of the existing slab before placing the adjacent concrete. If edges are not ground sufficiently, joints may be difficult to follow while sawing resulting in misaligned saw cuts. Misaligned saw cuts are unsightly and difficult to repair or conceal.
For edging isolation or construction joints, use an edger with a 18-inch radius edge. A larger edge radius will create surface widths that are too wide for sawing and hard-wheeled traffic. Before edging, use a pointed mason's or margin trowel to clean off the edge form and to loosen or cut the concrete from the inside face of the edge form using a vertical sawing motion. During the edging process, hand-trowel adjacent surfaces to remove edger markers and to minimize differences in floor color, texture and gloss.
Addressing the details does take extra time, effort and perhaps more finishers, but the overall appearance and quality of the floor will be enhanced.
Kim Basham is president of KB Engineering LLC, which provides engineering and scientific services to the concrete industry. Basham also teaches seminars and workshops dealing with all aspects of concrete technology, construction and troubleshooting. He can be reached via email at [email protected].