A visual inspection of a hydraulic hose can prevent downtime, provided you can diagnose potential problems. Joseph Skovrinski, Gates Condition Monitoring Engineer, recommends you look for:
- Hose cover damage. This includes cuts, cracks, abrasion, exposed reinforcement, etc.
- Hose stiffness or hardness. Sunlight, ozone, extreme temperatures and chemicals can cause hose to lose resiliency. A stiffened hose can crack when flexed, leading to catastrophic failure.
- Changes in color. Color changes in hose may indicate chemical attack, deterioration or aging.
- Cover blisters. Blisters in the hose cover may indicate chemical incompatibility with the fluid, or leaking due to permeation. Blisters can break and expose the reinforcement, which can then degrade due to exposure to the environment.
- Kinked of flattened hose. Kinked or flattened hose could restrict material flow and hose performance.
- Leaking hose. Check for puddles or spilled material under the hose assembly, which could indicate a problem with the coupling interface or attachment. Also look for weeping from the hose.
- Damaged hose reinforcement. Hose reinforcement that is exposed to the atmosphere will deteriorate and weaken the hose.
If the inspection shows that a hydraulic hose requires replacement, it's imperative to choose the right one. Selecting the best hose for the application can reduce, if not eliminate, premature hose failure. Tim Deans, Gates Global Hydraulic Systems, engineering team lead – new product commercialization, recommends you follow the "STAMPED" method of hose selection:
Size – Choose a hose with an inside diameter (ID) that is adequate to minimize pressure loss and avoid hose damage caused by the heat generated by excessive fluid turbulence.
Temperature – The hose must be able to withstand the system’s minimum and maximum fluid and ambient temperatures.
Application – Determine where or how the hose will be used. You’ll need to know the equipment type, working and impulse pressures, fluid to be used, bend radius, static conductivity, etc.
Material to be conveyed – The hose, including the hose tube and cover, along with the couplings and O-rings, must be compatible with the type of fluid being conveyed.
Pressure – Know the system pressure, including pressure spikes. The hose’s published working pressure must be equal to, or greater than, the normal system pressure and any pressure surges it will encounter.
Ends or couplings – Identify the type of threads the system uses and select couplings that are compatible with those thread types.
Delivery – How many hose assemblies do you need and when do you need them? Ensure that the right type and size of hose you need is readily available.
Prevent Leaks
Of course, a new hose assembly isn’t worth much if it leaks. “Keeping the work area clean is a key factor in avoiding leaks,” says Deans. “On metal-to-metal seals, be certain to clean the sealing surfaces to ensure a leak-free connection. Certain couplings require the use of an O-ring. For couplings that use elastomeric seals to resist leakage, replace the O-rings every time you replace the hose.”
Take special care when installing O-rings on flange connections. “Inspect the coupling for burrs that could cut the O-ring. While installing the O-ring, do not let the machined surface of the port nick the O-ring and create a leak,” says Deans. “About 40% of hydraulic leaks are caused by damaged O-rings.”
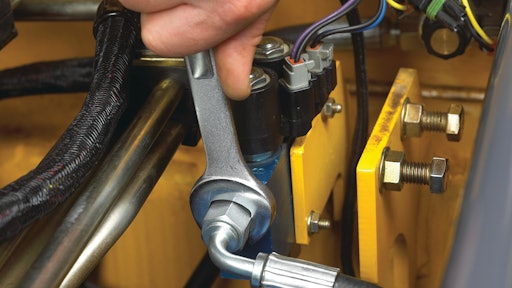
Finally, always properly torque the fittings. “Installation torque is critically important to ensure a proper leak-free seal,” says Deans. “Over-torquing a threaded connection can stretch and damage threads and seat angles. It can also damage the staking area of a nut or possibly break a bolt on the port area. Under-torquing does not allow proper sealing. The most reliable method of torquing threaded connections is to first hand tighten the connection, then use a torque wrench to measure the torque.”
Many types of hose end connections exist, such as JIC, ORS, male pipe, flange, etc. Each has its own torque specifications, pressure capabilities and installation procedures. “The installer should carefully follow the manufacturer’s recommendations, particularly in regard to torque and/or turns-past-hand-tight assembly procedures,” says Douglas Jahnke, marketing manager, Eaton Hydraulics. “Either a torque wrench or the traditional ‘number of flats past hand tight’ procedure (hand tighten and then turn a quarter or half turn more) are acceptable if the installer follows the recommended procedure.”
He adds, “When replacing a hose that has failed in service, the installer may want to consider converting to a more ‘leak-proof’ design (such as ORS to replace pipe thread) if there is any evidence of leakage at the connecting point.”