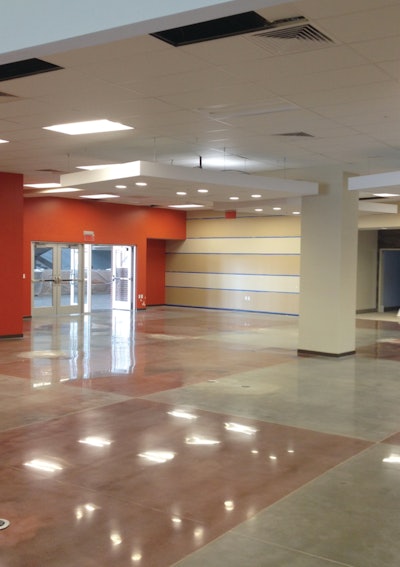
The Concrete Services division of Budget Maintenance, Pottstown, Pa., recently finished an 18,000-square-foot polished concrete project at Lincoln University in Kenneth Square, Pa. The university tried polished concrete a few years back and was pleased with its performance. When it built a new student center on campus, complete with a cafeteria and social lounge, the owners took the opportunity to install more polished concrete because of its long-term durability and low maintenance requirements.
Project planning
Budget Maintenance worked hand in hand with general contractor, Lobar Construction Services, on the student center project. John Jones, head of the Concrete Services division at Budget Maintenance, says getting involved in planning the concrete details, schedule and floor protection is key to ensuring the slab is optimized to take a polish. “It is very important to have a job meeting with the concrete contractor and the GC before the pour so everyone understands the specifications,” he says.
On this project, the owner and architect wanted a cream polish – no salt and pepper exposure. To ensure that kind of finish, Jones had to make it clear to the GC and concrete contractor how floor flatness and floor levelness can affect the end results of a polishing job.
When FF and FL numbers are too low, he explains, the grinding process will expose beyond the cream top and into the aggregate in the high spots. Low FF and FL numbers will also result in a wavy appearance on the floor and the inability to optimize reflectivity.
“We told them we needed FF and FL numbers of 40 and above,” Jones says. “They did achieve those numbers and it helped in a successful end product.”
Polishing process
After the slab was placed and finished, the concrete sat for 45 days. When their slot in the construction schedule came up, the five-man Budget Maintenance crew started the dry grinding process with 30/40-grit metal-bond abrasives and continued on with 80- then 150-grit metals. After switching over to resin-bond abrasives, crew members started with 100-grit resin abrasives then proceeded through the process to 200, 400, 800 and 1,500. Crews dyed and desnsified after the 400-grit resin step. After the 1,500-grit polish, they applied a second densifier.
Jones says one of the challenges with this project was the owner and architect struggled with the color choicse up to the last minute. Jones’ crew created three mock-ups on the working slab while they were moving their way through the metal and early resin steps. “It was very important to us that they made their color decision on time,” Jones says. “We had to get approval so we could keep grinding.”
The architect and owner finally settled on a three-color scheme throughout the three polished areas of the student center. Their decision came in enough time that the Budget Maintenance crews could avoid stopping the project to wait for a color decision.
Edge work was another challenge the Budget Maintenance crews succeeded on. “The guys did a great job on edges,” Jones says. “The colors blended great at the conjunctions where the edge work met the floor.”
Maintenance tips
Maintenance is the key to keeping a successful polished floor looking good. Budget Maintenance provides maintenance instructions for its flooring systems in an operations manual it turns over as part of its close-out documents for each project. But Jones says the company takes its maintenance advice a step further.
“We have a face-to-face meeting scheduled with the head of maintenance. We will tell him about the correct pads to use and how to choose a cleaner with the correct pH,” he says. “We think it’s important to do more than just hand him some instructions.”
Budget Maintenance was able to complete a successful project because it took steps to ensure the entire project ran smoothly from the concrete pour to the regular maintenance.