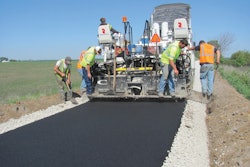
One of the more difficult paving jobs contractors encounter is paving a circle – in most cases a cul-de-sac. The difficulty arises because the tight radius of the circle does not match up well with the straight and relatively inflexible shape and configuration of the paving screed. That, combined with the need for effective drainage, can create headaches for contractors and property owners alike.
But here’s a “best practices” approach to get that troublesome job done. Where circles often are paved up to gravel or even grass, many are surrounded by concrete curb and gutter so that’s the job we’ll tackle in this article: an asphalt overlay on a cul-de-sac ringed by concrete curb and gutter. The curb and gutter defines the edge, generally provides sewer grates to remove water from the surface – and also creates difficulties for the paver operator and his team.
Drainage Governs Approach
As with any paving job, preparation and planning is 80% of the job’s success and possibly even more important when paving a circle. That’s because the planning of the job involves pie-shaped paving passes instead of just straight pulls.
But first things first: Drainage. As with any paving job you need to identify the way the water flows off the pavement, then you need to mimic that in your overlay. In a perfect world water would flow evenly from the center of the cul-de-sac to the edges in several directions (Figure 1). Sometimes the water flows from the center toward each side (Figure 2), and when paving circles around an island you will likely encounter drainage that sheets the water from the inside if the circle to the outside (Figure 3). Regardless of how the water flows you need to determine that prior to paving your project because the last thing you want is water pooling in the center of the cul-de-sac.
In addition to determining drainage you need to identify the crown, which should basically divide the circle in half from top to bottom and extend into the roadway. Your paving plan should make every effort to construct the crown in the final paving pass as your paver pulls out of the circle into begins paving the road.
Don’t Skip Layout
When paving a cul-de-sac or other circle some contractors like to pave the initial pass against the curb all the way around, then work off that first pass to “fill the pie.” The problem with this is the inside joint of the pass – the joint away from the curb – becomes cold by the time you are back to paving against it.
So a “best practices” approach to paving a cul-de-sac is to pave half the circle at a time. Identify the crown and work half at a time from the outside edge to the center; from the outside on one half to the crown and from the outside to the crown on the other half. That way your final paving path will be on the crown and at full width.
The key to any successful paving job is hot joints. You try to maximize the hot joints and minimize the cold joints because any time you’re paving against a cold joint you are creating compaction issues which eventually will result in pavement failure—cracking, water intrusion and more.
So to maximize the number of hot joints in the job you need to plan it out. The first pass will be against the curb, 8 feet or 12 feet wide depending on your machine, to create a bench or starter mat from which to work. Subsequent passes will be straight, but they will narrow as they reach the opening (bottom) of the cul-de-sac. It’s important to plan this paving out in as few passes as possible, reducing handwork and labor while maintaining the integrity of the mat.
The layout within the circle will depend on the actual width of the circle. So to plan the passes after the starter mat measure the width of the half circle at its widest part and at its narrowest part. Your paving widths will not be uniform (except for the last pull in each half – the center of the circle) and each pass to “fill the pie” will start wide and narrow at the bottom but you should try to maintain wider passes as much as possible.
There are some challenges when paving the narrow end of each pie piece and we’ll cover those later. But for now determine how many passes you will need to get to the final pass on the first half of the project. This final pass should be 8 feet or 12 feet wide (basically it should match up with half the width of the road entering the cul-de-sac). That final pass should create a butt joint at the bottom of the circle from which you can start paving the road that leads in to the cul-de-sac.
Ready to Pave
So you’ve got the plan, you’ve done the layout, and you’re ready to pave your starter mat. The only question you have left is “How are you going to fill the paver hopper?” Getting the material to the paver is one of the most difficult challenges when paving in a circle, especially on the first pass, because you can’t have the truck-paver interface on a tight radius.
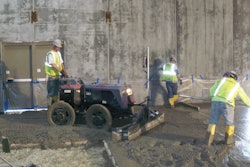
If you have a material transfer vehicle and the job is big enough to warrant hauling it to the site, your problem’s solved: use it. But most contractors don’t have one and don’t have access to one so the options are either moving the paver to the truck so the truck can dump mix into the hopper, then driving the paver back to continue paving, or to use some type of loader to haul material from the truck to the paver while the paver stays in place.
Experience and testing has shown it is always better to leave the paver in line where it’s paving and bring the mix to it. Each time you move the paver, lifting the screed from the surface, you create a bump in the finished mat; You also create the potential for a cold joint at the point where the screed was lifted and set back down. By far the best process is to leave the paver in place and keep the hopper filled using a bucket machine or skid steer loader. This way even if you have to stop paving to wait for mix, which in this type of job you probably will, you can leave the screed on the surface, eliminating the cold joint and eliminating or at least significantly reducing any bump in the mat.
Paving the Starter Mat
To begin paving start at the top, opposite the road entering the circle, and pave one paver width along the curb to the road opening. This first pass is the starter mat, or bench.
Because of the way pavers are built the operator can’t see the curb over the front of the machine so he can’t use that as a guide to steer. It helps the paver operator if hash marks are sprayed onto the pavement marking the inside of the pass because he can see those marks and steer by them, keeping the radius on track and not bumping against the curb.
Also, the shape of the paver and its screed require that the paver be 12 to 24 inches from the curb as it moves along the radius. This gives the screw man at the back an opportunity to work the extensions and depth to make sure a quality mat is placed along the curb. You need to maintain enough distance from the curb to allow the screw man to make up that distance while allowing the paver operator to complete the pass – all without scraping the concrete curb.
“Filling in the Pie”
You’ve planned out the job, used stringline or paint to mark the passes on the pavement, and you’ve placed your starter mat and compacted it to within a few inches of its edge. Now fill in the half circle by following the passes you’ve marked out.
The difficulty here isn’t getting the material into the hopper, it’s producing a quality mat in a process where the width of the paving changes significantly over a very short distance. It’s a challenge because you’re paving pie-shaped pieces and when the screed gets to a point where there’s not enough material the screed will drop, resulting in an uneven pavement and poor quality job. Drainage also could be affected.
So it’s important to maintain correct width with head of material to prevent the screed from dropping. The most-effective way to do that is to lock up one of the screed lift cylinders. This essentially prevents the screed from floating and enables you to maintain uniform depth from side to side of the screed as you pave. Another option is to overlap your paving passes but that creates issues with the mix and generally results in a poor-looking job. (Some contractors opt to pave by hand, but when paving by hand you can never get the same density or quality. Basically anything done by hand is inferior to what a screed can do.)
Repeat the Process
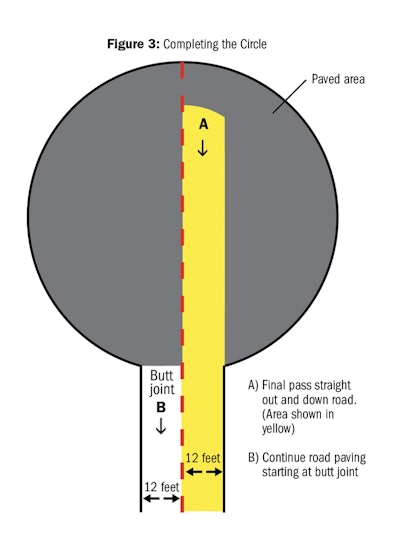
Once you have one half of the circle paved and a butt joint constructed at the base of the cul-de-sac, you simply repeat the process on the opposite side. Return the paver to the top where you began your starter mat, face it in the other direction, and pull another starter mat to the opening of the cul-de-sac. Just as in the first half you have measured and marked the pavement passes, and once those are placed and compacted you should have one last pull to make from the top of the cul-de-sac out. Remember, this paving pass should be equal to half the width of the roadway.
It’s best for drainage if this very last path is paved straight out from the center of the circle all the way out of the circle and down the road. This maintains the integrity of the drainage within the cul-de-sac and on the road. Using this “best practices” approach you end up with only two cold joints on the job – the butt joint, which was unavoidable as you construct the “pie” to fill in, and a joint right down the middle of the job where it would normally be anyway. As you reach the end of the cul-de-sac and continue paving into the road you are essentially beginning what is a standard road paving job. The tough stuff is behind you.
Tom Travers is sales and marketing manager for Carlson Paving Products, Tacoma, WA; www.carlsonpavingproducts.com. He will present "Commercial Paving 'Tough Jobs' and How to Solve Them" at National Pavement Expo, Jan. 23-26, 2013 in Nashville. For more information visit www.nationalpavementexpo.com.
[sidebar]
Compaction Tips for Circle Paving
When paving a circle it’s essential to maintain hot joints throughout the job, and the compactive effort is key to that: Compaction must stay close to but behind production and it must leave and edge of loose, uncompacted material to pave the next pass against.
So your roller operator needs to roll up near the joint without hitting the joint – stay at least several inches away. That way you are paving the next pass against uncompacted material and you construct a much better, much stronger joint when you can do that.
In addition when the roller operator follows properly and does not compact that pavement edge, there’s less effort needed from the crew because when the next pass is placed the roller operator ties the two passes together and compacts the still-hot joint at the same time. This virtually eliminates raking and luting on the seams. If you wait to compact that joint until the next pass is made there’s much less work for the crew to do.
Tom Travers, Carlson Paving, Tacoma, WA, will present "Commercial Paving 'Tough Jobs' and How to Pave Them" at National Pavement Expo, Jan. 23-26, 2013 in Nashville. For more information visit www.nationalpavementexpo.com.