Sweeper attachments are some of the most versatile attachments available. Keeping them running smoothly and to their full potential requires daily inspection and the proper performance of required maintenance. Get to know your sweeper attachment inside and out to prevent unnecessary future, sometimes fatal, failures.
Sweeper attachments require a certain kind of finesse. You have to know how and when to adjust your sweeper depending on broom type and application. Too much brush contact and/or an overly aggressive operator can greatly diminish brush life, but proper adjustment and operation will keep your attachment running smoother, longer.
The best way to keep your sweeper attachment running at its maximum efficiency is to perform daily inspections and maintenance before each use. Sweepster, a Paladin Construction Group company, along with most other sweeper manufacturers includes a maintenance schedule work sheet with each of its sweeper attachments to help its customers maintain their attachments correctly. Take these precautions before each use to determine whether or not your sweeper attachment requires maintenance.
Checking & Adjusting Brush Pattern
The optimum brush pattern adjustment for a sweeper attachment is a 2- to 4-inch contact pattern that allows the brush to pick up debris with a “flicking” motion. If brush pressure is too light, the debris is not picked up by the flicking motion. If it is too heavy, the brush begins to work almost like a mop, leading to excessive brush wear as a large portion of the brush is drug across the surface.
To check your sweeper attachment’s brush pattern:
1. Move the sweeper to a dusty flat surface.
2. Set the prime mover’s parking brake and leave the engine running.
3. Start the sweeper at a slow speed. Lower it so the boom arms bottom out. Run the sweeper in stationary position for 10 seconds.
4. Raise the sweeper and back away. Switch off the engine and remove the key from the prime mover. The brush pattern left in the dust should be two to four inches wide, running the length of the brush.
To adjust your sweeper attachment’s brush pattern:
1. If the brush pattern is too wide, reduce brush pressure or brush-to-surface load. Several of Sweepster’s pickup sweepers feature a “T” handle quick pin that allows for tool free adjustment.
2. If the brush pattern is too narrow, increase brush pressure or brush-to-surface load.
3. Repeat the steps for checking your sweeper attachment’s brush pattern until the brush pattern is two to four inches wide.
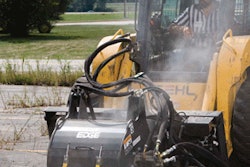
Checking & Adjusting Fittings & Hoses
Make sure all hydraulic hardware and hydraulic fittings are tight and that all clamps, guards and shields are installed correctly. Check for damage and replace parts if any of the following conditions are present:
- The end fittings are damaged or leaking.
- The outer covering is chafed or cut.
- The reinforcing wire layer is exposed.
- The outer cover is ballooning locally.
- The hose is kinked or crushed.
- The hose has been pulled or stretched.
Be careful when inspecting fittings and hoses as escaping hydraulic fluid can have enough pressure to penetrate the skin, causing serious personal injury. Do not bend or strike high pressure lines. Do not install bent lines, bent tubes, kinked hoses or damaged lines tubes or hoses. It is important to repair damaged or loose lines, tubes and hoses to prevent leaks.
Hydraulic Oil & Hardware
Insufficient prime mover oil flow can result in sluggish broom operation. A low level of oil or dirty oil and/or filter can cause excessive oil temperatures.
Check your prime mover’s oil levels and cleanliness before each use. All hydraulic fluid should be filtered before use in a sweeper attachment to obtain the ISO cleanliness standard of 17-14 or better as required by the prime mover.
Check all hardware to assure it is tight. Make certain that all locking pins, latches, and connection devices are properly installed and secured. Remove and replace any damaged, fatigued or excessively worn parts. Make certain all safety decals are in place and are legible. Keep decals clean and replace them if they become worn and hard to read.
Attachments break, but taking the time to perform daily inspections and maintenance can prevent premature failure, saving you time and money in the long run. Proper storage can also help prolong the life of your sweeper attachment. These three in combination—inspection, maintenance and proper storage—are your best defense in the fight against failing attachments.
John Thomas is the vice president of marketing & business development for Paladin, which includes Sweepster Attachments, based in Dexter, MI. For more information about Sweepster Attachments visit www.paladinbrands.com.
[sidebar]
Store It Right To Avoid Next Year’s Plight
Daily inspections and maintenance are futile if you don’t properly store your sweeper attachment when it is not in use. When storing your sweeper attachment, place it on blocks or storage stands to avoid putting excess weight on the brush. This weight will deform bristles, greatly minimizing sweeping effectiveness. Also, do not store polypropylene brushes in direct sunlight because this can cause the material to deteriorate and crumble before the bristles are worn out. Take these additional precautions before placing your sweeper attachment in storage:
- Clean the unit thoroughly, removing all mud, dirt and grease.
- Inspect for visible signs of wear, breakage or damage. Order any parts required and make the necessary repairs before storing.
- Tighten loose nuts, bolts and hydraulic connections.
- Coat exposed portions of the cylinder rods with grease.
- Lubricate grease fittings.
- Seal hydraulic system from contaminants and secure all hydraulic hoses off the ground to help prevent damage.
- Store unit in a dry and protected place.