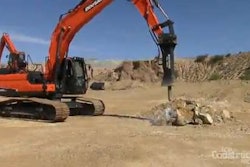
It’s astounding that a modern hydraulic breaker provides a useful life measured in years, since under normal operation, one piece of metal attacks another piece of metal up to 1,000 times or more per minute. “Just the mere nature of that activity is destructive,” says Jim Lafon, attachments project manager, Doosan.
The only thing preventing your hammer from turning itself into scrap metal is a good preventive maintenance plan — a necessity to reduce downtime and cost. “A preventive maintenance program allows you to take care of the little things before they turn into something big,” says Keith Becker, product development specialist, construction tools, Atlas Copco Construction Equipment.
Tracking use allows scheduled major maintenance intervals. The industry standard is one year equates to approximately 2,000 hours of carrier operation. Lafon reports that breaker run time is about 25% of carrier operation time. So the average breaker accumulates 500 hours of run time a year. Typically, manufacturers design hammers to be torn down and resealed on a yearly or 500-hour basis.
No matter how much maintenance you perform, as a breaker ages, operating costs will escalate. “Design, material and workmanship have a lot to do with expected lifespan,” says Becker. “As the breaker wears and ages, it may not hold up as it did before, leading to more downtime and increased maintenance cost. There will be a time when the breaker needs to be updated. This is not to say the older unit should be scrapped. It may be good for a backup or for use on lower profile jobs.”
Start with proper setup
The first step in ensuring longevity is to properly set up and size the hammer for the job. “If a small breaker is used on a job that requires a much larger breaker, its life will be shortened. This is due to over-working or forcing the breaker to do more than it was designed to do,” says Becker. “A large breaker can do a smaller job or break smaller material, if it makes sense financially. In this case, the operator has to be cautious, controlling the size and power of the breaker.”
The hydraulic systems must also be set to match the particular hammer used. Hammers are designed to run within a defined range of hydraulic pressures and flows. “If it performs outside the design parameters, something is going to happen,” says Lafon.
A common error is setting the flows and pressures improperly or swapping a hammer from machine to machine and not following up to make sure it is set up correctly. “Flow relates to the speed at which the hammer operates,” says Greg Clinton, district service manager, Tramac. “If you over-speed the hammer and the material is failing to break, you start to bounce. When that happens, the reverberation transfers back up into the carrier.” This results in worn stick pins and bushings, and possible cracks on the arm or stick. “All of that energy has to go somewhere. Basically, it is just self-destructing the hammer.”
Some setups are not as tolerant to incorrect pressure and flow settings. “Because our hammers are variable-speed hammers, they sense when the material is breaking,” says Clinton. “As the material fails to break and the hammer bounces a little bit, our breakers are designed to shift more oil to the power side of the strike piston to lift it up so it hits harder. If you have too much flow or too much backpressure, that will hinder the ability for the hammer to shift and operate properly.”
Running the attachment too slow with low flow or pressure is not a good option either. “You can typically do as much damage running it too slow as you can too fast,” says Clinton.
Grease equals life
Greasing is the most important maintenance task on a breaker. Grease performs a two-phase job: it lubricates and it clears the tool bushing area of debris. But you need to maintain the right amount. “Too much grease and you may get a buildup between the strike piston and the tool top,” says Clinton. This absorbs striking force from the piston to the work tool. “Too little grease, now you have a lapping compound once it is mixed with the dust.”
Grease also needs to be able to withstand heat and pressure. “Breakers exert a tremendous amount of force on the tool,” says Becker. “The material causes heat and pressure in the tool bushing area. So a chisel paste must be used that can handle high temperature and pressure. A chisel paste with a high-temp moly base that has graphite and copper additives is the best for this application.”
Manufacturers typically recommend high-moly grease with a working temperature above 500° F. “The moly provides the added lubrication once the oil additives break down,” says Clinton.
Greg Smith, Allied Construction Products, adds, “If you apply a grease that breaks down at temperatures below 500° F, you have no lubrication once the unit has been run for a while.”
Also pay close attention to the greasing interval, which can vary by breaker and application. “Breakers should be greased at startup and after every two to three hours of operation,” says Jeff Crane, president/CEO, Furukawa Rock Drill USA.
There are visual signs that a hammer is not getting enough lubrication. “As a general rule, if the breaker is hanging in the air and you notice the tool and lower bushing area are dry or shiny, the tool needs lubrication,” says Becker.
Auto lube systems are capable of providing a steady supply of grease to the hammer. “An auto lube pump or lubrication system is a good investment,” says Becker. “This increases the chances that the tool and bushings will get lubricated on a regular schedule.”
The larger the breaker, the more likely you should use an auto lube system. On some larger hammers, you simply cannot supply enough grease by hand. “The breaker needs to be running grease all of the time,” says Crane.
Tramac recommends the use of auto lube systems on breakers 3,000 ft.-lbs. and larger. “We recommend an auto lube system, which will provide a 7mm shot of grease each time the hammer is in operation,” Becker states. “On smaller units, you hand grease. We recommend anywhere from six to 10 pumps of grease every hour and a half to two hours to maintain the proper greasing level.”
Of course, auto lube systems still require attention. “A major concern with auto lube systems can be a false sense of security. It’s not uncommon for the canister or cartridge to empty during operation,” says Crane.
Clinton agrees, noting, “An auto lube system is only as good as the people operating the system and their willingness to fill up that grease station.”
The key is to make sure sufficient grease is applied to the tool/bearing interface. “How often you grease or if you have an auto lube system really makes no difference as long as you monitor the tool and have a sufficient 4 to 6 in. of melted grease flowing from the hammer, properly lubing, cooling and flushing contaminants,” says Smith. “Intervals can vary anywhere from 30 minutes to four hours, depending upon application.”
Inspect for wear
In addition to greasing, routine inspection can save a lot of damage and repair expense. “By not inspecting the breaker properly, it can cost half the value of the breaker in repairs in a matter of weeks,” says Clinton.
A number of breakers are gas/hydraulic operated. “These designs use nitrogen gas in the backhead as a cushion and/or for increased power, and may also utilize an accumulator to absorb hydraulic spikes during operation,” Crane explains. “These gas charges should be checked for the appropriate pressure reading on a weekly basis, as a change in ambient temperature can affect the required pressure.”
Visually inspect for loose or broken bolts and worn out bushings. Keep an eye on tool and bushing wear. “If the tool appears loose in the bushings, the play should be measured and recorded,” says Becker.
“Worn out front bushings will cause misalignment between the piston and working steel. This may allow the piston to contact the inside cylinder wall during operation, thereby damaging the piston and cylinder — the two most expensive components of the breaker,”
says Crane.
Tool retaining pins are also subject to wear. “The tool and tool retaining pins should be removed and inspected every 40 hours of operation,” says Smith. “This interval could be longer or shorter depending on material and application. Look for damage in the retaining pin area, as well as determine whether the tool is receiving sufficient grease.”
If you start to see excessive wear on the tool retainer during routine weekly inspections, look at how the hammer is being used. “Tool retainer wear would be the first indication that you have blank firing, followed closely by the tool retainer shoulder,” notes Clinton. “I have seen blank firing so severe that the actual tool will swell. The tool retainer area will swell to the point that you have to cut the tool off and press the tool, bushings and everything out together. It can become quite expensive. So in your weekly inspection, pull the retainers and make sure you have no sharp burrs.”
Some manufacturers, such as Furukawa, suggest the operator rotate the retaining pins to have them wear evenly and to double the life of the pins. “Minor galling is expected, but when deep scarring becomes noticeable, you need to replace the retaining pins,” says Crane. “If you choose not to, the pins could deform, making them very difficult to remove from the breaker without burning or machining them out.”
Inspection of the retaining system for a hydraulic breaker can vary per manufacturer and application. “The retaining system, buffer ring, bushings and tool should all be inspected during a tool change,” Becker states. “Also, this is the perfect opportunity to inspect the impact face of the piston for any unusual wear, fatigue or damage. All manufacturers have guidelines for these items. As a general rule of thumb, if it looks bad, it probably should be replaced.”
Doosan and Tramac utilize go/no-go gauges. “You can quickly measure the wear on the tool retainer and on the shoulders of the tool retainers,” says Clinton. “They are quick 10-second checks. If it doesn’t fit, it is good. If it does fit, then it is bad.”
The working steel should also be inspected weekly. “Most wear on a working steel should be on the end doing the impacting; this is common and expected,” says Crane. “But the section of the working steel in the hammer can also show signs of wear. Look for scarring and galling around the portion where it comes into contact with the front bushing.”
This is usually a sign of insufficient grease. “When scarring or galling occurs, immediately replace the working steel,” Crane advises. “If the front-head bushings are also worn past recommended tolerances, they should be replaced, as well. A new working steel and front-head bushing could prevent unnecessary piston and cylinder damage.”
Every inspection will give you a full use profile of that breaker. “The tool is the avenue through which all of the energy travels,” says Lafon. “Inspection of the tool will tell you how efficient the energy is traveling, if there has been abuse or extraordinary wear.”
Note peculiar wear patterns. “Uneven wear [on the top of the tool] tells you the operator may not be running the hammer at 90° to the product, which is optimal,” says Clinton. “If you see wear on the side of the tool, you will know that they are working at less than ideal angles.”
Also pay attention to the hydraulic hoses and couplers. “A very common cause of hammer failure can be unexpected failure of the quick-disconnect couplers on the hoses that are installed on the carriers (backhoes and excavators),” says Crane. “Another common cause of failure is contaminated oil getting into the breaker. This can easily happen when an operator switches from breaker to bucket, then from bucket back to breaker. Operators need to be sure that the hose ends are free from dirt before coupling the hoses.”