This project was a Homemade Modern adventure.
Background:
Due to my recent DIY craze this summer, I’ve become obsessed with homemade-modern.com. For those who don’t know, this website follows a man named Ben as he creates easy home improvement projects and crafts. I have been highly inspired by these simple and cheap decorative ideas and decided to try one.
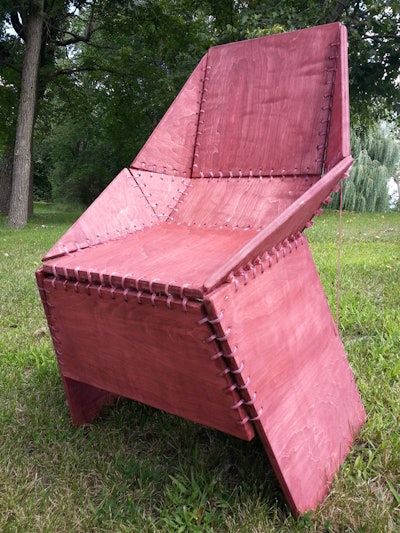
Living in a dorm room, seating usually consists of plopping yourself on the bed or finding the comfiest spot on the floor. This is why I decided to create the “Zip-stitch Chair.” It is a wooden chair held together by zip-ties. I know, it sounds dangerous (trust me I was somewhat skeptical). But Ben seems to know what he’s doing and what fun is life without risks? So I went for it!
Materials:
• Two 4’ x 4’ plywood
• 500 10” zip-ties
Process:
Seeing that this project required so little materials, my partner, Eric, and I decided to make a chair for each of us. We bought both the plywood and zip-ties at Menards.
In a brief shining moment of pre-planning, we decided to make one chair first as a guinea pig and adjust the second chair based on our findings. We began by printing out the instructions for the chair and measuring the plywood for cutting. Because the chair required some angular cuts, we decided to skip the table saw and use a circular saw. This worked well until the pieces became smaller. I was legitimately concerned for the safety of my fingers as I braced the last tiny triangular pieces. I suggest using a smaller machine for these sections -- possibly a jigsaw.
After cutting, we used the instructions to measure the areas we would need to drill. We marked 282 drill holes, 1” apart, ½” from the edge and then used a drill press to do the job. The drill press was actually really fun. I’m the type of person who doesn’t mind repetitive work as long as it is efficient, and the drill press satisfied that description.
Once the pieces were drilled, we began the glorious process of zip-tying. By "glorious," I mean tedious and time consuming. We had to thread a zip-tie in each of the drilled holes and connect the pieces by weaving two zip-ties through each other and tightening them. We used pliers to tighten all 282 of the zip-ties as best we could. One thing we didn’t take into account was the ridiculous amount of zip-tie ends sticking out in all directions. These made access to some parts of the chair nearly impossible and cutting all of them off was just as tedious as putting them on.
By this point, we began to realize a small glitch in our planning. Though we had the chair together, we still needed to sand and possibly stain the chair. We definitely learned the importance of order-of-operations during this project. I decided to opt out of the staining idea to avoid the hassle of coordinating around the zip-ties. Instead, I decided to staple leftover carpet squares from the cat tree we made (see "Internal Ramblings- Creativity and Improvisation Characterize Construction of Cat Tree") onto the seat of my chair to add a bit of comfort.
Our idea to make the chairs in order was a good one. Eric was able to make adjustments based on the mistakes we had made and ideas we had formed during the making of my chair. For instance, instead of using a circular saw, he used a jigsaw for cutting the plywood. He also eliminated some of the unnecessary drill holes we discovered on my chair. Eric did decide to stain his chair a cherry color, which gave it a cool outdoorsy look that he enjoys.
Results:
The chairs are pretty comfortable - that is if you can get past the uneasy feeling when you first sit in one and the stretchy zip-ties force you to recline. But really, the chairs are safe, sturdy and cool looking. For our first pieces of furniture, they turned out really well and I’m proud of them. Hey, it beats sitting on a dorm room floor!