Staining or dyeing polished concrete floors is certainly not a new concept. But as technologies have evolved, so too have the limitations with which you can apply color.
“Not too long ago there wasn’t an option to color your concrete safely, but now you can do so much with dyes. And it’s not just spraying a floor one color; people are saying, ‘Let’s do several different colors, and make a neat design,’” says Greg Cabot, digital marketing manager for Ameripolish, a manufacturer of architectural concrete products.
“When you get designers involved, you can have a really exceptional and unique finish. You can come up with whatever you want,” he adds.
Texas Bomanite is one such contractor that specializes in these unique types of polished floors. On a recent $16.8 million elementary school project, the contractor was asked to apply four different colors of dye across 52,000 sq. ft. of corridors and classrooms. The project completed in Spring 2019 took three months to complete.
Project Specifications
Size: 52,000 sq. ft.
Finish: Level 1 400-grit, with a Class A no-aggregate exposure
General Contractor: Cloud Construction
School officials at Charter Oak Elementary School in Belton, Texas, which is set to open in Fall 2019, chose polished concrete floors for their easy maintenance and pleasing appearance.
“We originally bid the corridors, but they liked the mockup so much that they added the classrooms,” says Tyler Balch, vice president and principal at Texas Bomanite.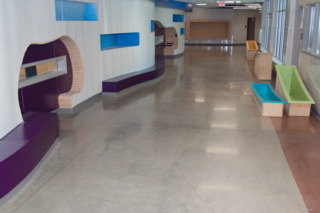 Texas Bomanite
On this project, Texas Bomanite provided a 100 sq. ft. mockup using a few colors the architect said they would like to see. After installing those dyes in the mockup, the architect then chose the final colors.
The contractor chose Ameripolish’s solvent-based dyes for the floors, including the manufacturer’s 3D HS Densifier and 3D SP Stain Protector as the guard or sealer on top.
There are many colors and manufacturers of dyes and stains to choose from. Acid-based stains have been around longer than dyes, but their popularity is waning due to their unpredictability. Stains work by reacting chemically with the concrete and can create a somewhat unpredictable color.
“Some people still like the acid-stain look, but the industry has really turned toward dyes in the last 10 years,” says Cabot. “A stain has a color it thinks it’s going to be, and its reacting with the concrete itself, so a lot of times it can be unpredictable, which is why Ameripolish originally invented the dye. We wanted something that we would know the color before it was going down.”
Ameripolish has played an active role in popularizing dyes with the introduction of solvent-based concrete penetrating dyes in 2005. Dyes are either water-based or solvent-based and work by penetrating the concrete surface. Water-based dyes typically produce softer colors, whereas solvent-based products offer more vibrant colors and tend to penetrate better so that dyes can be used in hard-to-penetrate floors and even applied later in the polishing process.
“Dyes are better than stains because we are not waiting around for a chemical reaction. A dye is a dye; it’s a predictable color. If we give you slate blue, it’s going to be some variation of slate blue based on the canvas or concrete you’re putting it on. You’ll see a mild variation in that some people have more grey concrete and some people have more tan concrete,” adds Cabot.
Dyes also make multiple color changes like those designed at Charter Oak Elementary School possible. These color changes, however, posed several challenges, which Texas Bomanite addressed with decorative saw cuts and a one-color-at-at-time application approach.
“There were a lot of different color changes on this project, and it’s different to see a project with this many,” says Balch.
Decorative Saw Cuts
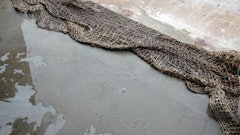
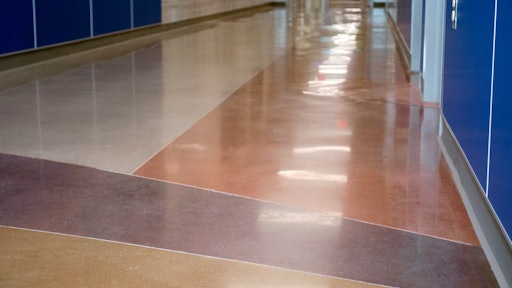
The more color changes, the more bands and cuts required to create a clean line. This project involved about 3,000 to 4,000 lineal feet of decorative saw cuts—most of which were angled, wavy and circular.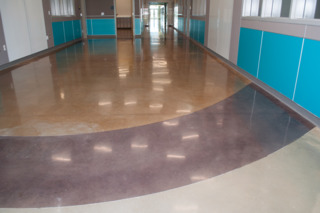 About 3,000 to 4,000 lineal feet of decorative saw cuts helped the contractor keep the color changes from bleeding.Texas Bomanite
Decorative saw cuts 1/8-in. wide by 1/8-in. deep were made between each color transition to keep the colors from bleeding. Any controlled joints or cracks that formed were filled with polyurea joint filler.
While Balch notes that not every contractor believes in decorative saw cuts, Texas Bomanite believes they make a big difference.
“If you just tape these lines out and simply shoot the die, sometimes you’re going to get bleed. You’re not going to have a nice crisp line. It’s kind of like paint, if you don’t tape off and make sure you have a nice crisp tape line, you could get bleeding,” he explains.
Dye Application
Before applying the color, the first step is densifying the floor. The first cuts made when polishing open up the pores of the slabs, Balch explains. The densifier is used to fill those holes, so the slab will polish correctly.
In polished concrete there are four levels of aggregate exposure—Class A, B, C and D. Class A is a cream finish where you are simply polishing the cap, and Class B is referred to as a salt and pepper aggregate exposure. With a Class B finish, you must cut the cap of the concrete off to expose the fine sands and small aggregates of the concrete. Class C and D exposes the rock and aggregate in the concrete.
The owner requested a Class A aggregate exposure on this project, meaning the slab was simply densified as is. On a Class B, C or D aggregate exposure, bottoming cuts would be required first to get down to the aggregate exposure desired, and then the floor would be densified.
In addition to filling the slabs pores, densifier also is an essential protective measure.
“The densifier it one of—if not the most important thing—you’re doing to the floor,” adds Cabot. “Because the concrete is like a sponge that absorbs any time of moisture or spill on top of it, these products help resist those type of intrusive materials. By the densifier tightening up the pore structure, it doesn’t allow as much moisture to be absorbed.”
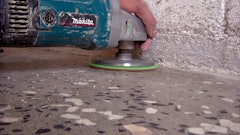
Once the densifier has been applied, the next step is running a resibond diamond grinder over the concrete, which is what polishes and hones the floor and gives it the shine. On this project, Balch says they started with a 100-grit resin polishing pad, moved to a 200-grit, applied the dye, then ran a 400-grit resin, applied the guard and finished by varnishing the floors.
“It’s a pretty short process because they wanted a Class A 400-grit finish. There’s only about 4-5 steps, whereas normally there could be 9-10 steps,” Balch says.
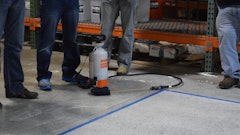
As far as actually applying the dye, Texas Bomanite takes a special approach there too. The contractor shot the dye one color at a time in order to best handle the color transitions. They taped off one color area, applied the dye, let it dry (which typically takes about 30-40 minutes), and moved onto the next color.
“It’s a lot of taping off, but we would shoot just one color at a time to make sure everything was taped off correctly and the dye was applied uniformly,” Balch explains.
The crew also employs a two-application method to ensure the color is perfect and to capitalize on the right window of opportunity.
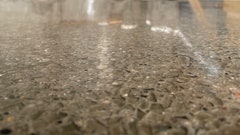
“When you’re applying dyes, you have to make sure that you apply them at the right time, and you apply them correctly. There’s a window that you apply dyes,” Balch explains.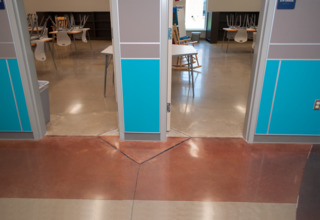 Imperfections in the slab were a challenge, but not unexpected with a Class A no-aggregate exposure, which is simply polishing the concrete as is.Texas Bomanite
Some contractors apply dyes after polishing the concrete with a resibond diamond grinder using a 100-grit resin polishing pad, some after 200-grit and then others do it after 400-grit resins.
“The thing about dyes is you can’t apply the dye too early. Because the pore of the slabs are still open, the dye will soak in, and when you run your next step of diamonds, it will cut some of the dye out. But on the back end of that, you can’t apply it too late because then you’ve already closed up the pores of the slab, and all that dye is going to sit on top of the concrete and not soak in,” notes Balch.
He adds that Texas Bomanite chooses to apply the dye after 200-grit resins and then again after 400-grit resins to ensure coverage.
“We do two coats of dye to make sure the dye is good and soaked into the concrete, and you have a good clean crisp application over the entire thing and no bald spots that didn’t take dye,” he says.
The final step in the dyeing process is to apply a stain protectant such as a guard or sealer. The protective guard is applied and then heated up with a high-speed propane varnisher.
“Adding the guard as a sacrificial barrier over the top serves to protect the concrete longer and make it more durable over time,” explains Cabot.
Managing Expectations
In addition to the multiple colors and unique saw cuts, the project’s Class A finish was another challenge as the contract had to work through unavoidable imperfections in the slab.
On this project, the owner wanted a Level 1 400-grit finish, with a Class A no-aggregate exposure, which Balch says means “you’re simply polishing what’s there.”
Because of this, the crew had to work through imperfections such as chattermarks left from the finishing blades of the concrete contractor.
“When you’re doing these types of polishes, you have to set the expectations of what they could possibly see. A good pre-construction meeting explaining the Class A and showing a mockup up of a good Class A finish can set the expectations where they need to be,” Balch says.
There were also a few high and low spots that with a Class B finish (typically the most popular finish) could have been cut out to get a smooth slab. While choosing a Class A finish can be about the budget, Balch notes that some architects, however, simply like to see movement in the concrete.
“When you’re doing a Class A, you’re going to have a few waves in the floor, which goes back to making sure the owner and the architect know exactly what to expect,” Balch adds.
Balch further emphasizes the importance of the pre-construction meeting and mockup to ensure all parties are on the same page.
“We always like to have a pre-construction meeting with the general contractor and the concrete contractor to let them know that this concrete is going to be exposed, so they know they’ve got to give a really good quality finish on this floor,” he concludes.