Looking for another way to showcase your talents in decorative concrete? Want to offer your customers a service that other contractors are not? Then consider stenciled concrete.
Stenciled concrete offers the benefits of cast-in-place concrete and the look of a paver without the paver price. The different colored grout line created with stencils gives concrete the appearance of multiple textures without the labor involved with stamping. Stencils, which are not reusable, can be made from either new or recycled paper or cardboard and come in many patterns. Unlike stamped concrete, which can leave a higher, textured surface, stenciling keeps the concrete plane flatter.
A decorative stencil job can be done in one day without ever having to get onto the concrete. The technique is popular for backyard patios, residential driveways and commercial hardscape applications.
The following are two stenciled concrete job stories that demonstrate the uses and benefits of stenciled concrete.
Stencils hit the sidewalk
Todd Rose Decorative Concrete
Lincoln, Neb.
toddrosedecorativeconcrete.com
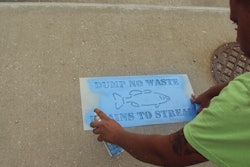
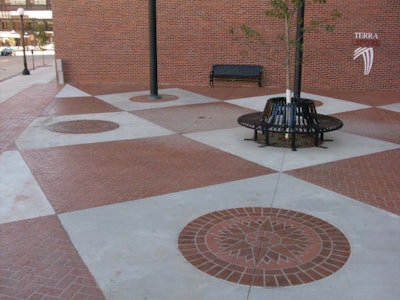
Sometimes, the best way to gain customers is to show them your work. That's how Todd Rose of Todd Rose Decorative Concrete landed a job for the Terra Centre in Sioux City, Iowa. Rose was in Iowa stenciling sidewalks for another customer when the Centre client saw the look of the stenciled job and immediately told Rose that he wanted that effect. The previous courtyard had been done with pavers, but maintenance issues drove the customer to look for a better option. Enter stenciling.
Rose and three other employees were able to complete the 6,100-square-foot job in three weeks. Because the job required stenciled concrete in some areas and non-textured in others, Rose broke the pouring and stenciling process down to make it simpler.
Rose separated the site into 160-square-foot squares and poured three squares at a time using plain gray concrete. Several admixtures were used during the process to prevent some possible headaches. "At times, when we were pouring in the shade, we would use non-chloride accelerators so we could place the concrete, do the stencil, get the color, and do it very quickly," Rose says.
Rose used sheets of Masonite to block out the gray concrete and prevent the color hardener or the stencil from disturbing it. He added the color hardener to areas that would be stenciled and worked it in with a bull and a magnesium float. He used Decorative Concrete Impressions' paper stencils on the concrete and ran a tapered texture roller over the concrete and stencil to create the imprint. "Once the concrete is at the right time for stamping it's the right time to roll with a texture roller," Rose says. "And the stencil breaks up any repeating pattern from the textured roller.
Rose used a liquid release with antiquing color added so they were not required to come back and wash off a powdered release agent. This helped save time by allowing them to seal the concrete the same day.
Once the entire area had been stenciled the crew removed the stencils and sealed the concrete using an acrylic solvent-based cure and seal.
As a final touch, Rose came back the next day and used two colors of acid stain on the stenciled compasses to give them a more defined look.
Stenciling in history
Concrete Tailors LLC
Noblesville, Ind.
www.concretetailors.com
Concrete Tailors used stenciled decorative concrete to match the historic look of a house built in the late 1800s. The project involved stenciling a 700-square-foot wrap-around porch, the rounded front steps and the connecting front walk, says Don Reynolds, owner of Concrete Tailors.
The homeowners wanted the authentic look of a brick mortar joint for the outside of the historic home, Reynolds says. Previously, the homeowner used bricks mortared on top of concrete. Due to poor grade issues and no reinforcement in the concrete, cracks and settling occurred. Stenciled concrete provided them with the same brick and grout joint look but in one monolithic piece. The customer chose a Rustic Brick Artcrete stencil, Sunset Rose color hardener and Charcoal release with a Slate texture roller.
Before the concrete could be poured and stenciled, Concrete Tailors first tore out the existing concrete on the porch, walk and stairs. They used a laser to shoot grade for the porch and ensure the water drained away from the house and toward the drains. Stenciling this particular porch had some obstacles. The porch was bordered on one side by the house and all the other sides by a short wall. This increased the difficulty to place the stencil. To make pouring easier and give the crew more room to cut the stencil, Reynolds glued a foam expansion around the sides of the porch and short walls.
This also allowed the crew to float the concrete to the proper grade while providing some slip protection for the aging brick on the house.
Reynolds poured the porch in three sections starting with the two sides in the morning and then the middle in the afternoon. "In doing it that way, the one thing we had to be really careful about was making sure that from the left side of the porch to the right side the stencil was going to line up and the bricks were going to match. By precutting our stencil we were able to keep a continuous look across the pours," he explains.
Because of the tight squeeze, Concrete Tailors walked the stencil in the freshly placed concrete - filling their foot holes as they retreated - Reynolds says. Pick boards could have been used to span the concrete to place the stencil but would have needed to be attached to the aging brick face on the house. "We used a stencil roller to embed the stencil. Once the stencil was all in, we tossed the Sunset Rose color and worked it in with floats," Reynolds says.
With the color hardener and the stencil in place, Reynolds tossed the Charcoal release over the concrete. He followed with the Slate texture roller. After waiting approximately an hour, the crew lifted the stencil out leaving the patterned brick behind. The crew poured the steps and the front walk in the same process. "The rounded steps were cantilevered with a half inch expansion underneath to make it to look like a paver sitting on top," Reynolds adds.
After waiting 24 hours from the final pour, Reynolds' crew lightly acid washed the concrete, which removed the release, and sanded the mortar joints for a more authentic look. The concrete was neutralized using ammonia and sealed with one coat of a non-yellowing 30 percent solids sealer from Surface Koatings.
The project took Concrete Tailors' three-man crew about four and a half days to complete.