When I started my journey in stamped concrete, things in the industry were starting to change. More and more contractors were starting to offer stamped concrete, and manufacturers needed to respond. More stamped concrete on the ground meant the need for products and supplies was growing fast. Not only did manufacturers need upscale production, but they had the opportunity to develop new technologies.
One of the biggest things that was changing was the coloring systems. Integral color had been around for almost 100 years at this point, but color hardener was still the go-to for stamped concrete projects. I remember hearing things like “leave stamped concrete to pros” or “stamped concrete is too complicated.” While those statements did have some truth to them, the hardest part of the whole thing was using color hardener. After getting the concrete on the ground, you had to completely color the slab by hand before you could start finishing and stamping. With the onslaught of new installers, something had to change. The industry started to trend toward integral color. More manufacturers got into the color game, and the newer liquid dispersion systems made things easier. By the time we hit the teens, integral color was everywhere. Now you would hear things like, “You still use color hardener? Get with times” or “No one uses color hardener anymore.”
Fast forward to today, and things have started to come full circle. Color hardener is not just old technology these days. Now, It’s known as an advanced technique for stamped concrete. There are countless stamped concrete contractors for end users to choose from, but the ones that use color hardener seem to stand out from the crowd.
Learning to use color hardener properly is one of the biggest steps you can take to elevate your stamped concrete work to the next level. It might seem old school, but there are plenty of reasons that most of the top contractors in the industry still use it today.
Benefits of Color Hardener
As long you cast the proper amount on the slab, the color is consistent every time.
Durability is generally priority number one for both the contractor and end user. Due to the color hardener’s high concentration of portland cement and sand, the surface strength of color-hardened concrete can cure out to over 8,000 PSI, making it almost double compared to standard concrete. Color-hardened concrete also holds up to salt or other winter weather damage much better than standard or integrally colored concrete. This reason alone makes it an easy decision for high-end projects in the northern part of the country.
The next thing would be color options and consistency. Color hardeners create a wide variety of colors, including lighter and darker shades, that would not even be possible with integral color. You can also use mutable colors on the same slab, creating a marbled effect that’ll give your stamped concrete an even more realistic look. Most manufacturers offer 40 standard colors, usually all at the same price. Integral color can vary up to $75 dollars per yard, depending on the color. With color hardener, the customer can pick any color they want, and you won’t have to adjust for the price. Integral color can also be problematic when making multiple pours. Great care is required to ensure color consistency from slab to slab. When using color hardener, the color is in the bucket, not in the truck. As long you cast the proper amount on the slab, the color is consistent every time.
Another benefit is crisp, clean impressions. All that extra cement and sand have another benefit beyond durability. It also adds density to the surface, and the buttery smooth paste just trowels out nicer. The denser, smoother surface leads to crisper impressions with less grain and fuzz.
The fact that you are only coloring the surface of the concrete means that you can easily separate multiple colors on the same pour. Forming up borders and bands separately is not required. You can do it all monolithically from the same concrete truck without any extra forming.
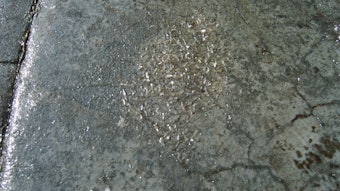
Fixing problems and addressing details is one of the things that separates high-end contractors from everyone else. Color hardener mixed with water makes a slurry that is incredibly helpful in fixing various problems. Any blow-outs around grout lines, excessive surface cracking, or stone pop-outs are easily repaired with color hardener slurry. The best thing is you’ll make the slurry out of the same bucket of color you used to color the slab, so it’ll match every time.
This leads to one last point. Color hardener makes it possible to create the highest-end of stamped concrete steps, and it’s easier. Color hardener slurry works excellent for finishing risers in a controlled environment. You don’t have to worry about finishing them while you’re stamping; it could be done later that day or at any point before applying the sealer. It could be a broken rock face, or you can put the slurry on thick enough to texture it. Like all the stuff we’ve talked about so far, this does require some technique. Color hardener might make stamped concrete steps less stressful, but it’s certainly not the easiest way of coloring the concrete.
Getting Started
Using color hardener can be quite challenging in the beginning. It takes more time and manpower, it’s dusty, and there are limitations on how far you can throw it. Trying to use color hardener for the first time on an 800sq/ft job will not only be stressful, but it might even cause you to never want to use it again. You won’t become a pro at throwing color hardener by just reading an article, but there are a few things that’ll make it easier to get started.
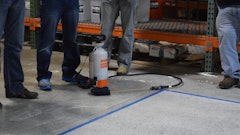
Tools can make or break any job, so set yourself up for success. A resin or wooden bull float always works better than magnesium for floating in the color hardener. It helps keep the surface open longer to accept the color and creates more friction to work the hardener into the concrete. Extra weight can also be crucial when floating in the hardener. Forming stakes or small bricks can be used in a pinch, but several tool manufacturers offer pre-made weights that fit right on your bull float. These weights also come in handy when finishing the concrete with a Fresno before stamping. I can’t remember very many jobs where weights stayed in the tool trailer.
Timing is everything in decorative concrete, and you’ll only have a short amount of time to get the concrete colored, so start working on it right away. This is not the time to take a break or catch up on the phone calls you missed during the pour. Getting behind on the coloring will cause you to get behind on the stamping. In most cases, someone needs to start floating and throwing color hardener before the concrete is even all on the ground. If you need three guys to pour the concrete, you’ll need a fourth just to float and throw the color hardener.
Becoming proficient at throwing color hardener does take some time. Whether you throw it by hand or use a bucket lid as a tool, your technique will develop with every job. The bucket lid is a great way to get started, and it does a nice job of spreading the color out on its own. When throwing by the handful, just make sure to open your hand as you throw so it doesn’t all end up in one spot. Whatever method you use, always start throwing to the farthest point and work your way back. An experienced installer can throw color hardener 20-25 ft., but in the beginning, plan your pours out strategically so you don’t have to throw more than 12-15 ft. Throwing enough color on the first pass is also crucial, as initial coverage can be deceiving; even though it seems to cover the all the gray, once you float it in, additional color will still be needed. The best results are achieved with a two-pass approach, using 70% of the color on the first pass and the remaining 30% on the second.
Once it’s on the surface, the color hardener needs some time to absorb moisture from the concrete. When you first throw the hardener, it looks dry, and the color will seem lighter than expected. Trying to work it in at this point simply won’t work. Once the color has darkened and it looks wet, you can go ahead and work it in. The exact amount of time this takes can vary, but 5-10 minutes is a good average. In cooler weather, it’s a good idea to let it sit even longer so you don’t end up working it in too deep and lose some of the color.
Just like anything in decorative concrete, things seem to change from day to day based on sun, wind, temperature, and the concrete itself. Sometimes, there’s plenty of moisture in concrete, but other days, you need to add something extra to help work in the hardener. The use of a finishing aid will help with this problem. When used correctly, it will not only give you some extra moisture when you need it, but it’ll also help reduce surface crusting.
If color hardener is something you’re considering, take it slow. Maybe attend a training class on color hardener. Maybe you have a little 300-400sq/ft foot job coming up that you can try it on. You can still run integral color just like you normally would. Use a color hardener that’s close to the integral color; that way, you won’t have to worry about completely coloring the slab. If you only get one pass of hardener thrown and it’s time to start finishing, it’s no big deal. The point is that you’ll get experience throwing and floating in the hardener but won’t have to stress about coloring 100% of the slab. After that, start working your way up in size, and eventually, just leave out the integral color altogether.
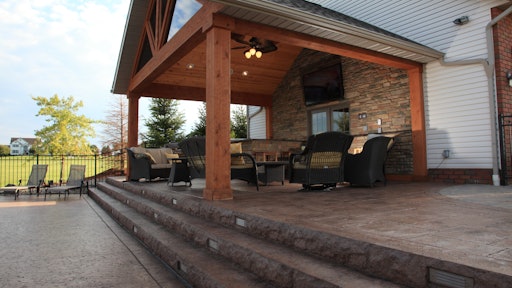
All in all, color hardener creates the most high-end and longest-lasting stamped concrete. It’s hard work and messy, and you’ll have to haul a bunch of heavy buckets to the job. It’s not for everyone, but for those who are willing to deal with the challenges, color hardener will open up a new level of quality and beauty for their stamped concrete projects.
Jeff Hershberger is the training and store expansion lead for Deco-Crete Supply. Please feel free to contact us if you need any advice on color hardener or anything else related to stamped concrete. We also have numerous how-to videos about color hardener on our YouTube channel.