Many choices exist in today's market for materials to repair concrete. Manufacturers produce a variety of materials: cement-based, acrylic-modified, epoxies and other chemicals, all of which can be confusing.
The first step in choosing a repair mortar is to determine the structural soundness of the parent concrete. For a long-term fix of concrete that is weak, unsound or severely cracked, it may be more cost-effective to replace rather than repair. If you are going to go ahead with the repair, you need to determine the cause of concrete distress and the concrete's ongoing use.
If the strength and integrity of the parent concrete has not been compromised, a repair mortar and application method can easily be selected for the repair. When a visual assessment shows severe distress such as extensive cracking in structural elements or any distress that may affect the integrity of the structure and beyond your expertise, it is best to enlist the aid of experts. A professional consultant or engineering firm may be required for extensive evaluation involving testing.
Before involving more expertise, consider a few more questions. Does the service environment contribute to the problem? Is the area interior or exterior? Will freezing and thawing occur? What type of traffic loads is the parent concrete subjected to? Is the area subject to extreme heat or cold, such as near or in furnaces or freezers? Will the material be in contact with chemicals, such as deicing salts? Is the repair time sensitive? Is the area to be in use during the repair? Are there specific times for the repair to be conducted? These questions and others will aid in the selection of a repair mortar.
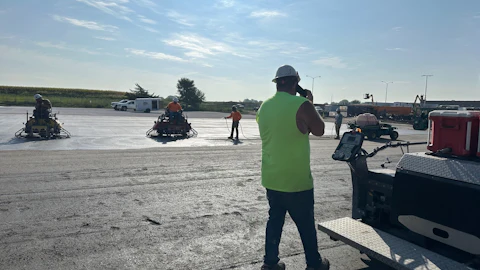
Substrate preparation is critical to the success of repair. During the site condition survey, the methods and equipment required to properly prepare the area should be determined. Factors to consider in the selection process include the type of repair required, i.e., cracks, partial depth or full depth; size of the repair; condition of the concrete; and type and amount of contaminates on the concrete. In addition, the methods and equipment should be chosen to conform to any environmental requirements or time-sensitive issues on the jobsite. Can water, chemicals or dusty abrasives be used? Note more than one type of preparation and/or cleaning method may be required to suitably prepare the concrete for repair.
Selection of The Repair Mortar
The workability of the product is an important consideration. Repair mortars are formulated to be trowel applied, pourable, pumpable, spray applied, flowable or self-leveling.
Flowable mortars work well in fairly flat horizontal applications. Spray applied mortars are best suited for large volume applications involving vertical and overhead placements. Trowel or hand-packed applied mortars can be formulated for vertical, horizontal or overhead applications. Normally vertical and overhead trowel applied mortars are formulated to hang well during placement. Trowel applied horizontal repair mortars normally will contain slightly larger sands to provide for better abrasion resistance. Form and pour mortars are normally designed to include aggregate for more volume repairs. These are also pumpable for faster placement.
The set time and speed of strength development is also an important factor. How soon will the area be required to be reopened to traffic? A bridge deck repair on a busy roadway would require a mortar with rapid setting, high early strength development, while a repair to a residential sidewalk in most cases would not.
Other important considerations for the physical properties of the repair mortar include freeze/thaw resistance for areas subjected to repeated freezing and thawing and coefficient of thermal expansion, for repairs subject to changes in temperature. Material should be similar to that of the concrete being repaired.
In structural situations, modulus of elasticity, or stiffness of the material, affects the load transfer. Stiffer materials deform less under a given load than lower modulus materials. Structural repairs require that the modulus of elasticity be similar to that of the concrete substrate, while nonstructural repairs can utilize a lower modulus. Low shrinkage compensation is desirable in the material to reduce cracking after placement, especially in large volume repair applications. Bond strength, permeability, water vapor transmission, sulfate resistance, abrasion resistance, tensile and flexural strengths may also be factors when choosing a repair mortar.
Surface Preparation
Often, even more than the repair mortar selected, proper surface preparation may be the single key factor to the success of the repair installation. All unsound concrete must be removed.
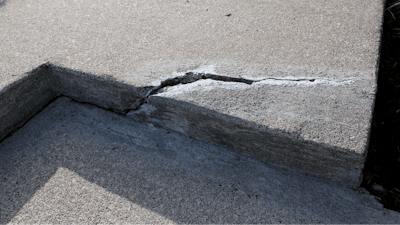
When preparing an area, simple configurations are best, preferably with square cut corners for load transfer. Avoid inside corners. Uniform depth of the area to be repaired is also desirable. Avoid feather edging, especially on any surface that will have traffic.
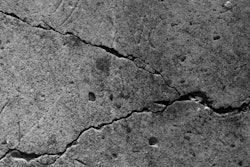
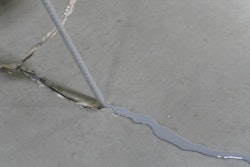
Cracks in concrete generally exhibit movement. Filling a dynamic or moving crack with a rigid repair mortar will only result in the area recracking. The movement must be stopped or relieved through a control joint to manage the cracking. Cracks can be welded together with an epoxy; however, failure to stop the movement or install control joints will also result in cracks reappearing.
Installation
Most concrete repair materials require the substrate to be SSD (Surface Saturated Dry). Prior to installing a cement-based repair mortar, the substrate should be saturated with water. However, puddling or standing water must be removed to keep the material-water-cement ratio intact.
Another key is the placement of a bond coat. To the saturated area, just prior to final placement, place a small amount of the mixed mortar onto the area and scrub it well with a stiff brush into the area. Do not add extra water or liquid to this scrub coat, as that will increase the water-to-cement ratio, creating a weak bond line at the repair.
While the scrub coat is still with moisture, install the repair mortar. Consult the product's data sheet for proper mixing instructions and depth of installation requirements, as well as any special application instructions, finishing techniques or curing procedures.
About the author
David L. DeBruler ([email protected]) is technical service manager for Dayton Superior Corp., Chemical Division, and J.V. "Van" Crary ([email protected]) is marketing manager for Dayton's Restoration and Decorative Coating Programs.