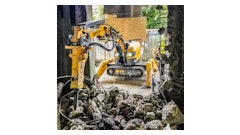
By their very nature, hydraulic breaker attachments are subject to an abusive operating environment where vibration, heat and dust can quickly turn your investment into a pile of scrap metal. Despite their outward appearance, hydraulic breakers are actually precision instruments with a strike piston moving up and down in a cylinder separated with close-tolerance, mirror-finished surfaces. Any kind of contamination is the enemy; therefore, proper maintenance is key to survival.
Hammers are often used in conjunction with other attachments, such as buckets. This can create several issues if not handled properly. First, make sure the hoses are properly capped to prevent hydraulic oil contamination. Second, if you share the attachment between carriers, check the flows and pressures.
Over-speeding a hammer is a sure way to shorten life expectancy. Don’t just mount the closest available hammer to the available carrier.
“Correctly sizing a breaker to match its carrier’s weight is one way to increase a hydraulic breaker’s lifespan,” says Kevin Loomis, business line manager, construction tools, Atlas Copco. “Using hydraulic breakers that are too small can damage mounting adapters and internal components because the larger carrier applies too much force on the breaker. Selecting the right hydraulic breaker from the start will save owners time and extra maintenance costs.”
Also monitor the condition of the work tools. “Use sharp demolition tools as they are far more productive and will reduce stress on the breaker,” says Greg Smith, marketing communications manager, Allied Construction Products LLC.
Use the Right Grease
The right grease in the correct amount is vital to maximize breaker life. There is no single grease that works best on all makes and models.
“The best grease varies between breakers and manufacturers, so operators should consult their owner’s manuals or the manufacturer,” says Loomis. “Some manufacturers suggest using molybdenum-based, or moly-based, grease that withstands working temperatures greater than
500° F.”
A recent development in lubrication technology is chisel paste. “Chisel paste is a lubricant specifically designed for the tool steel on a hydraulic breaker, and some manufacturers offer different varieties,” says Loomis. “Atlas Copco offers moly-based chisel paste that contains small particles of copper and graphite. The particles roll up like ball bearings between the tool steel and working bushing to prevent the metal-on-metal contact that can cause bushings and working steel to wear prematurely. Chisel paste is also more viscous than standard lubricants. The thicker properties of the paste allow it to remain between the tool steel and bushings and provide better lubrication for longer periods.’
Allied Construction Products also recommends lubricant with graphite and copper solids since that will provide the highest quality demolition tool lubricant. “A key characteristic is the ability of the grease to withstand high heat and pressure generated by the demolition tool,” says Smith. “This quality will extend the service period between tool and tool bushing replacement. For underwater applications, a special biodegradable chisel paste should be used that does not include solids.”
Standard grease is often not up to the task. “Standard grease may offer adequate high-temperature resistance and lubricating properties, but because of its low viscosity, it doesn’t always stay between the tool steel and bushing,” says Loomis. “Grease with inferior high-temperature resistance loses its thickness as the tool steel heats up from regular operation and vibrates out of the breaker, which wears the tool steel and bushing. It is not uncommon for contractors to choose the wrong grease.”
“Typically, you will see a lot of the red bearing grease,” says Greg Clinton, service manager for the Northern United States, Montabert. “Although the temperature range is usually acceptable, the grease breaks down relatively easily with friction. When that happens, it loses its ability to lubricate the bushing. Yes, it does a great job flowing down the tool and washing away any debris that may be trapped between the tool and the bushings. However, it does not do a good job lubricating the bushings. That is where the moly comes in. Moly will typically separate from the grease and remain bonded to the bushing material.”
Montabert equips most of its breakers with an autolube system, which impacts the correct grease choice. “We do not recommend chisel paste,” says Clinton. “It is too thick for the lube stations to pump. We would recommend a NLGI grade 2 grease with a soap-type lithium base with no less than 3% moly.”
Allied Construction Products also equips many of its breakers with an
autolube system. “At two-hour intervals, an operator should check that the grease cartridge is not empty and replace, if necessary,” says Smith. “Do not remove the grease cartridge unnecessarily. Always keep the grease cartridge in the greasing device to prevent dirt from entering. And every two hours, the operator should ensure the tool has received sufficient grease.”
Ensure Proper Amounts and Greasing Technique
The right amount of grease is just as important as the type of grease. “Breakers should have adequate amounts of grease to keep the tool bushing area filled and reduce friction,” says Loomis. “Too little grease causes the bushings to overheat, seize and damage the hydraulic breaker’s tools. Shiny marks on the tool are a good indication if the breaker isn’t properly lubricated. Just as the type of grease differs from model to model and manufacturer to manufacturer, so does the ideal amount, so it’s best to follow what the manufacturer suggests for each specific unit.”
“The actual amount of grease needed for proper lubrication varies according to hammer size, wear rate of the tool shank and bushing, condition of the tool seal, operator’s work techniques and grease quality,” says Smith. “Unless you have an automatic lubrication system, you need to grease, grease and grease more. You have steel against steel and a lot of heat, so you need a good lubricant (chisel paste) and a lot of it.”
Autolube systems can greatly enhance hydraulic breaker life by continuously ensuring an adequate flow of grease to the tool. Montabert has even developed an autolube system that shuts the hammer down when it runs out of grease. “We have had very good luck when our customers employ that system,” says Clinton.
When adding grease manually, it’s important to see it exiting the bottom of the breaker. “This accomplishes two objectives: It ensures the void between the bushings and the tool steel is filled, and old grease gets displaced with new grease,” says Loomis.
Greasing intervals vary between hydraulic breaker manufacturers. “When a breaker requires manual greasing, our rule of thumb is to add grease every two hours,” says Loomis.
“If you are working in a dry, dusty environment, you are going to want to use more grease,” Clinton advises. “You want to see grease flow down the tool — not running like water or oil, but just nicely flowing down and carrying away all of the dirt and debris. If you have too little grease, that creates a lapping compound once you mix the dirt and dust with it.” That wears out bushings.
Wet and underwater applications also require more grease. “You are going to grease more often because it is going to wash away,” says Clinton.
While much less prevalent, over-greasing can also cause issues in addition to wasting money. “If you have a buildup of grease trapped between the strike face of the piston and the tool top, you risk causing a fracture to the piston strike face or tool top strike face,” says Clinton. “The grease has nowhere to go. You are literally pounding it into the pores of the material. It also reduces your shock wave. It is like hitting on a sponge or a rubber mat. It is going to deteriorate your ability to break the material you want to break.”
Proper technique ensures grease flows to the correct areas. “If you are doing manual greasing, you want the hammer in a vertical configuration with downpressure on the tool bit forcing the tool bit up against the strike piston,” says Clinton.
“This ensures grease only goes around the tool and exits the bottom of the breaker," adds Loomis. “This procedure also prevents lubricant from entering the percussion chamber, where the piston hits the top of the tool. Lubricant entering the percussion chamber can be forced up into the breaker, damaging internal components by pushing out seals and injecting lubricant where it shouldn’t be going.”
Inspections Prevent Catastrophic Failures
Daily inspections can prevent expensive failures. “Inspect hydraulic breakers daily to check for any worn or damaged parts or hydraulic leaks,” Loomis advises. “Also inspect the hydraulic breaker’s tool steel retaining pins for excessive wear and for any loose or damaged fasteners. While a damaged fastener might seem like a minor issue, it could cause protective casings to come apart and expose crucial components to incoming debris or create dangerous conditions.”
Different makes and models have different inspection criteria, but industry wide, weekly inspection of the tool and bushings is recommended. “We recommend once a week that you remove the tool, either at the start of the week or at the end of the week, so you have a chance to order a part or tool,” says Clinton. “You are not going to compromise your production. Grind off any burrs or sharp edges and ensure that your top angle is still correct.”
Inspect the tool for cracks, remove any sharp edges and make sure there are no signs of blank firing. Inspect tool retainers. Make sure they are still serviceable. Check for bushing wear. Make sure there are no cracks on the strike face of the piston. Typically, this inspection takes between
15 minutes and a half an hour.
Use tools provided by the manufacturer. “Most of our hammers have go/no-go gauges for bushing and tool retainer wear,” says Clinton. If the bushings are worn beyond the maximum limits, the tool can move back and forth and create misalignment to the strike piston. “All of the impact force from the piston is now hitting a concentrated location on the tool top rather than hitting it square on the strike face. All of that energy concentrated in a single location will increase the likelihood of failure.”
Bushing replacement intervals vary between manufacturers, applications and models. “Keep in mind that bushings can wear out faster than normal if operators are using non-OEM components or do not have an adequately sized breaker for the application,” says Loomis.
Allied Construction Products offers a simple guideline for replacing bushings. “Tool bushings should be replaced when the first two grease grooves are visibly worn out,” says Smith. A qualified or trained technician should also do a thorough inspection every 13 months, depending upon usage.
“The rule of thumb, between the 11th and 13th month, we recommend that the hammer be inspected by a qualified or trained technician,” says Clinton. “If you are getting 30 or 40 hours a week of operation, you might be looking at the 9th to 11th month that you have to tear it down and inspect it.”
If you run a breaker three to five hours a week, you may extend the service interval out to 13 to 15 months, although it is not advised to go more than 18 months before opening it up and at least resealing it.
“Typically, at that time, you are going to have some wear items that need to be replaced. If you are doing the right job lubricating, you are probably due for at least a lower bushing change,” says Clinton. “You are going to change two lower bushings to every upper one.”
“For long-term maintenance schedules, it’s good to start with the owner’s manual to find the manufacturer’s suggestions and incorporate those guidelines into your application’s schedule,” says Loomis.
Proper Storage Prevents Corrosion
Failing to properly store the breaker when it is not mounted to a carrier can lead to extensive damage. The piston and its cylinder are mirrored, precision surfaces that can easily be damaged by corrosion. For this reason, the breaker should always be stored with the bracket cap end elevated to allow moisture to drain out from the front guide area. For long-term storage, you should take several precautions.
“If the hammer is not stored with the bushing housing sloping down, we will see moisture ingression into the front guide area,” says Clinton. “Once corrosion gets on the strike piston, it will tear up lip seals.” This results in an oil leak. “By that time, the piston is usually scored pretty badly, where it is not repairable.”
“We strongly recommend that you pull the working tool,” says Clinton. “Push the strike piston up into the cylinder as far as it will travel. Coat the area as much as you can with grease. Coat the tool really heavily with grease. Re-insert the tool back into the hammer. Put a layer of grease right around the tool. Elevate the opposite end of the hammer at 25° or 30° so you have no chance of moisture flowing up the tool and simply put a tarp over it."
For a gas-fired hammer, you will want to deplete the nitrogen chambers; this will prolong seal life. “The strike pistons relax without compromising the seals,” Clinton explains. Once it's time to put the breaker back into use, you may want to pull the tool to ensure there was no moisture. “You also want to make sure you don’t have a buildup of grease between the strike faces.”