We need to consider all cracks for sealing: those new cracks that just appeared as well as cracks that were previously sealed and are now distressed and no longer provide an effective seal. Knowing how to reseal a previously sealed crack once it begins deteriorating should be just another maintenance tool in your tool box.
According to the FHWA, the most important way to assure a successful crack repair is to prepare the crack properly. This is true when repairing untreated cracks and especially true when repairing a crack that has previously been crack sealed or crack filled.
Cracks that have previously been filled or sealed but need repair will undoubtedly have old crack repair material in them. It will have pulled free of the crack walls and might be brittle, but it’s still likely to flex. These cracks need to be cleaned and dried as much as possible to attain the best conditions possible for new material to be placed. Cleaning the crack channel is perhaps the most important aspect of crack sealing and crack filling operations because a high percentage of treatment failures are adhesion failures that result from dirty or moist crack channels.
5 Tips to Fixing Previously Sealed Cracks
The best way to assure that cracks will not have to be resealed is to rout them prior to sealing. Routed-and-sealed cracks have proven in long-term studies to provide over twice the service life vs. non-routed and sealed cracks. A crack that has been appropriately routed, cleaned and sealed using a high-quality sealant has proven to achieve a service life in AC pavement over seven years.
Routing is important for two specific reasons: (1) routing cleans the crack and creates uniform and fresh edges to allow the sealant to adhere better with the pavement, and (2) a designed routed reservoir filled with crack sealant has the amount of sealant to expand and contract with the seasonal movement of the pavement and the sealant is at the right depth below the surface of the pavement to protect it from traffic and snowplow contact, if applicable.
When you find pavement that has non-performing crack sealant, it is better to treat the deteriorated crack rather than leave it untreated where it is infiltrated by water, impurities (chlorides, deicing chemicals, fuels), debris and sunlight that continue to deteriorate the pavement. So when you see those adhesive, cohesive, or other types of distresses on the pavement sealant, it is better to provide some treatment repair than leaving them unrepaired.
Here are five ways to make sure you get the best second-seal possible:
- Remove as much of the old sealant as possible without causing further damage to the pavement, and then add new sealant. New sealant applied over old, dirty sealant can pull right off wasting time, money and resources. If you choose NOT to remove the old sealant, you must know that placing new sealant over old sealant will not last as long as if you had placed all new sealant. When placing new sealant on old sealant, if the old sealant is brittle you must remove it, preferably when temperatures are cooler to make the job easier. If the old sealant is soft and you choose to leave it in the crack, use a hot air lance to warm and turn the old sealant surface shiny black to help the new sealant better adhere to the old sealant.
- Sealed or filled cracks that have deteriorated still require removal of debris and moisture prior to resealing. Use a high-powered air compressor to blow debris from the crack.
- Use a heat lance to rid the crack and old crack sealant from moisture and to begin to melt the old sealant in the crack. Generally when resealing, the new crack sealant will not reheat the old crack sealant to create a good bond. It is important to use a hot air lance to melt the old sealant immediately before adding new sealant to achieve a good bond. The new crack sealing should take place immediately after the old sealant is heated.
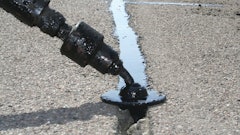
- When placing new hot-applied crack sealant, it is important to fill the crack from the bottom to the top of the crack to ensure a complete seal. Remember, sealants are limited to cracks that are smaller than 1.5 inches wide. For full-depth cracks and cracks wider than that, you will want to contact your crack sealing expert to partner with you to determine the alternate treatments that provide better solutions for that particular situation, such as a mastic sealant.
- Overband the sealant using an appropriate sealing disk when applying sealant, or make a final pass using a U- or V-shaped squeegee. This band needs to extend approximately 1 inch (25 mm) on both sides of the crack and it should be flush with the pavement surface. The overband should be approximately 1/16 to 1/8 inch (1.6-3 mm) thick. Do not leave an excessive band on the top of the pavement.