It’s a well-known fact that joints are some of the first places that an asphalt pavement will start to fail. That’s because joints in asphalt allow for water intrusion which can lead to pavement cracking and potholes. For this reason, paving contractors work hard to ensure the creation of joints in the mat is kept to a minimum.
However, when asphalt paving is interrupted, commonly at the start and finish of a day’s work, a transverse joint is formed. While these types of joints can be unavoidable at some points of your project, there are things that can be done to create fewer of this type of joint and make the ones that are necessary less troublesome for the life of the roadway.
Two Types of Transverse Joints
Transverse joints fall in to two categories, terminal and construction. Terminal joints are those that form at the beginning or end of the project and construction joints happen when contractors experience a breakdown, weather delay or when the mat cools down enough between loads where contractors will need to pick up, cut, step back and start paving again.
Transverse Joints Can Form:
- At the beginning of a project
- At the end of the project
- At the tie in of an intersection
- At the tie in of a structure
- At the end of the shift (i.e. night joints)
- Breakdowns
- Weather delays/cancellation
While terminal joints are a normal part of building roads, construction joints can be properly planned for in order to minimize their creation.
Construction of Transverse Joints
To help minimize the appearance of a terminal joint, it’s important to follow some best practices for paving transverse joints. Having a good starting point is paramount to the success of that transverse joint and this means having a straight, flat, vertical face that is intact with no waves.
When setting down on the joint, be sure to set the paving width and that the screed is set to match the existing profile. The tow point should be adjusted to match the screed pivot point so the screed comes off the joint parallel to the line of paving.
Remove all tension of the screed so that the screed is in free float and fully supported by the starting reference, then introduce your angle of attack based on manufacturer guidelines. The screed should also be hot before starting to pave.
It’s suggested that you start with your auger height 2-in. above the mat, however that height can be adjusted up or down depending on the mix type. Next, fill the auger chamber manually so that you can see the top of the auger, but the mix is filling the chamber up halfway. Do not force the material out to the endgates, but instead manually move the material out to the endgates to fill the material in. From there, adjust your flow gates, conveyor speed and auger speed to maintain that head of material at all times.
When pulling off from the joint you want to quickly achieve and then maintain a consistent paving speed. Always visually inspect the mat behind you to be sure there are no lines or undesirable textures coming out of the paver, which could be due to segregation. Screed vibes should also be turned on during this time.
Some contractors may opt to use a 10-ft. straight edge when taking off from the transverse joint to check their work and provide the crew with reassurance that everything is as was expected pulling off the joint.
Always try to minimize handwork at the transverse joint as well. You may need to remove excess material at the joint but you don’t want to break any material here which could create independent segregation. If everything was set up correctly, you should not have high or low areas that require additional handwork. If, however, adjustment of the surface level is required, it must be done promptly and before rolling begins.
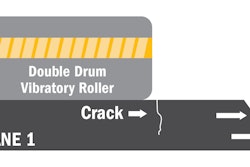
When compacting the joint, there are two approaches that work well. One rolling pattern involved approaching the joint at an angle and move up towards the edge of the mat to keep joints out of wheel paths as much as possible (figure 1). Continue rolling until the joint is smooth.
The other approach is to cross roll and pinch the joint which is not always an option on all projects. This pattern involves putting the drum mostly on the cold side during the first pass, then checking for smoothness and repeating with the drum further on the hot side during the second pass (figure 2).
No matter what method you choose, once these patterns are completed, the crew can continue rolling the mat as usual.
End of Day Best Practices
Before you’re ready to end the job for the day, a night joint needs to be made. It is important that the paver be run in normal fashion right up to the point at which the transverse joint is constructed. This means the head of material in front of the screed should remain as consistent as possible up to and at the location of the joint, so that the forces acting on the screed will be constant, and a consistent angle of attack will be maintained for the screed. The result will be a uniform mat thickness at the joint—the same thickness as that of the previously placed mix.
The Federal Highway Administration (FHWA) notes that it is a common, but incorrect practice, to empty out the paver hopper when a transverse joint is to be built. When this is done, the paver operator runs the hopper out of mix and the transverse joint is constructed at the point where the empty paver has stopped. As the hopper is emptied, however, the amount of mix carried on the augers is reduced until it is minimal. This process reduces the head of material in front of the paver screed, causing the screed angle to fall. The thickness of the mat then gradually decreases as the joint location is approached. The transverse joint is thus built at a low point in the new pavement surface, resulting in a dip that will be felt by traffic.
The FHWA says it is a much better practice to locate the transverse joint at a point where the head of material in front of the screed is normal. This type of operation, however, requires more work on the part of the paving crew. If the joint is made where the head of material is constant, the paver screed is simply raised up at the point where the joint is to be built. Doing so however leaves a great deal of mix on the roadway.
When finishing a day’s work then, the leftover asphalt is removed and then usually ramped down, if only for construction traffic or to allow rollers to come right to the end of the run. Before paving is continued the next day, this ramp must be removed by cutting the asphalt back to a point where the layer is full depth and even. If there is any doubt as to the extent of asphalt to be removed, a straight edge should be used to determine where the level drops off, and whether any bump has been created by rollers reversing before the end of the run.