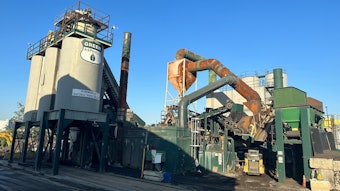
Glover’s SSI Bumper-mounted High-speed Inertial ProfilerProvided by Jas. W. Glover, Ltd.
Background
Modern pavement smoothness is a measure of the level of comfort the traveling public feels when driving on a road. Imagine having a stressful day at work and compare that to a relaxing day at the spa. What a World of difference, right! Driving on rough versus smooth roads can feel similar. So, how smooth is smooth? Just like how two reasonable people can differ on whether there is enough cheese on a slice of pizza, road smoothness can also be open to interpretation between people. However, the Federal Highway Administration (FHWA) recognizes qualitative and unambiguous indices to measure smoothness. The commonly used index is known as the International Roughness Index (IRI).
From the FHWA’s perspective, existing roads with and IRI exceeding 170 in/mi are considered “poor” and roads with an IRI less than 95 in/mi are considered “good”. The smoothness compliance thresholds for projects under construction vary by state and project scope. Generally, specifications in the USA have a 0.1-mile IRI requirement somewhere between 50 to 75 in/mile for mainline highways. The smoother a road is paved during construction, the longer it will be in service until the IRI exceeds the design trigger for rehabilitation.
IRI is measured within the left and right wheelpath using specialized equipment called inertial profilers to monitor road smoothness. Such equipment can be vehicle-mounted so data can be collected at traveling speeds without the need for road closures. The average IRI of both wheelpaths is known as the Mean Roughness Index (MRI), which is typically used to pay contractors for the smooth quality of roads they can construct.
Project
Pahoa-Kalapana Road is a two-lane traffic corridor that connects the small towns of Pahoa and Kalapana, which are nestled in the Puna district located on the eastern coast of the Big Island of Hawaii. The road burrows through lush green vegetation on either side providing access to either clusters of homes or sparsely located residential neighborhoods.
 Project locationProvided by Jas. W. Glover, Ltd.
Project Location
The Hawaii Department of Transportation (HDOT) oversaw the construction of this project. The scope of work included (1) placing a variable thickness of HDOT’s Hot Mix Asphalt Base Course (HMABC) over the existing road to fill low areas of the pavement and (2) placing a 2-inch thick surface course (State Mix IV) over HMABC. The finished pavement had to meet an MRI of 60 in/mi or less to meet the smoothness specification criterion for acceptance.
Contractor’s Experience
Glover used their portable bumper-mounted high-speed inertial profiler from Surface Systems and Instruments, Inc (SSI). for all smoothness measurements. Although the project specification required smoothness measurement on the finished pavement for acceptance, smoothness profile data was collected on the existing pavement and after every phase of the project. The goal was to track the difference in smoothness between activities to provide the paving crew the baseline data before they advanced to the next activity. Data analysis was performed using the ProVAL (Profile Viewer and Analyzer) software.
Glover’s SSI Bumper-mounted High-speed Inertial Profiler
Data collection and analysis can be divided into 3 phases: (1) Existing, (2) Intermediate, and (3) Final pavement.
Existing: The smoothness data collected on the existing road surface showed an MRI of more than 220 in/mi on Northbound and Southbound lanes. According to FHWA’s definition, both lanes were in “poor” condition. Analysis showed that the lane roughness between each wheelpath was very consistent, i.e., the left and right wheelpaths had similar spikes in the same locations. This translated into the existing roughness being caused by undulations in the road profile and not high frequency distresses like cracking and potholes.
Intermediate: Because the existing road was in “poor” condition, and the finished pavement had a higher elevation compared to the existing road, the overall pavement thickness had to be increased while filling some large dips in random areas of the road. So, a variable thickness HMABC – ranging from almost 0” thick to 12” thick – was paved over the existing surface. This increased the roughness on both lanes to an MRI of over 230 in/mi.
Based on the layer roughness on the intermediate surface, the team understood it was practically impossible to reduce the MRI of the finished pavement from 230 in/mi to under 60 in/mi. So, the project engineering team had to innovate a solution. The plan involved a two-pronged strategy:
- Pave a variable depth leveling course over HMABC slightly higher than the finished elevation across the length and width of the pavement, and
- Collect survey elevation data on the leveling course to develop a final pavement elevation 3D model using AutoCAD Civil 3D. This model would be referenced with a machine control system to accurately perform variable depth milling.
The idea behind placing the leveling course slightly higher than the finished elevation would be to variable mill that leveling course based on a 3D model to provide a uniform surface to pave a consistent 2-inch thick final lift.
Final: Paving was done one-lane at a time. With good coordination among the asphalt production personnel, quality control department, and the paving crew, sufficient good quality material was delivered to the project site as planned. The 2-inch final lift was placed upon the milled surface following all the recommended best practices. Strict quality control measures were practiced ensuring the rolling operation produced the minimum required density of the pavement, while being conscious about the effect of uneven rolling on pavement smoothness.
The smoothness data on the finished pavement showed an MRI of 48 in/mi and 46 in/mi in the Northbound and Southbound lanes, respectively. Starting the project with an existing MRI of over 220 in/mi, the project saw an overall percentage improvement of about 78%. The table below shows the individual smoothness measurements for Northbound and Southbound lanes after every activity and the percent change between activities.

Conclusion
The foresight to collect pavement smoothness data after every activity on the pavement and make data-driven decisions proved to be valuable in devising plans that not only resulted in meeting the minimum smoothness requirement of 60 in/mile but outperforming the pavement smoothness specification when it may not have been possible without these additional steps.