Everyone talks about how important it is to keep equipment in excellent shape -- how it saves money and increases operating time on the jobsite. Today's economic realities now demand using every trick of the trade in order to make equipment last longer, while squeezing every excess expense -- including constantly purchasing new tools -- out of the balance sheet.
Take breakers as an example. In the experience of Jerry R. Fifer, Technical Support Manager Southeast for Tramac, the most common maintenance gaffes that cost companies both in tool wear and big money for replacements come down to four basics:
1) All grease is the same, right?
The Fault: Breaker tools or points become extremely hot (as high as 400 degrees Fahrenheit or more) when in use. At those temperatures, standard lube will liquefy and run off the tool or actually burn up entirely. You're left with a shorter life span for your tools' bushings and broken tools.
The Fix: Breaker grease should be, at minimum, #2 lithium-based grease containing 3% molybdenum. (The molybdenum helps the grease stick to the tool.) It should be rated to work at temperatures of at least 500 degrees Fahrenheit or more.
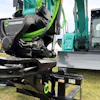
2) Where do I grease it?
The Fault: You may have the best grease, but failing to put enough on and applying it in the wrong way can be just as bad as using low-quality product.
The Fix: Start with a quick examination. When the breaker is raised vertically off the ground, the tool will drop down and expose the portion that is in contact with the lower tool bushing. The condition of this exposed portion is indicative of the condition of the upper, unexposed sections. The exposed portion should be thoroughly covered with grease.
Use an automatic greaser (lubrication system), if available, and set it to apply grease only when the breaker is operating. If the automatic greaser runs while the breaker tool has dropped down, grease will be deposited on the top of the tool. The next time you use the breaker, the grease (now trapped between the top of the breaker tool and the bottom of the strike piston) will be forced through the lower piston seals and damage them.
If applying lubricant manually, the tool must be pushed upward into the breaker before greasing. Simply lower the breaker vertically and press the tool against the ground.
The bottom line: using the proper amount of high-quality grease and putting it on in the right way greatly reduces the friction wear on the tool and tool bushings.
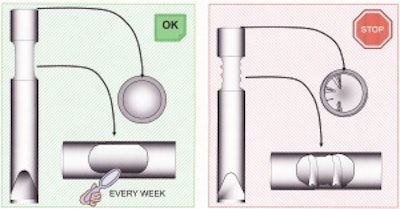
3) When is it time to inspect?
The Fault: Tool tops not checked regularly lead to more damage overall.
The Fix: The top of the tool takes a tremendous beating from the strike piston. Eventually, the tool top's surface will mushroom just like the top of a mechanic's cold chisel or punch. It is important that the mushrooming areas be filed off before they become so large that they break off. Broken pieces of the tool can get trapped between the tool and the strike piston, resulting in piston damage.
Also be sure to check for damage on the areas of the tool that strike the tool retainers. Any mushrooming or other faults must be filed off at regularly.
Different types of breaker applications will result in more or less tool damage. Inspect and service the tool once a week until experience teaches you how long your service intervals can be.
4) When do I replace the bushings?
The Fault: Wear limits on bushings are routinely misjudged, resulting in piston damage and shortened life span on other parts.
The Fix: All breaker tool bushings have a specified inner diameter wear limit. When this limit is reached, most bushings appear to have plenty of material left to wear off and are usually not replaced as recommended. But the key is to remember that the wear limit is not based on how much material is left, but on the possible angle of engagement between the tool and strike piston.
The lower bushing will be the first to wear out. If it is allowed to wear past the limit, the tool can be at such an angle to the piston that the piston only hits the tool on the edge of the strike surface. Continuing to operate the breaker in this way will damage the strike piston.
In addition, wear on the upper bushing is accelerated when the lower bushing is worn out. You can extend the life span of the upper bushing by replacing the lower bushing when the wear limit is reached.
So why risk down time, lost job opportunities and uncontrolled spending to replace worn equipment? Spend a little time and money on the simple fundamentals and the results can pay off for a long time to come.
DII Attachments is a business unit of Doosan Infracore International, a U.S.-based subsidiary of Doosan. DII Attachments (formerly known as Ingersoll Rand Attachments) was acquired by Doosan in late 2007. DII Attachments is comprised of two leading market brands: Tramac and Geith. The acquisition of DII has made Doosan one of the world's top ten manufacturers of construction and utility equipment and related attachments.