To aid owners of hydraulic breaker attachments, Doug Keller, Engineering Documentation Specialist at Allied Construction Products, LLC, has compiled the following tips* on proper operation and maintenance. While the tips are relatively generic in nature, it's important to consult the equipment operator's manual for specific recommendations for your particular model(s).
BREAKER CARE AND MAINTENANCE
1. Lubrication
The tool must be lubricated every 2 hours or if it appears dry. Use only Allied Chisel Paste.
To prevent serious damage to seals and other internal components, the breaker must be positioned vertically and down pressure applied to the tool until it contacts the impact ring.
Fill the bushing cavity until grease emerges from the bottom end of the tool holder.
2. Oil Leaks
Check hose connections for hydraulic oil leaks. If oil is seen dripping from the tool end of the breaker it must be stopped immediately until qualified personnel can determine the source. Continued operation may lead to internal damage.
3. Pre-Charge Gas Pressure
A combination of oil and nitrogen gas pressure is used to operate this breaker. The nitrogen gas pressure ("pre-charge") is located on top of the breaker, inside the cylinder cover.
Poor breaker performance may indicate the pre-charge gas pressure should be serviced.
Only qualified personnel should service the pre-charge gas.
4. Parking
During idle periods the breaker should be positioned horizontally with the top of the breaker slightly higher than the tool end.
Following this recommendation will prevent the entry of moisture through the tool holder, which may lead to internal damage.
5. Underwater Use
Under no circumstances can the breaker be used underwater unless it has been modified with an approved underwater kit.
BREAKER OPERATING INSTRUCTIONS
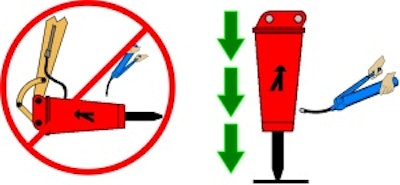
6. Down Pressure
Do NOT start the breaker until the tip of the tool is in contact with the material to be demolished.
Push down on the breaker until the front end of the carrier is lifted several inches off the ground.
The breaker can be operated in any position, but never operate the breaker with the tool suspended in the air.
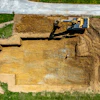
7. Initial Breaking Point/Advancement
Avoid starting too far from the material's edge. Break large objects from the outside edges and work inward.
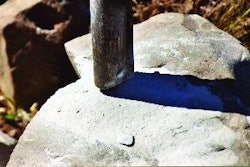
8. Proper Contact Angle
The tool of the breaker must always be kept at right angles (90°) to the work surface.
Accelerated bushing - tool wear and tool breakage can result when forces applied to the breaker are not kept in line with the tool. Rocking the breaker back and forth will expel any dust accumulating under the tip of the tool. Never exceed 5° in either direction. The tool is not designed for prying.
9. Tool Penetration
Do NOT bury the tool.
As the tool penetrates through the material, follow the breaker with down pressure from the carrier. Anticipate breaking through the material and stop the breaker immediately to prevent blank firing.
Listen for solid, fast blows. If blow frequency slows or becomes hollow sounding increase down pressure or correct the alignment of the tool.
10. Maximum Duty Cycle
Material should break within the first 30 seconds. If, after 30 seconds, the material has not broken, reposition the tool to locate the material's seams, fractures, joints, or faults. Excessive heat can be generated from operating the breaker longer than 30 seconds, in one spot, with little or no tool penetration.
* For more details refer to the "Safety Manual for Operating and Maintenance Personnel" developed by CIMA.