Getting striping to stick (and getting striping removed) is frustrating, but it can be done.
There are ways to do it easier, quicker and more reliably so the striping or striping removal gets done right. And I think contractors should be paid for providing the best-possible surface either before striping or when stripes are removed.
That’s what I told the contractors who attended my recent National Pavement Expo session, “Surface Preparation: ‘Best Practices’ to Improve Your Bottom Line.” I told them,
“I don’t think it’s fair that stripers are being held responsible for producing a quality stripe if they don’t have responsibility for the surface upon which their stripe is being applied. The responsibility for surface prep needs to be better defined in contracts. In fact, it should be a separate paid line item, and not considered incidental to the striping contract. Because, what is paid for and inspected will get done.”
Charge for Surface Preparation
Preparing the surface to accept new markings is a service – a service that extends marking life. Therefore, striping contractors need to start charging for the surface preparation work they are now giving away.
If the surfaces are not in “ready striping condition” prior to the start of work, the customer should expect a conditioning charge. For example, if the surface has already been prepared to the right conditions to immediately accept the striper’s paint, then no additional charges would be expected.
However, if the customer’s surface requires heavy sweeping, surface repairs and/or surface profiling to open the pore structure in order to accept the paint or other applied markings, then a normal surcharge of the striper’s prep time and materials should be added to the contract.
With surface-prep practices written correctly in the specs, everyone benefits – from manufacturers selling more materials, to design engineers getting their specified products to perform its entire engineered life, and road surface owners and the public getting a much safer, lasting product.
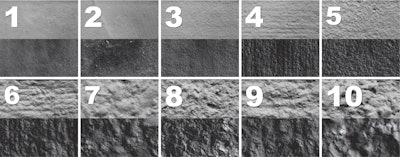
Evaluating the Surface Profile
Everyone should go into the contract knowing that before the stripe is installed, the surface should be sound, dry, clean and profiled within any of the selected surface profile textures called for on the surface profile chart (Exhibit 1). Having a porous (rather than a non-porous) surface will assure a mechanical substrate bond with the installed stripe.
As a member of the ICRI Institute and student of their concrete surface profile study(1), I was fascinated with their work on the Concrete Surface Preparation Profiles (CSPs) table. I wanted to see if their work on identifying properly prepared concrete surfaces can be applied to pavement striping and the growing frustration with subjective vs objective evaluations.
The source of everyone’s frustration, is lack of clear guidelines for specifications, installation and inspection on how to best determine if the pavement surface is adequately prepared to accept new markings and if the old markings they removed will meet MUTCD and inspector requirements as being unidentifiable with minimal pavement scarring. Having someone say, “I’m not accepting your work because I don’t like how it looks should not be acceptable”
ICRI identified 10 distinct profiles represented in molded replica pads using 10 distinct surface preparation methods on concrete derived from its members equipment from grinders to shotblasters, scarifiers, scabblers and breakers and their work is written in their Technical Guidelines No 310.2R-2013 (1) “Selecting and Specifying Concrete Surface Preparation for Sealers, Coatings, Polymers and Concrete Repair”.
I wanted to use the same 10 point scale for the pavement maintenance industry to best help all parties know before they bid, execute and during the inspection process if the surfaces are properly prepared using a visual aid. I began work creating each of the 10 profiles on both asphalt and concrete calling it SP (Surface Profiles) using inexpensive scarification and rotary erasing equipment commonly owned by stripers. I learned that most installers are unfamiliar with correctly using these machines and the proper selection of cutters and spacing patterns that can achieve each of the 10 profiles. The work is ongoing and will continue to improve methods until the SP scale is adopted for use in pavements by all parties to effectively communicate job and performance expectations.
The Surface Profile Chart(1)
The surface profile (SP) chart is used as a visual representation of desired surface textures, roughness, and general appearance on concrete or asphalt. Each profile has a corresponding number, ranging from SP1 (nearly flat) to SP10 (extremely rough). The surface profile is defined as the measurement of the average distance from the peaks of the surface to the valleys, as seen through a cross-section of the prepared substrate.
The creation of a surface profile can be accomplished with a variety of tools, equipment and materials, and requires a specification to select the desired SP range, dependent upon the type of overlay system and material thickness to be installed. Having these SP numbers noted in the contract plans assures that all parties get what they expect, i.e., the stripe or repair materials to be installed, or to match the outlying surface area when the prior stripes are removed, without creating grooving or “ghost” lines.
The profile should only be prepared on a sound surface with selected equipment that will not cause the substrate to micro-crack, fracture or spall. Installing coatings or overlay materials over an unsound surface causes premature bonding failures.
Obtain the Correct Profile for Concrete or Asphalt Surfaces
When new markings are applied on a new surface or re-applied over existing markings in the same location, installers refer to the contract specifications but can also turn to the marking guide (Exhibit 2) and surface profile chart to help them achieve the desired surface profile range (SP#) for the selected marking material type and thickness.
For example, when installing 15 mil traffic paint on a new concrete surfaces, with an SP 0-1 (very smooth, non-porous) profile, the first step is to remove the curing compound with a scarifier outfitted on a cutter drum with either (Exhibit 3) Finish-it steel cutters or (Exhibit 4) Strip-it carbide cutters in an offset fine array. The scarifier should be pulled or pushed in the opposite direction of the cutter drum rotation by walking or driving at a consistent pace. Depending upon the overall flatness or hardness of the concrete surface, multiple passes are required to provide a unform profile finish. Test in several spots prior to starting the work to determine the correct working travel speeds, removal depths and number of passes. Record these details in a Job Log. It is important to always perform the work in one direction at the same pace leaving a consistent profile to match the profile chart. Working the equipment back and forth, ie: like a vacuum cleaner, will produce inconsistent finishes and not correctly open the surface pore structure to establish the best bonding strength.
On new asphalt surfaces with an SP 1 – 2 profile, the sealer must be completely cured prior to installing the new pavement marking. If applying 15-mil traffic paint for the parking lines, and 90-mil screeded thermoplastic for the transverse stopbars and arrow symbols in the same location, follow these steps prior to striping. (1) Removal any oils, grease, surface tire marks, grime, compacted dirt and flaking paints in the areas 2” wider than the applied markings with the correct scarifier cutter drum that will leave the recommended SP#. (2a) For preparing surfaces to hold thin paint coatings, a scarifier can be used outfitted with either a fine finish Cure-it wire brushes (Exhibit 5) or an alternate Finish-it steel star cutters (Exhibit 6). To achieve a fine finish , the cutters or wire brushes are positioned next to each other on the cutter drum without using spacers between each cutter assembled in an offset pattern on the cutter drum. Spacers are only used to set the removal width for the prepared surface, ie 6” width for a 4” wide stripe. (2b) For preparing surfaces to hold thicker thermoplastic markings, the same scarifier can be outfitted with Flail-it Carbide Cutters (Exhibit 7) assembled without spacers in an offset fine pattern on the drum, Use of these more aggressive cutters will produce the desired SP4 - 6 profile prior to the thermoplastic application.
(3) After selecting the correct cutter drum for the application, only allow the outside edges of the cutters to contact the surface at minimal working depths at right angles and pull or push the scarifier in the opposite direction of the drum rotation, ie: up-cut, at a consistent rate of speed that allows a consistent profile finish for traffic paint (SP 1-3) or thermoplastic (SP 4-6). (4) Rather than re-adjusting the cutting depth as you travel, make several passes to completely remove the existing materials and obtain the correct surface profile without surface scarring. It is important to note that when profiling on surfaces that may appear flat to the eye, most are undulating and require multiple passes to prevent deep surface scarring. The deeper you go into the surface, the profile you create will be increasingly dominant by the shape and size of the coarse aggregate. To prevent microcracking or destablizing the surface, shallower removal paths are recommended.
As a general rule, the surface profile coarseness depends solely on the thickness of the applied coating systems. Thin solvent and water-borne paints applied up to 15 mils as parking stalls should have a surface profile between SP1 and SP 3, depending upon the pavement surface characteristics. Thicker materials, such as hot-applied thermoplastics and hot-melt tapes installed as transverse markings up to 120 mils, perform best when an SP 4 – SP6 range is established prior to the stripe being applied.
If your job requires removing existing markings prior to sealcoating or changing traffic lane patterns, (Exhibit 12) it is important that the markings should be removed in a method that does not conflict with any new markings, does not cause sharp-edge grooving where water can collect nor create false ghost-lines that may re-appear in various ambient light conditions ie: dawn, dusk and night.
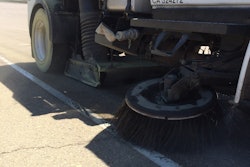
The use of a rotary eraser (Exhibit 9) is recommended over a drum-style scarifier because of its ability to provide the same surface finishes as a high pressure water-blaster without undermining the surface and without water. The rotary eraser works by controlling surface depths when selecting the right cutter and applying the oscillating side-to-side removal action similar to the way one uses a surface grinder to remove surface marks on a concrete floor or a hand buffer when polishing your car paint.
In 1983, Pave-Mark Corp., a manufacturer of thermoplastic materials and equipment published a study (Standard Practices for Removing Pavement Markings (2)) on the effects of rotary eradication by water and mechanical methods (erasing) to demonstrate how rotation of the jets or cutting edges with a planetary disc and precise oscillating removal action affects the removal of markings with minimal pavement scarring.
Why a porous surface holds coatings better than a non-porous surface:
Most pavement markings fail due to its inability to properly bond with the underlaying surface that may be too impermeable or too unstable to hold the marking in place. A dry-erase whiteboard is a good example of a non-porous surface where markings stay on top of the surface to be quickly wiped off on demand. Only when the whiteboard tough outer shell is scratched will the markings penetrate. A white paper pad, alternatively, is a good example of a porous surface that quickly absorbs markings for a permanent bond that is very difficult to remove.
If stripers install their markings on very smooth asphalt or concrete surfaces, especially in areas where there is heavy shearing of tires in stop-and-go traffic, turning lanes, or in traffic roundabouts, the bond strength of the coatings are put to a severe test. Coatings that were applied on very smooth surfaces that remain solely on top of the surface, like a whiteboard, allow the shearing of the tires to quickly break the coatings bond from the road. Adding a surface profile is the only way to support the applied coating system with a tough mechanical bond being formed allowing the applied material to wet int the prepared porous substrate.
Markings applied on unstable surfaces that are poorly bonded, peeling or flaking will fail. Dirt, oil, films, rubber, paint, coatings, cure, sealer, unsound asphalt or concrete and other materials that will interfere with the adhesion or penetration of any sealer, coating or marking material must be removed. They can be removed with a scarifier outfitted with an outfitted cutter drum assembly (Exhibit 13) that can also produce the desired SP1 – SP10 profile range suitable for the new marking material.
To prepare for the profile, the installer uses the profile photo chart as a visual guide to match the existing surface conditions, and then prepares the surface using the equipment selection and cutter selection guides to best determine the appropriate equipment and cutter tools to create the desired surface profile. If the operators are not familiar with achieving all 10 surface profiles with their equipment, they can participate in available training programs through associations and manufacturers.
Getting the surface preparation specs clearly defined beforehand, and separated from the striping portion of the contract is extremely important. It assures that the work will be properly completed and the installed stripe will perform for its entire engineered service life.
To get customers who have always considered the prep portion to be part of the job to now start paying will be challenging – but it is in everyone's best interests. Clear specs will benefit all parties – from the striper being better able to estimate job costs (since preparation will be defined), to the customer who will be more knowledgeable on the cause-and-effect relationship with surface conditions before striping, and the motorist who will benefit from having a safer and longer-lasting surface.
The Equipment You Need
Most of the surface preparation and traffic-line removal work can be accomplished using common equipment that stripers already own. For example Drum-style scarifiers (Exhibit 8) create the surface profile through its vertical cutting action, while rotary-style eradicators (aka erasers) (Exhibit 9) better cut-depth control with the same rotation as water-blasters.
The term “grinder” is not a correct terminology; in both processes, with the selection of the right cutter type and set-up pattern array on the drum with an up-cut removal (scarifier) or side-to side removal process (erasers), all traces of removed markings can be removed, leaving the surface approximating the contiguous surface, with the SP profile pads as a guide. It is important to note that any remaining surface shadowing on a non-grooved surface will normally fade and blend in with the surrounding oxidized surface over time.
A grinder is actually (Exhibit 10) a rotary process with abrading stones ie: diamond applied under the right frictional force against a hard surface to wear away the pastes, fines, coatings and aggregates at a uniform rate with minimal or no profile.
A scarifier (Exhibit 8) is a drum style removal process producing rough to smooth parallel striated patterns depending upon cutter selection and array for removal of hard surfaces, brittle or soft coatings requiring multiple passes when removal depths are greater than 1/8". The scarifier is best used when preparing the right surface profile or for groove-inlay patterns to recess stripes into and/or below the surface.
A rotary eraser (Exhibit 9) is a combination grinder (abrasion) and scarifier (impact) method using fine-to-coarse cutter tips leaving a bevel-edge coarse to smooth surface pattern without sharp-edge grooves dependent upon the exposure time and oscillating sweeping pattern performed. The eraser is best for removing old pavement markings that are not re-applied in the same location. A rotary eraser will not cause deep surface scars where water can accumulate or pond. Erasing leaves the remaining surface approximating the contiguous surface (SP 1 – SP 6 profile pattern) with only surface shadowing that fades over time.
Use of a Vacuum to Collect Dust and Debris
When using any dust producing equipment like scarifiers or rotary erasers, it is important to provide a positive means to control airborne dust with use of a dust collector (Exhibit 11) attached to the removal equipment. Accumulated piles of debris on the surface or from the right of way as a result from the removal operation shall be collected and disposed of in accordance with applicable federal, state, and local regulations.
Steven Smith is president of SMITH Manufacturing, which designs and builds surface-preparation equipment for striping contractors. SMITH Manufacturing offers a free surface-prep workbook and training through its website, smithu.com.
References:
(1) ICRI Technical Guidelines No 10.2R-2013 © International Concrete Repair Institute 2013
(2) Standard Practices for Removing Pavement Markings by Rotary Erasing © Pave-Mark 1983

![Lee Boy Facility 2025 17 Use[16]](https://img.forconstructionpros.com/mindful/acbm/workspaces/default/uploads/2025/09/leeboy-facility-2025-17-use16.AbONDzEzbV.jpg?auto=format%2Ccompress&fit=crop&h=100&q=70&w=100)


![Lee Boy Facility 2025 17 Use[16]](https://img.forconstructionpros.com/mindful/acbm/workspaces/default/uploads/2025/09/leeboy-facility-2025-17-use16.AbONDzEzbV.jpg?ar=16%3A9&auto=format%2Ccompress&dpr=2&fit=crop&h=135&q=70&w=240)


