Governments and safety organizations are constantly on the lookout for ways to improve pedestrian and driver safety by slowing down traffic as it approaches an intersection. Reducing speed limits installing asphalt or recycled rubber speed bumps have been a go-to alternative for many situations, but an innovative approach that relies only on pavement marking is being tried in a number of countries.
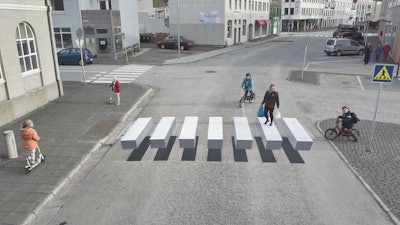
Essentially a 3-dimensional design, these crosswalks when finished appear to “float” above the pavement, giving drivers the initial impression of a raised impediment on the pavement and causing them to tap the brakes.
Last year Ralf Trylla, environmental officer for the city of Ísafjörður in northwest Iceland, decided the city should give the 3D crosswalk a try. He reportedly was influenced by seeing a 3D example in India on the Internet. He contacted Gautur Ívar Halldórsson, co-owner of GĺH Vegamálun, a striping company in northwest Iceland, and “floated” the idea.
“When they first told me they were thinking about painting a 3D crosswalk I didn‘t believe them,“ Halldórsson says. “They wanted to know how much it would cost and I thought they were joking.“ But after he realized they were serious, GĺH Vegamálun put together a plan and costs and waited for approval from the town.
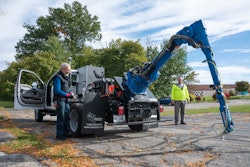
Halldórsson had worked for a road striping company for 10 years before buying a used Airlessco unit, fixing it, and starting to stripe parking lots part time in 2009. He also had a landscape business and managed a campsite. He sold the landscape business but now has six employees striping and managing the campsite.
He says 70% of his striping work is on parking lots and the remainder is road striping including long-line striping and crosswalks. He says he currently stripes for six small towns (population 2,500 – 4,000) and plans to double that number this year. GĺH’s Vegamalun’s outdoor season runs mid-March through November; in the winter the company stripes indoor parking garages.
“We can paint anything on roads or parking lots,“ he says.
Halldórsson says that in many ways the striping of the 3D crosswalk is like striping a normal crosswalk --the white horizontal stripes are measured and striped just like a normal crosswalk.
Then it gets interesting.
Halldórsson says that to create the 3D or “floating“ effect you need to first establish what he terms a “photo point“ away from the crosswalk toward the direction from which traffic will be approaching.
Halldórsson says his first 3D crosswalk was designed with a photo point only 8 feet out from the edge of the crosswalk, but he says a greater distance is needed tio give drivers more time to react. So future 3D crosswalks would be based on a photo point 16 feet from the leading edge of the white stripes – making the 3D image “pop“ to the driver at 16 feet. (Note: Halldórsson measured his job in meters but for this article measurements have been converted and rounded to feet and inches.)
In this instance the crosswalk he designed was on a one-way street so the 3D affect was only needed to be seen from one direction. For a crosswalk in a two-way street a second point 16 feet away into the intersection would be marked as well and the process would be completed from both sides.
Step 1: The Photo Point and Optical Lines
Measure and paint the white crosswalk bars as you would a normal crosswalk. Then measure 16 feet from the leading edge (the edge the drivers will approach the crosswalk) and mark the photo point Figure 1A). From this point chalk optical lines to each corner of each white bar (Figure 1B). Do not extend an optical line to the farthest back corner of each bar. One stripe – the stripe the driver would see head-on – needs only two chalk lines, one to each of the closest corners.
Step 2: Determining Bar “Thickness”
Measure from the leading edge of the bars toward the photo point a distance equal to how “thick” you want the bars to appear to the driver. Halldórsson used 30 inches, but the measurement can be any distance you like. Chalk this line the length of the crosswalk (Figure 2).
Step 3: Creating the “Shadow”
From the leading edge of the white bars, measure 5 feet out toward the photo point. Chalk this line the length of the crosswalk. This line plays an important role throughout the rest of the layout process as it gives you the leading edge of the black shadow (Figure 3A).
Also, the point where this 5-ft. line crosses the nearest edge of each Optical Line 2 (in red) from the photo point controls the position of the black shadow for each bar (Figure 3B).
The shorter edge of the black shadow is controlled by the point where the other edge point of the white bar crosses each Optical Line 1 (in red). (Figure 3C).
Step 4: Creating the 3D Edges of the White Bar
On each bar, locate the intersection where each Optical Line 2 (red) intersects the orange 30-in. line (Figure 4A). Chalk a line (T) from this intersection point, parallel to the long side of each white bar (Figure 4B). This indicates the lighter, 3D side edge of each bar. Measure and chalk for each bar. The combination of the 30-in. chalk line, the T lines, and the optical lines form the outlines of the thickness of each bar (Figure 4C).
Step 5: Marking the Shadow Outline
You’ve already begun creating the edges of the shadow in Step 3. Now it’s time to connect some of the dots to create the outline of the shadow. In Figure 5 we’ve removed some of the chalk lines already in place to make this clearer.
The leading edge of the shadow (nearest the driver and photo point) is marked by the point (A) where the 5-ft. line and the Optical Line 2 cross. Chalk a line parallel to the long edge of light gray bar. Mark the point (B) where this line crosses Optical Line 3. This line AB is the edge of the shadow. The width of the leading edge of the shadow has already been determined; it’s on the chalked 5-ft. line, from A to D (where Optical Line 1 crosses the 5 ft. line). This line is parallel to the leading edge of the bar.
To create the other edge of the shadow just chalk a line from D toward the stripe where it meets the bar thickness at E. Chalk a line D to E parallel to the long sides of the bar to mark that edge of the dark shadow. To mark the back end of the dark shadow simply chalk a line from B towards C, parallel to the back edge of the stripe.
This process is repeated for each stripe in the crosswalk, and you’re ready to paint. Halldórsson says that as with many striping jobs, all chalk lines are measured and marked on the pavement at the same time (Figure 6) before any paint is applied. “It can get kind of complicated,“ he says. “When laying it out I‘m always walking back to the point to take a look at it it to make sure I‘ve got it right.“
Figure 7 shows the bars after they’ve been painted and Figure 8 shows the finished 3D crosswalk.
The 3D design costs more to apply because it takes more than four times as long to paint and requires so much more handwork and measuring. Halldórsson says he thinks that he can cut down on the time if he paints enough 3D crosswalks and he hopes to rely more on lazers than the extensive chalking the design requires. “You need a good broom once you‘re all done,“ he says. “There‘s a lot of chalk on the pavement.“
Painting the Crosswalk
Halldórsson says the striping requires at least two paint machines, each containing a different color. He also used a hand-held unit that holds only 1 gal. of paint (he mixed white and black to create the gray shades).
He says that even though there are fine edges, small areas and even areas that appear to overlap to paint in this “floating” crosswalk, he chalks his marks and never uses tape. “That’s the secret of a good road marker,” he says. “I don’t use any tape.”
Halldórsson says the white crossing itself needs to be painted first so the special effects can be added. “In this case because I just used my small Graco battery powered hand gun the colors controlled what was painted first,” he says. “So in order I painted white, light grey, dark grey and the black.”
Halldórsson says that in rain or at night the 3D crosswalk loses its depth, partly because of the color choices of white and grey. He says that future 3D efforts will likely use different colors of paint with the addition of glass beads for reflectivity.