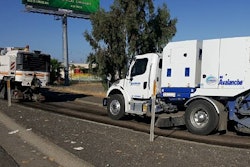
Pure vacuum sweepers, like the Elgin Whirlwind, use vacuum to convey the debris into the hopper and rely on direction change and separation to clean the air stream before being exhausted to the atmosphere. Use of water in the hopper or at the side brooms helps prevent fine particles from being pulled through the vacuum fan and exhausted into the free air, reducing any dust generated by the broom motion.
These sweepers rely on air movement established at an impeller, and seals to contain and maintain the integrity of the air stream as it lifts the debris from the sweeping surface and its conveyance into the containment area or hopper. The air stream on a pure vacuum sweeper must be exhausted after the impeller to keep the vacuum system working optimally.
For a vacuum sweeper to work, several components must work in unison to develop and maintain the air stream. It’s all about airflow – maintaining airflow controls how well debris is picked up. Any defects in any one of the components involved can and will affect the sweeper’s ability to capture and convey the material.
Impeller
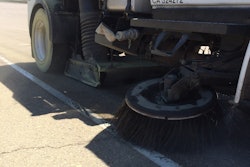
An impeller rotates and creates air flow that can be managed at a suction nozzle to capture and convey the debris from the sweeping surface. The addition of side brooms and a center broom mounted under the sweeper before the suction nozzles assist the vacuum system in cleaning debris from the streets. As the side brooms rotate, the dirt and debris from the street and gutter are moved into the path of the suction nozzle.
The impeller creates a vacuum (low pressure) area under the nozzle and atmospheric pressure rushes in to fill the void. Street debris is captured in that rush of air and transported into a hopper. The air stream through the suction nozzles and the suction tubes moves very rapidly, and when it enters the eight-cubic-yard volumetric hopper, the air stream slows down, allowing the heavier debris to fall out of the air stream and onto the floor of the hopper.
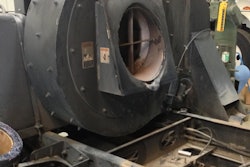
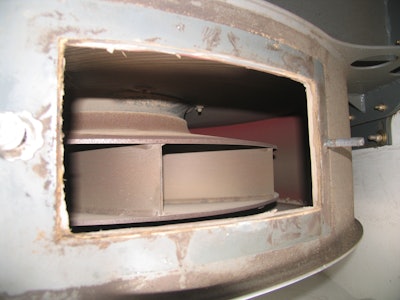
Periodic inspection of the impeller is essential for its function and longevity. It is recommended that impellers be inspected every 50 hours of operation – and more frequently if water is not consistently being used. Always remove the keys and lockout/tagout the sweeper during impeller inspections. A running impeller can cause injury, so protection is crucial. Impeller inspections identify discrepancies, such as holes in the vanes caused by the accelerated erosion of the metal. Wear of the vanes causes deteriorated suction performance over the life of the impeller.
Elgin Sweeper impellers are dynamically spin-balanced for vibration-free operation during sweeping. Abrasion from carryover is the number one cause for impeller wear and failure. Excessive debris buildup and abrasion can cause an out-of-balance impeller and the resulting vibration. Any time the operator notices an unusual vibration, the impeller must be inspected. All vacuum sweeper manufacturers provide inspection access into the impeller housings.
Use caution during impeller inspection, as wear and erosion of the vanes may result in extremely sharp edges. Gloves must be worn during the impeller inspection to prevent injury and infections from any dirt remaining on the impeller. The impeller should be rotated with a gloved hand for a thorough, 360-degree inspection. Some sweepers require “barring” the auxiliary engine over to thoroughly inspect the impeller.
It is important to keep the impeller clean. If dirt or debris has collected on or become entangled in the impeller, it must be inspected and cleaned in accordance with all published information. When repairs are deemed necessary due to damage and wear, the impeller must be removed and replaced with a new impeller.
The impeller bearings should be greased following the manufacturer’s recommendations. Elgin Sweeper recommends greasing the impeller bearings every 50 hours. Over-greasing can cause high bearing temperatures, so follow the recommendations in the operator’s manual.
Inspect the housing while inspecting the impeller. Any discrepancies with the liner will require liner replacement. While checking the housing, be sure to check the bulb seal between the hopper and impeller. Any airflow loss here will reduce the flow at the suction nozzle.
Hopper and Screens
The first stage for separation of debris is the hopper. As previously described, the air stream drives the heavier debris through the suction nozzles and suction tubes and falls onto the floor of the hopper. The use of water is important to filtration as wet material is heavier than dry debris and will fall out of the air stream more completely.
 Wash or flush out screens in their down service positions.
These screens should be washed or flushed in their down service positions. Since all debris washed from the top side is flushed into the empty hopper, the hopper should be washed after the screens have been washed.
The hopper should be cleaned daily, taking extra care with any corners that could hold debris. Since debris holds water, which can cause rust, it’s important to clean the corners, especially behind the inlet chutes at the front of the hopper. A scraper bar can be used to ensure that the area is clean.
 Clean hopper corners.
Diffuser
The final stage of debris separation happens at the diffuser location. On the Elgin Whirlwind sweeper, the diffuser is located over the left rear set of dual tires. The diffuser is a conduit used to route the air stream out of the impeller housing, along the hopper floor, externally, and exhausted behind the left rear tires. The exhaust conduit terminates with a clean-out and some large diameter holes to catch any carryover material that may get past the screens.
Any carryover material remaining in the air stream past the diffuser can be controlled using water, sweeping speeds and impeller RPM. If the diffuser is continually filling and needs to be cleaned out, the first step is to verify that the water tank is full and the spray nozzles are delivering enough atomized water to moisten the debris. This controls dust and makes the debris heavier and acts as a lubricant. Wet debris is less abrasive to wear components, ensuring a longer service life. The next step is to look at the impeller speed the operator is using. It may be too fast.
Fast impeller speed does not allow the air stream to slow down enough when it reaches the hopper to separate the debris. Simply reducing the impeller speed a couple hundred RPM will be enough to ensure the filtration process works. The impeller speed should only be fast enough to convey the material to the hopper, too fast and carryover will shorten the life of the impeller.
Suction Nozzle
 Elgin Whirlwind diagram indicates adjustments necessary to make the suction nozzle perform at peak efficiency.
On Elgin's Whirlwind suction nozzle, for example, there are six adjustments that assist the air stream as it enters the nozzle. Deck height is established by placing shim plates between the caster and the nozzle’s mounting location for the casters (identified as “A” in the illustration), which is 6 7/8 inches from the top of the deck at the rear of the nozzle.
 On the suction nozzle, visually verify all spray orifices are spraying. If not, clean the holes with a small drill bit, paper clip, or other tool.
The ground clearance for the rear and inner curtains should be ¼ inch off the ground. The job of the curtains is to direct the airflow. Since most of the air should be coming from the front of the nozzle, these curtains are closest to the ground. This adjustment is made by placing a ¼-inch spacer under the curtain, loosening the curtain mounting bolts (identified by “D” and “E” in the illustration) and retightening once the ¼-inch air gap has been established.
The nozzle shutter opening spring tension (labeled “F” in the illustration) features a cotter pin that locks the adjusting hex nut once the adjustment has been made. The cotter pin should be removed and the hex nut rotated clockwise until the shutter just begins to open. The hex nut should be backed off until the shutter just closes. Then the cotter pin should be reinstalled to complete the adjustment of the shutter opening. This allows the shutter to open easily even when very light-weight debris, like empty bottles or cans, begins to accumulate in front of the nozzle.
While adjusting the curtains for air flow, it’s important to check the spray water bars on the suction nozzles. There are two spray bars on each suction nozzle, each totaling seven spray orifices. Visually verify all spray orifices are spraying. If not, clean the holes with a small drill bit, paper clip, or other tool. Open the valves at the end of the spray bars and run the water pump while cleaning these orifices to push the entrapped debris out of the valves.
Seals
 Transition bulb seals from the suction nozzles into the hopper must be cleaned when dumped and inspected at regular intervals.
Suction hoses carry all the debris from the suction nozzle into the hopper. That debris can gradually damage the inside of those hoses, so they should be rotated every 150 hours for longest life. Using spray water helps lubricate the debris so the hoses last longer.
With this type of sweeper, it’s always important to sweep with the proper amount of water, not just for dust suppression, but also to maintain the overall integrity of the machine.
Operation and Service Manuals
Every sweeper manufacturer publishes service intervals, preventative maintenance tips and other helpful guidelines in their operations and service manuals. These guidelines must be closely followed to keep the sweeper on the road and out of the service shop. The time invested in studying these manuals can deliver significant payback to the owner in terms of getting more work done and running a safer, more efficient operation.
Conclusion
As with any type of sweeper, lack of maintenance and neglect are very harmful to the machine’s overall performance. Educating operators and service technicians on proper operating and maintenance habits will make all the difference when it comes to extending the life of a pure vacuum sweeper and minimizing the overall cost of ownership.
Steve Dunning is technical training instructor for Elgin Sweeper, whose products are sold and serviced through a network of more than 100 dealer locations worldwide. Elgin Sweeper products are available for a variety of general street maintenance, special industrial and airport applications for municipalities, contractors and industries, using the latest sweeping technologies—mechanical, pure vacuum, regenerative air, alternative fuel and waterless dust control. Elgin Sweeper is a subsidiary of Federal Signal Corporation’s Environmental Solutions Group. For more information, visit www.elginsweeper.com.