Best practices for any cracksealing job start well before the job does and carries through all the way until the crew and equipment are back in the yard, readying for the next day. And then it starts all over again.
Once the job has been awarded, planning starts and it’s important that both the crew leader and estimator are involved. That way the person leading the execution of the job will understand how the person who bid the work was thinking. But once the planning is done it’s time to go to work.
Let’s start at the end.
After the day’s work is done and the crew returns to the shop, manufacturers say the best practice is to ready the equipment for the next day. The goal is to enable the crew to get a quick start out of the yard the next morning and to eliminate any reason a crew member might have to be pulled off a job to go back to the yard to get something they forgot.
Overnight Care of Material
Once the crew returns to the yard, the first step is to take care of the material still left in the tank. Ben Thielbar, director at Cimline Inc., says it’s important to follow the manufacturer’s recommendations to properly cool down the sealant at the end of the day to prevent coking inside the tank.
Brandi M. Julian, Crafco Inc. training director, recommends leaving the material tank half full (or full just above the top of the agitator blades). “This does two things,” she says. “It enables the material to heat quicker in the morning and it gives you room to add new material.”
Most manufacturers recommend reheating material only one time – that means heating it, shutting down, then reheating it the next day. That constitutes one reheat and the material can’t be reheated again unless enough new material is added to rejuvenate what’s in the tank.
“If the tank is all the way filled, there’ s no room to add fresh material,” Julian says. “This leads to the potential to overcook the material or exceed the material’s pot life. Leaving room in the tank allows fresh material to be added in, resetting the pot life of the material in the tank.”
This process is designed to protect the integrity of the cracksealing material, but because it can withstand only one reheat, manufacturers offer overnight heaters to help shorten the heat time the next day. These overnight heaters keep the material heated at roughly 180°F, cutting heat time by as much as 50%. Note that pot life is still a concern and fresh material should be added every 12-15 hours.
But Julian cautions, overnight heaters are for “over night. Extended use keeping the same tank of sealant warm over an extended time period will lead to breakdown of the sealant and cause issues associated with that breakdown. “Any longer than that results in gelling and that means you have to shut down the entire tank, let it cool, and clean it out throughout including hoses, pump and the tank interior,” Julian says. “This is to be avoided at all costs.”
Ready the Equipment
Once you’ve protected the material, contractors should take care of the machine and ready it for the next day. Thielbar recommends that each cracksealing machine have its own daily checklist, and crews should work through the checklist at the end of each day. Any problems discovered should be communicated to the crew leader and maintenance staff immediately so they can be fixed overnight.
While each contractor might develop their own checklist, Thielbar says the list should include checking the oil and grease points; blowing out and checking filters; and making a visual inspection of the sealing hose, wand, connections, sealant tank and pump. If the crew is using routers, inspect the router bits, blow out the filters and the radiator, and check the oil and grease points. A DOT daily trailer inspection sheet should also be used.
He adds that cleaning the unit also should be considered because keeping the unit clean helps it last longer and operate properly. This is best done at the end of the day, rather than in the morning – or worse, a month or more later.
Stock the Trailer
Next, ready the unit for the next day’s work. That means stocking it with enough sealant blocks for the day’s work. Consider loading 10% more material that you expect to use during the day as crack size and depth varies and cracks can widen or deepen between the time of the estimate and the work.
Then make sure to load all the tools that might be needed on the job, and make sure they’re in good shape. Also make sure to have enough consumables and wear parts such as tips, switches, fuses to get through the day without a delay. Julian recommends filling the machine with diesel each night when you head back to the shop. “This has a few benefits,” she says. “First, it eliminates the possibility of the crew accidentally forgetting to fill up in the morning. Second, it saves time to get out on the job, one less item to take care of in the morning. And third, it’s a safety precaution that eliminates any risk of filling up a unit while it’s running or hot.”
Preparing to Crackseal
“Sealant requires adhesion,” Thielbar says. “Always clean vegetation from cracks, whether they’re on a parking lot or road. And cracks need to be dry, dry, dry. Moisture in the crack will ruin a crackseal job.”
Julian agrees. “First and foremost – all cracks must be prepared properly. Clean and dry are the most important elements,” she says. “No matter how good the crew, the material, and/or the equipment – if the cracks are not properly cleaned and dried, the cracksealing project will result in failure; a waste of time and money for everyone.”
Thielbar says that a compressor with 60+ cfm and 150 psi can be used to prepare a crack, a heat lance is the best practice and provides for best adhesion (short of routing, see below).
“A hot air lance is a great tool that can do many things for crack preparation including cleaning out debris, heating the pavement temperature to help improve bond with the material, cleaning out weeds if present, and eliminating any residual moisture not visible to the naked eye,” Julian says.
“When working in humid areas or when near the dew points, or in shaded areas, moisture in the crack may not be visible. Use of a hot air lance can perform the cleaning and drying operation all at once while improving adhesion.”
Thielbar adds that a clean crack will also keep secondary tools, such as squeegees, clean from picking up debris or contaminants while creating an overband.
Routing
“Better preparation leads to higher customer satisfaction and less call backs on warranty repairs,” Thielbar says. That’s why routing of cracks prior to sealing has become increasingly common.
“Routing helps prepare the crack by removing sand, rocks, vegetation, debris and old, oxidized asphalt in the crack, providing a sound asphalt crack face for the sealant to adhere to,” Julian says. “Routing results in better performance and better return on investment,” Julian says. “Eighty percent of cracksealing cost is labor, so if you double sealant service life you will improve ROI; that should yield customer satisfaction.”
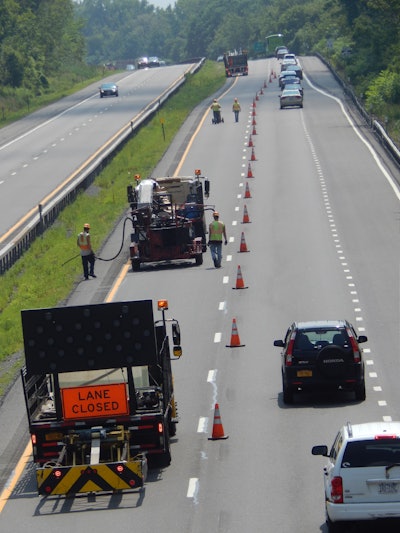
Thielbar says that on commercial jobs, the preparation is often best done with a separate preparation crew, often sent out a day or more in advance of the cracksealing crew.
He says routing does take the longest of any crack preparation, but it will also extend the sealed cracks’ life to the longest possible range. “It is also the method that allows the least chance of failure when cracks are cleaned properly after being routed,” Thielbar says.
Julian says studies show that using compressed air and applying an overband provides 44 months of sealant service life. Routing can extend sealant service life to 70 months. But also key is using a high-quality sealant that is chosen for the specific traffic and climate conditions.
“Many sealants that were not good quality failed well before 44 months, so it is the prep along with the high quality sealant that makes 44 months achievable,” she says.
“If you rout a reservoir, seal, and complete with a Band-Aid or overband, you can achieve a sealant service life of 90+ months,” Julian says. “So then the question becomes, if I rout the cracks, will that slow the crack sealing operation? The answer is simply no, routing will not slow down or decrease productivity of the crack sealing process.”
Material Handling on the Job
Manufacturers say that proper material handling can ease most cracksealing operations and make crews more productive. Improper material handling can not only reduce the on-the-job efficiency but can result in a poor-quality job.
Crews should load the tank about three-quarters full before heading to the jobsite in the morning. Depending on the size and efficiency of the unit, heating material should take an hour or less, giving the crew enough time to set up a staging area, begin any preparation and plan out their work once they arrive at the site.
Julian says that maintaining sealant temperature in the tank is imperative for productivity.
“Every sealant has an application temperature range provided by the manufacturer. Proper application temperature helps adhesion and bonding, so it’s important to apply it at the correct temperature.”
She says that to maintain sealant temperature, fresh material should be added equal to the amount of material being place on the ground. Often this means adding a block or two every 3-5 minutes, depending on productivity and speed of the crew. “If you are loading more than three blocks at a time you are waiting too long to load the machine,” Thielbar says.
But adding a block of sealer to the melter lowers the temperature of the molten material, which affects the application temperature.
“If too much material is added to the tank at once, the cold blocks of unmelted material will cool the material in the tank and drop the temperature below the application temperature range. That means the crew will have to stop and wait for the temperature to rise again. Adding equal amounts of material as being placed is the key to maintaining application temperatures and productivity.”
She says that on a small operation using a 10-gal. melter/applicator, it takes a while for that block to melt, so crews often must wait for most of it to melt before sealing. “In those situations, it’s best to use a mini-melter combined with some kind of feeder unit, such as 30-gal. or larger units,” she says.
Thielbar suggests that on larger melters, a power-loading conveyor eases and improves material handling. “You can load the boxes on the conveyor quicker than putting them individually into the machine so it gives you a head start and also promotes consistent loading which will help the maximum melt rate of the machine.”
Other tips include:
- Consider “boxless” material, which costs a bit more per pound but improves melting efficiency, could require one fewer labor, and eliminates hauling of waste material at the end of the day.
- Keeping material clean, dry, and free of contaminants will prevent delays caused by pump or tip clogs.
- Know and understand the temperature range and properties of the sealant you are working with.
Disc Tips and Squeegees
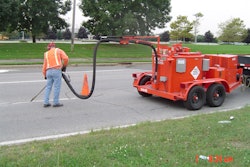
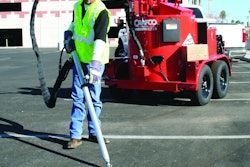
Once prepared, cracks are filled using a wand with a sealing disc tip or using a pipe tip or straight tip, followed by a squeegee. Both methods serve the same purpose – to force sealer down into the crack and create an overband to help prevent water seeping in and to smooth out the sealant. Which approach is used is often based on contractor preference and in some cases the size of the job.
Sealing discs are useful partly because they are a one-person operation, reducing the number of laborers needed on a job. The wand operator applies the material and creates the overband all in one operation.
If a pipe tip or straight tip is used, a squeegee must be used after. Whether a V or U squeegee is used is often a personal preference, but in some cases, depending on the speed of the person with the squeegee, you might want to opt for a V squeegee. There’s always a small puddle of material within the squeegee, and when using a U squeegee, you can end up with too big a puddle and a mess.
“Squeegees can help force sealant down into the crack and tight to the pavement surface, creating a great waterproof seal,” Julian says. “The more material you get down into the crack, the better it will accommodate the thermal movement of the crack as the seasons change.”
Thielbar says that especially when cracksealing on parking lots, a “V” squeegee is handy as it allows a second person to chase sealant down a crack and requires the crew to reposition the trailer machine less often.
“Regardless of the job, large cracks should be filled twice as material will settle,” Thielbar says. “In this method use the disc first, then follow up on the overband pass with a “V” squeegee.
When cracksealing using a straight tip, the operator must get the tip down into the crack and fill the crack from the bottom up. Placing material near but not deep into the crack, relying on the squeegee guys to fill it, causes several problems.
- Not filling the crack from the bottom, up, resulting in a less-effective seal
- Material is being wasted
- Material is more difficult to spread and smooth
Julian says the overband shouldn’t extend more than 1 in. beyond each side of the crack and should be 1/16 in. thick.
“You want it really tight to the pavement because it provides a better bond, promotes sealant longevity as well as vehicle safety and a smoother, nicer ride. It also helps in areas of snow removal because plows will rip up the material if it’s too thick.”
Using a squeegee (or multiple squeegees for high productivity) will require additional crew members but can increase productivity. “A good wand guy can keep multiple squeegee guys busy!” she says.