While the coronavirus pandemic may not have shut down your operation, it's sure to have slowed them, creating a backlog of work for 2021. That, combined with a tight labor market, makes productivity key to profitability for pavement marking contractors. The quicker you can get off (or on) a job, the more jobs you can do, the more revenue you can bring in and the more clients you can keep happy.
The important thing to keep in mind when examining productivity is that the changes don’t have to be major. Obviously, a big change – adding a crew, for example – will significantly improve the number of jobs your company is going to complete. But often as important are the small changes that, while possibly insignificant in and of themselves, can make a huge impact when compounded over numerous employees and numerous jobs. Something that can save one worker 10 minutes on a job, multiplied by three people on site, saves 30 minutes per job. If your crews complete three jobs a day, that’s 90 minutes – or 7.5 hours over a five-day work week, adding almost a full workday to your week.
So while looking for ways to improve your production, don’t overlook the tweaks that can really add up over a week, a month, a season and beyond.
Planning & Preparation
1. Take advantage of drones to better prepare your crew. Drones aren’t only for marketing. While sky-high photos and before-and-after videos of the great work you’ve done certainly showcase your company, using a drone in advance to walk a crew through a job from start to finish can make the job go quicker once on site. Workers will be familiar with the site, they’ll know where to start and where to end each day (assuming it’s not a one-day job), they can be made aware of troublesome or challenging areas, safety issues for them and for pedestrians and traffic can be highlighted, and barrier locations can be shown so crews know exactly what to put where when they pull up on the job. Areas where two-color striping is needed can be highlighted, along with crosswalks, fire lanes and other specialty markings. And when combined with other measuring technology, you can compare actual measurements with blueprints to avoid any last-minute surprises.
2. Organize your truck. This might seem like a suggestion that won’t have much impact, but how you organize your tools and equipment in the truck you take to the jobsite can cause downtime – if, for example, you left a tool at the yard, you don’t have enough paint, or everything was thrown in the back and a tool or stencil or part of a machine was broken. Most contractors use their pickup truck to haul a trailer outfitted for striping. Some contractors opt for vans or box trucks, but whichever approach you use, organize the truck so everything – paint, tools, stencils, buckets, cloths, tips, brooms, blowers – has a place and is locked down so it doesn’t slide around during transport. Create racks for stencils, locks for stripers, hangers for blowers. Make sure paint buckets are secure. If you have more than one striping crew it can be helpful if all your trucks are organized and outfitted the same so that a person moving from one crew to another knows where everything is.
3. Assign an organizer. Along with organizing your trucks, it’s a good idea to assign someone to make sure each truck is outfitted and ready to go for the next day’s work. This can be someone on the crew that’s using the truck or someone who stays at the yard with other duties but who checks and replenishes the trucks when they come back. Crews need to tell this person if there’s a problem with a piece of equipment, but otherwise the responsibilities should be to make sure stencils are clean and ready to use, tools are clean, paint is mixed, the right colors and correct amounts are in the truck for the next job. While this job could be done prior to heading out, it’s best to do it the day or night before so there’s time to solve any problems that come up.
4. Mix paint beforehand. There’s no reason to waste time on a jobsite mixing paint in 5-gal. buckets by hand. Invest in a tumbler or shaker that can handle 5-gal. buckets and assign someone the job of keeping paint mixed for the crews. Paint should last at least a week or two before remixing is needed.
5. Take measurements yourself. Spend some time talking with veteran stripers and just about all of them have a war story about a job where they followed the blueprints – only to find the blueprint measurements and the actual measurements didn’t match. If they were lucky, they discovered the problem before applying paint, but often that’s not the case. Take the extra few minutes to do your own measuring. It might slow productivity on the front end of the job but it can be a huge savings on the back end of the job if you learn to late that the layout you striped and the plans you were given don’t match. There are line stripers on the market today that have "measure mode" which will measure while you push the striper – or better yet ride along on a driver.
6. Don’t avoid chalking a layout. Veteran stripers who insist on measuring and snapping chalk lines might have a point, especially on complex or large jobs. While chalking a layout certainly is time consuming, it does enable contractors to step back and view the entire job to see if there are any layout problems or any mistakes – before putting any paint on pavement. Preventing mistakes and reducing call-backs increase productivity, too!
7. Buy a premarked tape. Regardless of how you approach layout, a color-coded premarked tape should be a staple of every striping crew.
8. Join “the chain gang.” An easy-to-make, easy-to-learn chain tool makes laying out parking stalls of any angle a quick and error-free process for three people. Invented by Mick Vinckier, Miktom Parking Lot Maintenance, and introduced in his “How to Stripe the Tough Jobs” seminar in the 1990s at National Pavement Expo, the chains enable laying out of 90º stalls without using the 3-4-5 triangle method and 60º stalls without a tape measure. The chains are particularly valuable when striping inside or outside a curve or laying out stalls on a circle – all with no math. The conventional method of measuring and marking outside stall width and inside stall width is time consuming and math intensive. It’s easy to make a mistake in the calculations or layout. Plus, because curves often aren’t consistent, contractors end up eyeballing, which creates its own problems. The chain tool saves striping contractors countless hours, eliminates layout headaches, and most importantly results in a near-perfect striping job on curves. The tool can be made easily and inexpensively using two chains (18 ft. each is good) with a snap hook on each end. If you’ve never used one, ask a striper who has.
The Right Equipment Speeds Layout & Striping
9. Consider auto-layout machines. Auto-layout devices, which operate similar to a skip-timer, are designed to eliminate measuring and chalking of a parking lot. Contractors either enter information from blueprints into a calculation system on the striper or walk the lot and let the striper do the measuring. The auto-layout calculates the measurements for the parking lot and determines the number of stalls needed. It then directs the operator to spray dots on the pavement to create the layout. Once all the dots are marked, the striping then becomes a game of “connect the dots.”
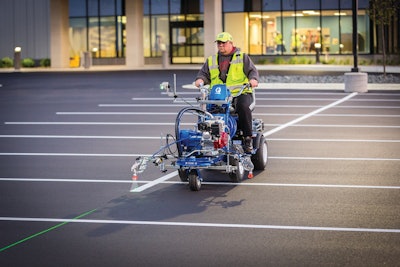
10. Look into lasers. The most-recent innovation in pavement marking, lasers can help layout and can also improve accuracy – to say nothing of saving time. Lasers are available to be retrofitted on older stripers and some new stripers are available with lasers already on them or as options. When it comes to lasers you have two options – dot lasers and line generating lasers. The dot lasers are best used to mark your start and stop when placed directly under the spray gun – eliminating the need for shingles. Line-generating lasers, on the other hand, are best for producing laser-accurate lines on the parking lot – eliminating the need for string lines.
11. Pay attention to ergonomics & convenience. Part of productivity is helping your workers maintain their energy and keeping them from getting worn out as the day progresses and as days turn into weeks and hot summer months. Manufacturers are paying closer attention to ergonomic features that make operating a striper easier, including controls within easy reach of the operator’s fingers, handlebars that can be easily adjusted for the comfort of each operator, and gun mounts that are easier to change. Just as ergonomics is important, in this day and age comfort is the name of the game, too, and manufacturers are including features such as cup holders, storage trays and phone charging ports. Your operators spend much of their day walking behind (or riding behind, see below!) units that weigh up to 300 lbs. when full with paint, so the easier and more comfortable you can make it for them the greater their productivity will be – especially at the end of a long day in the sun.
12. A machine for every color. While this does require significant investment, if you’re striping large enough properties and you’re regularly faced with striping two or even three colors, dedicating a machine to each color eliminates cleanout at the site, saving time on the job, and avoids the problem of how to dispose of the cleaned out paint. Dual color machines are also available – saving you not only money on equipment but also room in the trailer.
13. Get some wheels. Introduced to the industry in 1996, attachments that convert a walk-behind striper to a ride-on striper are probably the most-important productivity development to come along since striping contractors went from hand rollers to spray machines (or from nails and string to chalk lines). Attaching a driver to a walk-behind striper enables you to stripe much faster. You can put down more paint in less time than by walking. Productivity, anyone? They’re also a big advantage on a large parking lot where the staging area (and paint) is at one location and the striping is done clear across the lot. Driving back (they travel up to 12 mph) to get more paint takes less time and is way easier for operators. Contractors who rely on driver attachments get so used to them they rarely get off the unit – even on small lots. Users become adept at maneuvering and striping cleanly and accurately even in tight spaces. Use of a driver attachment reduces the wear and tear on your operators because instead of walking, pushing a striper all day, they’re riding. At day’s end they’re less tired and less tired means they’re likely to more productive. Plus, the accumulated wear and tear on operators is reduced so they’re likely to more productive over the following days. Equipment manufacturers now make their own driver attachments and sell units designed specifically for the attachment and with the attachment already included. The drivers are available either gasoline or battery powered.