The spring season ushers in many transformations in nature and fills everyone with new vitality and enthusiasm. The spring is especially exciting for us in the sealcoating industry, who can barely wait for the start of the new season after the idle months of winter.
As sealcoating professionals, you must put your best foot forward to set the right tone for the rest of the season. Do not let errors or oversight turn into “spring allergies” that may become perennial; a bad reputation is hard to shake off. For an effective commencement for the season, sealcoating projects have to be planned meticulously and executed precisely in a cost-effective manner. Here’s how:
Job inspection and Costing -- New Jobs. In the spring you will have shorter workdays and will have to contend with low temperatures in early mornings and evenings when sealer should not be applied. In other words, a normal one-day job may take two days, which means more travel time, overhead, payroll, and other expenses that should be factored into bid proposals and should be charged at a different rate than a job estimated for mid-summer.
Carry over work from the last season. In many cases, the spring work may entail the jobs left over from the previous year that were not completed due to early winter setting or just time constraints. You should personally evaluate the property before showing up to perform the work. It is likely that asphalt may have deteriorated over the winter and needs more crack repair, patching or replacement work before sealcoating can be performed. Hopefully, you have allowed for such contingencies in your bid proposal to recover your costs. If not, then it is a lesson for the future.
New Projects: Inspection prior to bidding. The inspection should include:
- Assessment of the overall condition and integrity of the asphalt pavement (the age, surface deterioration, any base or sub-base issues, and the drainage of the asphalt pavement).
- New asphalt installations. Paving done in late fall last year or early spring of this year, should be checked for their suitability for sealcoating. For the optimum performance of the sealcoating, it is essential that the asphalt pavement be allowed to age sufficiently to rid itself of its surface oils. Perform the “water-break-free-test” by casting a gallon of clean water out over the surface. If the water sheets out without crawling or showing oil rings, the surface is ready for sealcoating. If the asphalt fails this test, it should be allowed additional time for cure and be re-tested.
- Surface Profile of New Asphalt Installations. Observe the surface profile of the new asphalt closely to make sure that the asphalt was properly laid and compacted. Overly open, rough or “boney” surface appearance may be indicative of either cooling of the hot mix asphalt or inadequate compaction during paving. Report any abnormalities to the property owner and have him seek response from the paving contractor.
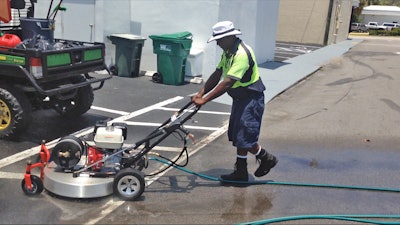
Check Equipment. Make sure that your equipment is in good working condition before you venture out to sealcoat. It is preferred that you start the season with a clean tank; check the agitation, pump, gauges, compressors, hoses, spray tips -- the whole nine yards.
More rigorous checks are warranted if you have material left over in your tank from last year. In our experience, many contractors do only cursory checks; start their rig, open the spray for a quick minute or two and think they are ready to go. What they do not see in that amount of time are the floating chunks, caked sealer on the walls of the tank, settled sealer in the bottom and debris.
All or any of these can cause equipment failure or poor or failed sealer performance, costing time, money and future jobs. Just test running the agitation and compressor is not enough. Start the agitation and circulate the material in the tank for a minimum of 15 minutes. Make sure that it is free from chunks and debris. Put the spray wand through the top of the tank and allow running in open mode for a minimum of 15 minutes, to check for any clogs in the lines. The material in the tank should be uniform, hoses clear and machine ready to spray.
Check Sealcoating Materials. Pay particular attention to sealer in your holding tanks and application rigs. Make absolutely sure that the materials that you stored over the winter months are still in good condition, meaning that they meet all the original quality standards, as supplied by your manufacturer. Would it be a safe assumption that you kept the material agitated in the holding tanks on a regular basis? Still, just prior to starting in the spring, agitate the material in holding tank or the rig and submit samples to your supplier to make sure that they are still within the quality control parameters. You may be advised to add some water, to adjust the solids or a pinch of biocide to take care of the foul odor, if any. Let the manufacturer instruct and you comply.
Check Additives, Traffic Marking Paints, Cold Pour Crack Fillers. Make sure these and other water-based products are still in good condition – that they have maintained their original consistency and fluidity. Any hardening, settling, watery separation or cottage cheese chunkiness may indicate freezing damage.
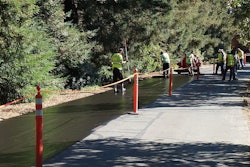
Prepare the Pavement Properly. Because of ambient conditions in early spring months and the ravages of the past winter the pavement might require additional preparation. In addition to the standard cleaning and preparation methods, thoroughly wash the pavement with water (preferably power washed) to remove embedded salt, silt and de-icing chemicals.
Furthermore, heavy rains in the spring can also require extra work as mulch and topsoil get washed out of the flowerbeds or parking lot islands onto asphalt surfaces. Such contaminants, if not thoroughly removed, are likely to cause sealer peeling and or premature wear.
Also, pay special attention to minor cracks that may hold a lot of moisture. You may need an effective compressed air source to dry out such cracks.
Early Spring Application Tips. Sealcoating should never be applied unless pavement temperatures are at least 50° F and the air temperature is 50° F and rising. When the sealcoating is applied below 50° F, the binder particles (refined tar or asphalt) do not soften and fuse to from a continuous sealer film. It is more like Swiss cheese -- full of holes and totally ineffective as a protective coating.
In addition, the sealcoating cured under such conditions usually turns out gray and blotchy in appearance and never attains its characteristic slate/black color.
During the curing stages, sealcoating should never be subjected to ambient conditions where temperatures may fall below 32° F (the freezing point of water). The sealer film will simply disbond or shatter.
Mix Design Recommendations. The recommendations made in the following section are based on scientific principles and are general in nature. We recommend that you have your manufacturer’s confirmation and acceptance before making any amendment to their recommendations.
- Suggest reducing water by 5% by volume in the mix design. Reduction in the amount will allow curing a bit faster because there will be less total water to be released by the wet film. Thus the wet film having a shorter life span is likely not to allow enough time for the finer filler particles to float up to the surface and interfere with the fully cured color of the film.
- Consider using a fast-drying, polymer-based additive that also contains carbon black, which, in turn, may be quite helpful in achieving the desired slate/black color, faster.
- Do not consider adding any kind of chemical that will slow down the drying (example glycols) to counteract overnight freezing of the wet sealer film. Such additives are slow evaporating and have a tendency to stay in cured film for a long time, thus keeping it a bit soft.
As a sealcoating professional you strive to do the very best in delivering the very best to your customers in materials and performance. As a sealcoating manufacturer, we want to provide you all the support based on our experience in the industry and the knowledge base. In this endeavor we have shared some fine points that may be overlooked, inadvertently. Have a great 2017 sealcoating season.
Girish C. Dubey is president of STAR Inc., Columbus, OH; www.starseal.com.