Following are instructions to pass along to your homeowner customers when they rent floor care equipment for their wood floor refinishing projects.
The decision's been made: you're going to refinish that old wood floor. Now where do you start? Following is a step-by-step guide to help you in your efforts.
Job preparation
The first step during your floor refinishing project is job preparation. Be sure to have enough people on hand to help you with the job. Remember, you'll have to move furniture, and the sanding process is easier with two people.
Remove all obstructions from the area to be sanded, including: furniture, drapes, pictures, breakables, etc. Heating grates can be removed now or as you’re sanding near them.
Inspect the floor to be sure any nails or staples are removed before beginning the sanding process.
Next, when renting the equipment for the project, don't forget to partner with your rental store. Ask for and use the guidance and expertise of its staff. Make it easier on yourself by doing one-stop shopping. A good rental center will not only carry the appropriate floor care equipment, but all the sandpaper, finishes, and other items you'll need to complete your project.
If the rental center offers a video tape to review -take the time to watch it. Also take the time to read any how-to handouts offered.
Be sure to ask the rental store about safety tips on how to properly use floor refinishing equipment. It's important to know how to lift and hold the equipment, as well as how to correctly transport it.
Saw dust is a concern when sanding floors. Many suppliers offer dust control systems that can save a lot of time and protect your home. Be sure to ask your rental partner about them.
Sanding
Sanding is a process in which you cut your floors with different abrasives to remove old finish, level the floor and smooth out the wood to accept the new finish. Start with heavier grits that make deeper cuts into your floors and finish with lighter grits that smooth out the surface to make the hardwood floor ready to be finished with your choice of coatings.
Sanding jobs can be completed in either three or four passes with different abrasive grits, depending on the condition of the floor being refinished.
For old floors, the first pass is to remove the old finish and level the floor. This will be the heaviest sanding and will make heavy scratch marks. The second pass is made to eliminate the roughness from the first pass, smooth out the scratch marks and remove any finish that was not removed with the first pass. The final pass is done to obtain a smooth finish when the coating is applied and removes more of the remaining marks from the previous sandings.
For newer floors, the first pass is to level the floor. Because the leveling process isn't as aggressive as it is for an older floor, the grit used will be higher, so the marks to be removed will not be as deep. Then finish the sanding process in the same manner as with an older floor.
Start your sanding using the lightest grit that will achieve the objective of your first pass. For example, if 40 grit does the job, then stay with it. Move to a lower grit only if you find the finish is not coming off. Don't skip more than one grit from pass to pass - follow 40 with 60, not 80 or 100.
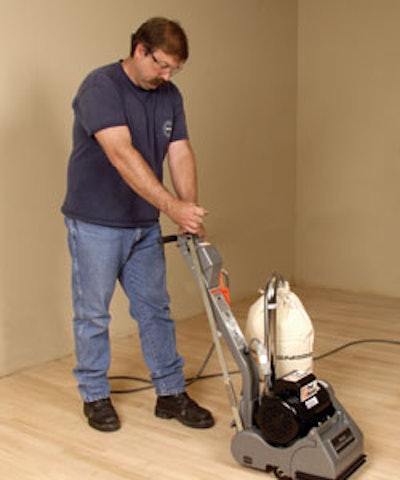
Sanding will be done from left to right. Locate an outlet in the room that will allow the cord to be behind you as you sand. Before you put on any sandpaper or plug in the machine, you might want to practice the movement of sanding. There are different types of sanders - drum, orbital and circular. Be sure to ask your rental partner which is best for your application.
Now it's time to actually sand. Install the paper and don’t forget your personal protection equipment such as earplugs and dust mask.
When you sand a room, you will do it in two sections. Start the sanding with two-thirds of the room in front of you. As you sand, overlap the previous path. Then turn around and sand the remaining one-third overlapping the two sections. Stagger the place where you lift the drum off the floor to avoid stop marks. Placing the drum down abruptly or stopping with the sanding drum in contact with the floor will make dips in the floor.
Sand both forward and backward following the grain of the wood in the same path. As you begin to move in either direction, slowly lower the drum to the floor. Be sure to be moving before you lower the drum. Never stop moving the sander once it's in contact with the floor.
If the cutting action of your sander seems to slow or diminish, it's probably time to change the sandpaper. Don’t try to extend the life of the paper; replace it as necessary. If you wait too long to replace, you might have to resand areas.
Edging
Follow each drum sander pass with an edger pass. Begin with the same grit as used on the drum sander and step up to match the grit used on the drum sander with each stage. The edger should be adjusted so that only about one fourth of the pad will contact the floor. This adjustment is done by the rental store and keeps swirl marks to a minimum.
After installing the paper and plugging the unit in, move it from left to right, leveling the floor from the area the floor sander has already sanded toward the wall or baseboard.
Move the edger in 12- to 18-inch sections, then move over. Always keep the edger moving in a semi-circular motion. When sanding along a wall that the wood runs perpendicular to, rotate the edger to the right on each board to avoid sanding against the grain. Never put added pressure on the edger - let the unit do the work for you. Exerting force will produce inconsistent results and place undue stress on bearings or the sanding pad.
When you're finished with the electric floor sanding equipment, it's time to scrape the corners and crevices of the room. Using a scraper, scrape all the corners. Keep the blade sharp as you scrape, especially when you must scrape against the grain of the wood. Hand sand these areas after you've scraped them.
Screening
Screening the floor helps blend the areas that were sanded by the sander and edger to attain a uniform look.
To screen, use an orbital/rotary sander, a nylon pad and a screen mesh disc. Run the unit along the edges of the room first, then screen the field of the floor with the grain of the wood. As you screen, look for edger marks, drum stop marks or other imperfections.
Floor sanding screens come in grits ranging from 60 to 180; some machines use steel wool pads. If using an oil-modified coating, screen to 100 grit. When using a water-based finish, screen with at least 120 grit to close up the pores in the wood.
The finished product
Before beginning the finishing stage, check the compatibility of the stain (if using) and finish. Be sure the room is vacuumed and free of dust before placing any coating. If applying a water-based finish, remove the dust by using damp soft rags first, then new rags or tack cloths. Let the dust settle for a few hours then wipe the walls and floors again. These precautions minimize the amount of dust available to land on your new finish.
After cleaning, apply the stain (if being used) according to label instructions and allow it to dry thoroughly. Now it's time to apply the floor finish.
There are two basic types of finishes: oil-based polyurethane, which will add a light golden tone to a floor, or water-based polyurethane, which will not change the color of the floor.
Oil-based polyurethane is generally less expensive but will yellow with age, darken the wood as it’s applied and have a strong odor. You'll need about three coats. However, oil-based poly has a minimal drying time and can produce smooth results.
Water-based polyurethane is fast-drying, will not darken the wood or yellow with age and has no odor. Four to five coats will be needed for proper wear and higher gloss.
Depending on the type of finish, there are certain types of finish applicators. When applying water-based, you will either use a pad or T-bar type applicator. Lambswool applicators are used with oil-modified finishes. There are also distinct ways to apply both finishes.
Oil-modified polys: Apply with the grain of the wood. Pour a line of urethane across the grain of the wood or dip the applicator in the finish and draw out the urethane in a line. Push and pull the finish, but make the last pass over each area in the same direction.
Apply an even, thin coat. Avoid puddles or drops. After a pass, excess finish can be removed by rolling the applicator in the next area to be coated.
Water-based polys: With water-based, pull the applicator when applying the finish.
Pour a line of finish on the floor following the grain. Then pull the applicator like a squeegee, plowing the finish to the end of the room. The applicator should be positioned with a slight angle so the urethane flows into the next area to be coated and not back into the area just completed. Remember to overlap the finish and be careful not to miss spots.
Water-based polys are designed to be used in many thin coats.
After the first coat dries, prepare for the next coat. If using an oil-modified finish, then you must screen the floor to remove any grain raised resulting from the application of finish. After screening, remember to vacuum and tack rag the whole room.
Also, with water-based finishes, do not screen after the first coat. You will have to screen between following coats, however. Repeat until you’ve applied the recommended number of coats for the finish.
Information provided by Clarke American Sanders, Essex-Silver Line and Virginia Abrasives.
Rental employees need to know their stuff
"Floor sanding is easy," says Frank Barous with Essex-Silver Line. "Some might say tedious, but with the right, correct information, it can save the homeowner hundreds - even thousands - of dollars."
Barous says that all rental employees need to know what they're saying and understand how floor equipment operates in order to give out the right information to renters. "Most counter people have never run a floor sander," he says. "Often they give out wrong information, omit information or are tentative in their explanations. Not imparting an air of confidence to the person renting gives the wrong impression."
Rental businesses also make a mistake when they don't give instructional tools to their customers, says Barous. "There are plenty of DVDs, videos, on-the-go guides and websites that users can reference to make the job easier," he explains. "Most rental stores fail to pass out these tools - and they can help in a big way."
All mistakes users make are rooted back to education of the product or process, says Keith Willey, marketing manager with Clarke American Sanders. "Most mistakes can be avoided or reduced if the rental location takes the extra time to ask open ended questions about the job that the customer is attempting to complete and the experience level of the customer," he says. "A simple thing like the differences in hard wood versus softer wood floors, for example, may make the difference in determining the best machine to use or best process to use in handling the job.
It's also important to note that even relatively seasoned contractors may not be fully aware of the specific brands or styles of machines that are being supplied. Supplying key machine brands and styles that are common in the industry can help save time reviewing machines, possible machine damage or injury."
Troubleshooting
Following the directions for floor sanding and even watching a video should prevent many problems preparing your hardwood floor for refinishing. Unfortunately, a few problems you might experience might not become evident until you apply the first coat of finish. By screening the floor prior to applying the finish, you can normally eliminate the problems before they require corrective action. However, minor problems can be easily fixed. If the affected area is small and localized, you should consider hand sanding, followed by screening.
Here are a few of the common problems you might encounter:
The best way to prevent "picture framing" is to screen the entire floor, using 120-grit mesh screen, prior to applying any finish. Screening between coats of finish will also improve color and luster consistency.
Overall, one of the most important things to keep in mind, says Reg Burgess, marketing manager with Virginia Abrasives, is to take your time and not go too fast. "The biggest mistake is people treat this like a race," he says. "They try to go too fast. Slow down and take your time, and you’ll have a beautiful result."
For more troubleshooting information, visit www.virginiaabrasives.com/troubleshoot.


