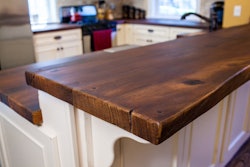
When most people think of concrete, they bring up images of sidewalks and driveways, roads, and buildings. Not the most glamorous of objects in our everyday lives, but they don’t really show off the diversity of concrete. I make decorative concrete countertops and furniture pieces, all unique works of art, all from concrete.
My favorite thing to do with concrete is to make it look like a slab of marble. Why not just use marble? Marble is great but it is hard to find the exact pattern, the exact colors, in the exact shape you want. Finding a slab big enough to make a seamless waterfall edge countertop, matching your coloring is insanely difficult. With concrete, you can mimic the styles of marble, but manipulate it into shapes and designs you or your customer’s desire.
There are some truly breathtaking examples out there, I continue to be amazed at pieces my contemporaries are putting out. I learned how to make concrete this way at the Concrete Design School (CDS), with this specific technique taught by Dusty Baker, and using his Dusty powder. This Dusty-crete technique is very simple to understand, but the potential is limitless. Finding the right balance and flow of the powder is an art form.
Mixture
My mixture is constantly changing, no two pieces use the same exact mix design. Every piece I do has different design limitations and challenges. I use Buddy Rhodes ECC Admixture, the finest sand you can find (I use mason sand from a local quarry; it’s not the finest but the locals love having a local product like that), white portland cement, and then low doses of PVA RECS 15 fibers, acrylic fibers, silica fume, plasticizer, and pigment if needed.
The admixture and fibers are the very last things I add to the mix, in that order. They both tend to bind the mixer up, so slowly adding them to the end helps to prevent that. The mix should have the consistency of taffy, you don’t want it super fluid. Yet, it should be able to move around the form to make natural-looking veins. You also don’t want it so dry that it leaves massive voids on the face of the project that you'll have to fill in later. Make sure your fibers get fully mixed in, your mix should feel stickier than regular concrete.  Bradley Coomes
Dusting
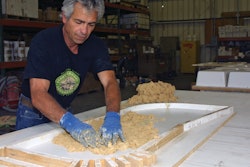
The crux of the process is how you dust the forms. Everybody has their own process, and every technique has its benefits. However you do it, you will be making something unique. I take about a half handful of powder and stand a couple of feet away from the form (you don’t need to be hovering over it).
I throw the powder towards the form, letting nature do the rest. It should be randomly scattered throughout your form. You can always add more if necessary. In the same vein, you can also blow out the form and try again.
On bigger pieces, you will most definitely need multiple throws to achieve a pattern across the entirety of the concrete face. It is important to make sure you don’t get a big buildup of powder on the edges of the form; it ends up ruining your concrete corners. I take a scraper and using a flick of the wrist, throw any built-up powder back into the form.
In this example, I used sanded grout to make a marbled effect. The Dusty-crete method uses the Dusty powder to create a nice texture. The sanded grout sucks moisture from the concrete when you cast, hardening to become a part of the face.
Casting
I fill a bucket with concrete and place it on my casting table, then take handfuls of the mix and carefully lay it over the powder. You don’t want to put so much in one place, where the concrete will roll over the powder. This is called steamrolling and causes the piece to become a bit cloudier, instead of having clear and concise marbling and veining. In this example, my mix was slightly wetter than normal, making the result show more blooms, to look like fireworks ingrained on the table.
With the mix how you would like it, place handfuls onto the powder. Once you have a couple of continuous handfuls all touching, I like to make sure the handfuls have all joined up nicely by massaging the backs gently, so as to not disturb the powder. Continue to place handfuls and fill up your forms, making sure the edges of the forms get massaged well to prevent as many air bubbles on the sides as possible. Make sure the back of the piece is level with your forms and cover it for the day.
 Bradley Coomes
Polishing
The day after casting, I carefully remove the form edges and flip the piece over. I check to make sure everything looks “normal.” I say that because it will look nothing like the finished concrete, I just want to make sure there aren’t any massive voids or huge buildups of powder that may have caused some disfigurement on the face.
After that, I use a wet polisher with a 200-grit diamond polishing pad to clean off the top layer of concrete, sometimes called the cream. Make sure to keep the polisher even, and to keep plenty of water on the surface.
Move slowly. Once the whole face is cleaned up, you should see some smaller holes that have appeared. These are air bubbles that we couldn’t fully get out of the concrete without disturbing the powder underneath. I mix a slurry consisting of cement, sand, water, and any pigment to match your design, and rub it into all the holes on the surface. After my first pass with slurry, I use a paint scraper to scrape the surface of excess, and it shows me any more that I may have missed. After all the holes are filled, use a damp rag to wipe the top clean of the excess.
 That's not marble, that's concrete.Bradley Coomes
Flip & Move
You spend all this time painstakingly pouring over your forms, weighing and measuring your ingredients just right, only to fumble the football and damage your piece while processing it or installing it. Every single person I have talked to has had wildly different ideas in how to move pieces around—from carts to hiring 15 people to help—but the one singular constant in every single discussion about it has been the need for patience.
Go slow.
When I remove my forms, I don’t slam my drill around, yank my side rails or anything. I know it’s concrete and my UHPC is reading massive compressive strengths, but it doesn’t take much to get a hairline crack started or to chip a corner, especially on green concrete. When I move a piece from my casting table to polishing dollies, I make sure there are literally no obstructions around, and that I have at least one extra person than I feel is necessary. This extra 45 minutes spent can be a hassle, sure, but it is a whole lot better than explaining to a customer why their project needs an extra couple of weeks.
Think about your tensile strength when moving your castings. Concrete generally cracks before it bends. Instead of rebar, I use a high load of fiber in my mix.
If you find that the concrete has bonded to your form when flipping a piece out, you can slowly wedge shims underneath in an even pattern. This should eventually get the entire piece to pop out. You should then be able to safely get underneath to flip the concrete over and begin processing the face.
 Bradley Coomes
This process of making concrete has completely changed my view on furniture and concrete applications in general. Like CDS, this design process continues to change and evolve. Craftsmen around the world use this technique, or ones similar, to achieve interesting results. Every person has a different take on it, and others have found other more intriguing ways of transforming their mixtures into something never before seen.
Use this article as a jumping-off point to try different methods. If you aren’t sure where to start or feel you need some help, definitely take a class from Dusty or any of the instructors at CDS or contact the support staff at the Buddy Rhodes headquarters.