Edge finishing is an age-old gripe with polishing contractors that has caused bad backs and sore knees since the beginning of polished concrete time. I wish I could write an article that would take away all your frustrations about edging, but I can't. What I can do is offer an article that presents solutions for the difficulties contractors often stumble upon during the edging steps of a polished concrete floor.
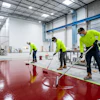
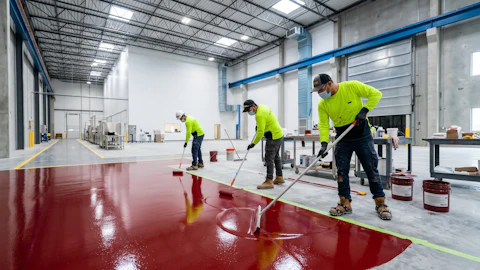
Successful edges start with attitude. A hate for edging can spread like a cancer through your company, so you must ensure a positive attitude about edging at the top of your company. Your employees need to know edges are an essential part of the overall beauty and finish of the floor and are the key to your company's profits. Employees who take their time and use their skills to produce beautifully blended edges should be commended and rewarded at the end of a project. An attitude adjustment like this coming from the top of your company will help ensure your projects are an overwhelming success.
Other challenges that can affect the outcome of edge work can't be solved by a simple attitude adjustment. Oftentimes, inconsistent concrete finishing along exterior walls is the result of concrete contractors having to hand-finish edges because their power trowels couldn't get close enough to the edge of the slab. Hand finishing can cause many frustrating situations such as an uneven finish with many highs and lows and "chalky" concrete or pitting. These problems can all be solved but only with elbow grease and backaches. I like to try to get the edges as flat as I can and blemish-free by heavy grinding or patching if necessary.
Another issue is timing and the construction schedule. Was I scheduled before drywall and baseboards? Are the toilets in? What about kitchen cabinets? The project manager always asks me when I want to come in to "do my thing." Of course I want to be free and clear of obstacles and interior walls, but a large percentage of my jobs start before the concrete is poured. I cannot expect the GC to wait 28 days until the concrete is cured before he can start rough framing or other tasks on his own schedule. I try to explain what works best for me and is most cost effective for him in regards to edging and we make an educated decision.
Choose the right tools
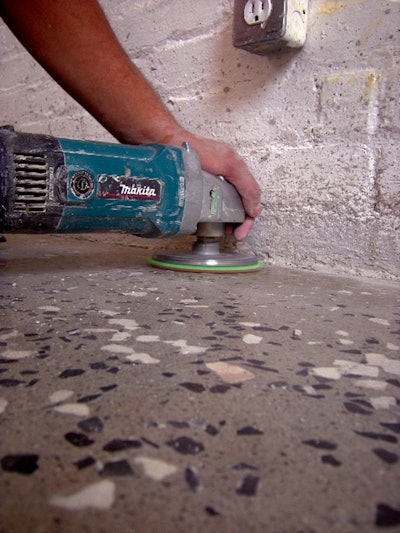
There are enough factors working against you when you're polishing edges on a concrete floor. Do yourself a favor and don't work against yourself even more by using the wrong equipment and subpar diamond abrasive pads.
Handheld, on-your-knees equipment
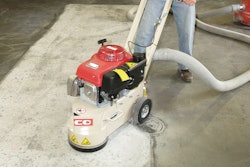
- 7- to 9-inch high-speed grinders with a shroud and metal cup wheel abrasive are generally used for the first cut or coating removals.
- 7-inch variable-speed grinders are often seen in a non-shrouded application with resin diamond pads and generally used in conjunction with the grinding steps of the floor machine.
Stand up and get off your knees equipment
- A handheld 7- to 9-inch high-speed grinder attached to a carriage, again typically equipped with a shroud and metal cup wheel abrasive and used for the first cut or coatings removal.
- A 2- to 3-hp stand up edger with single rotary head and articulating body for forward edge grinding.
- Counter rotary head stand up grinder.
Know the edging process
The challenge with edging is this: How do I use a smaller edging tool to match the polish made by a much heavier machine? Let me share with you my process for this procedure.
Usually you have at least two people on the job — one edging and one running the machine on the rest of the floor, moving both projects through the same grit sequence at the same time. In rare situations I have done both, grinding a few passes then playing catch-up with the edges or vice versa. Ideally you want to be chugging along at roughly the same pace.
First, I like to get a deep cut with a high-speed, powerful handheld grinder equipped with a shroud. Remember to predict the amount of exposure you will have on the rest of the floor and try to match this with your edge. Your floor can look terrible if you have big aggregate exposure throughout the central part of the floor and a salt and pepper finish on your edges. This first edge step is as crucial as it is with your big machines out on the floor. Your goal is to "flatten" as much as possible, eliminate as much surface defect as you can and refine the edge in preparation for the resin pads. A note to beginners: Be very careful on this step! You can create a lot of damage and headache in a very short time yielding a high speed hand grinder. The dreaded "ring mark" or "grinder scar" will have you crying in your coffee later in the polishing process
I recommend using a high-quality, 24-segment metal cup wheel of about 80/100 grit if possible. On a technical note, make sure you do not just keep the grinder up against the wall while you proceed or you will have a 7-inch line cut into the floor from the cup wheel. You need to keep the grinder moving in a circular motion to eliminate this. This step can be done before or after your first pass with your grinder. I prefer to do it first so your grinder can eliminate as much of the profile/damage from your initial edge cut.
As your floor progresses through the process, it is best to try to keep up with the grit sequence of your polishing machine. Again, high quality resin pads are essential. We like to use a variable speed 7 inch grinder with 5 inch resin pads. We stock low grit resins such as 30 and 50 grits which are essential to follow your metal pass.
I should note that the starting grit is determined by the degree of cut you are trying to achieve. With a cream polish you would not start with a cup wheel. For example, some contractors start with a flexible copper abrasive to follow the floor and never use a cup unless they are going for aggregate.
Essentially the process along the edge is the same as what is happening out on the main part of your floor. I think something to remember would be as you practice full refinement as the CPAA teaches, the edges need to be refined fully as well.
Well defined edges that match in aggregate and tone with the rest of the floor takes a lot of work and craftsmanship. You are battling the whole time trying to match the refinement of a heavy machine with much more down pressure than your variable speed hand grinder. As I say with anything in this business, you should slowly refine your process and research the "new" edging solutions and equipment before you rush out to buy what they are selling.