At a newly built educational exhibit in the Mammoth Spring National Fish Hatchery in Mammoth Spring, Ark., visitors can learn about the plants, animals and aquatic life around Mammoth Spring, a National Natural Landmark and Arkansas’s largest natural spring. The building’s polished concrete floors tell a story of their own with an interactive river scene that winds throughout the 7,000-sqaure-foot exhibit space. The three-dimensional design, complete with lily pads and fish, was designed to lead visitors through various areas of the exhibit that represent the mouth of the spring and the environments its rivers and streams create.
The concrete polishing is the work of Buildco, Saint James, Mo. After hearing the owner’s desires to make the exhibit floors complimentary to the exhibit’s natural grass displays and aquatic tanks, Buildco owner Mook Cunningham brought Rachel Knigge-Bruce onto the project, knowing she could bring a touch of artistry to the floors. Knigge-Bruce is the owner of FloorMap Stencil Designs, a company that designs and sells vinyl logo systems for concrete. After six months of back-and-forth design planning, Knigge-Bruce took the owner’s simple idea for a two-color design — a blue river on a beige background — and transformed it into a three-dimension river scene that mimics the colors and nature of the area.
Adding polish and design
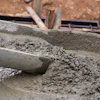
The floor polishing at the fish hatchery exhibit took place in two mobilizations. The first happened in the fall of 2011. The Buildco crew cut the new construction floor with 80-grit then 150-grit metal-bond abrasives. Then they moved to 50- and 100-grit hybrid diamonds, the last wet grinding steps they took in the polishing process. Then the crew continued processing the floor with 100- and 200-grit resin-bonded abrasives before densifing the surface.
After this initial work, Buildco left the site for the winter while the rest of the structure was built. When the Buildco crew returned in the spring, they found the floor survived the construction that took place on it over the winter, thanks in part to the densification and in part to the general contractor. “There were no major issues with the exposed floors when we came back,” Cunningham says. “We told the GC there is only so much we can do to take out a stain, so the GC was really careful with the floor.”
The Buildco crew re-ran the 100- and 200-grit resins, mostly to clean up the floor, Cunningham says. After the quick clean-up, Knigge-Bruce and her two artists started the week-long dye process with support from Cunningham and his crew. The team used more than 30 custom dye colors and airbrush work to create a river scene that offers depth and movement.
The entire process was intricate and time consuming. Knigge-Bruce explains that creating three dimensional art with translucent dyes is a challenge because you cannot build color upon color like you can with opaque paints. But the translucent properties of dye allowed the artists to take advantage of other effects.
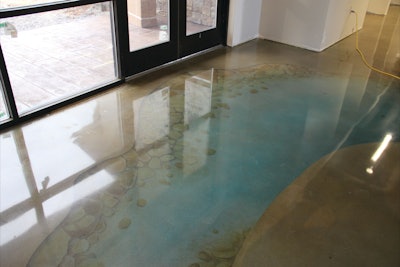
“Near the shallow parts of the river we created rocks. In these sections we painted the rock, and then to make them appear as though they were underwater we diluted shades of blue to airbrush on top of them,” she explains. “Toward the deep end of the river the color was darker — a more vibrant, richer blue. Toward the shallow end near the rock the blue was misted on to make the rocks look like they were just under the surface of the water. That was one of the benefits of working with the translucent dyes.”
The greatest challenge a contractor has with creating an artistic scene on polished concrete is the risk of grinding it off after the color work is finished and he moves through the final steps of the polishing process. “People apply color to their polished floors at different times. The key is to avoid running too many passes after you apply color, because each pass takes off a little color,” Cunningham explains. “We dyed this floor after the 200-grit resins, then took the floor up to a 1,500-grit polish. We tested this before the project to make sure we wouldn’t take too much color out.”
Knigge-Bruce adds, “Getting a three-dimensional effect with polished concrete is tricky because you are generally going to apply dye midway through your grinding steps. If you were just sealing over the top of the artwork, you could create pretty much anything and the sealer would lock colors and shades in place.”
While Knigge-Bruce says the biggest challenge on this design was achieving the right effect without losing detail in the end, for Cunningham and his polishing crew it was working in tight quarters around other trades and contractors installing the exhibit’s large aquariums. But in the end, the creativity of the artistry team and the expert finish from the polishing crew offered an interactive floor that enhances the visitor experience.