The current market makes it difficult to justify large capital expenditures. "A lot of people right now are looking to manage their fleets very carefully," says Paul Hendrix, equipment pricing analyst, Iron Planet.
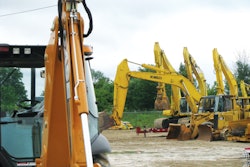
Purchasing high-dollar earthmoving equipment such as motor graders and scrapers can be especially challenging if you don't have a large backlog of business. One viable solution is to purchase used late model grading equipment manufactured in the last five years.
"Some of the late model units we sell have very low working hours and are an excellent option to purchasing new," says Doug Olive, senior director, pricing and valuation, Ritchie Bros. Auctioneers. "By doing your homework prior to attending an auction, a contractor will be able to leave with a work-ready motor grader at fair market value."
Bargains are especially plentiful for motor scrapers."The used market for motor scrapers has been really tough. If you look at the used market for those assets over the last three years, they have literally been falling off a cliff," says Hendrix. "I think most people would think twice about making the cash outlay on a new motor scraper when they can buy used for such a bargain right now."
Know what you're getting
Before purchasing a used machine, it's important to perform a thorough inspection. Unless you are an experienced mechanic, Olive advises you bring one along to complete a walk-around of the unit you are interested in purchasing.
"When inspecting a used motor grader, there are a few 'rules of thumb' to keep in mind and some basic things to ask for," says Wade Porter, ADSD motor grader application specialist, Caterpillar. "Overall cleanliness of the machine will give a good indication of how well it was kept up. Structural damage, gouges, etc., can indicate the grader was used in heavy applications (e.g., rock), which will reduce its life expectancy before major repair and/or overhaul."
Ask for the machine's service records. "Whether or not it was serviced regularly, and by whom, will give you a good indication of the condition the grader is in, especially for the areas 'below the surface'," says Porter.
Take oil samples. "Fluid samples can tell you a lot about the current condition of a major component such as the engine, hydraulic system, transmission, etc.," notes Porter. "Most major brand dealers offer this product support service."
Motor grader inspection
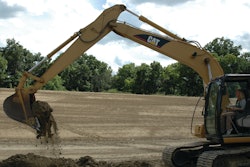
When inspecting a motor grader, look carefully for any repairs that may be required. "The components on a motor grader that can lead to costly repairs are the circle, tandems (rear housings) and the center pivot pin," Olive points out.
It's best to take a systematic approach. Hendrix uses a four-point process to evaluate all types of equipment. "You can get into some pretty complicated systems with some of these units, especially motor graders," he states. "There are so many pivot points and wear points, it is literally a minefield if you get overwhelmed by it."
The four points to examine include structural, mechanical, hydraulic and ground-engaging components. "If you break any inspection down into those four components, it is easier to concentrate on each one individually and then come up with an aggregate at the end to determine the overall condition of the unit," says Hendrix.
Start by looking for any structural problems. "If a motor grader does not have blade accumulators and you hit something with the blade, you can do a lot of damage to the A-frame, which is the part of the frame that carries the blade circle," says Hendrix. "Look carefully around the A-frame of the blade circle to make sure there hasn't been breaks or cracks." Make sure no plates have been welded on there.
Then examine the mechanical items, including the engine and transmission. Note how easily the engine cranks and whether there is a miss in the engine or any leaks. "Get it in gear and make sure it operates in all forward and reverse gears," Hendrix advises.
Next, cycle the hydraulics. "If the hydraulic pump has a lot of whining in it or it makes a lot of noise every time you engage the hydraulics, chances are you have an internal problem. Also look for blade drift."
Finally, check the most critical part, the ground-engaging components. "The most common wear points are obviously around the blade and work equipment that is involved with the blade — which is, more than anything, the blade circle," says Hendrix.
In order to fine grade, a motor grader needs to maintain tight tolerances. "It is very important to check wear strips, shims and everything used to tighten up a motor grader," says Hendrix. "In the blade circle, there might be a dozen different ball joint couplers. Every one of those couplers will have some type of shims when they come from the factory. As the ball joint wears, these shims can be removed to maintain tight clearance."
Look for the presence or absence of shims. If the shims are gone, then you will have to replace the ball itself. It gets a lot more involved and costly at that point.
Also observe how the blade was maintained. "Since the moldboard is where all of the grader action takes place... it is a good indicator of how the overall machine has been maintained," says Olive. "If the cutting edge has been worn so much that there are signs of wear into the moldboard, that is a big sign of neglect or misuse of the machine."
When determining whether the moldboard might need to be replaced, first check how worn the moldboard is and if the cutting edges have been replaced prior to wear. "Other indicators the moldboard might need to be replaced are evidence of fishplating, or if the sideshift pin is not straight," Olive says. When inspecting the moldboard slide, watch for a bent rod and hydraulic oil leaks.
"You also want to make sure the moldboard has not been warped — that it hasn't hit something in the middle or end that bent it one way or the other," says Hendrix. "The only way to do that is to bend down and really look down the moldboard to make sure it is straight."
Controls also need to be tight. "It is extremely critical to a finish grader operator to have 'tight' control linkages, just like the drawbar, circle and moldboard linkages," says Porter. "A little bit of slop or play will remove the 'feel' of the cutting edge and negatively affect the 'modulated' performance capability of the operator. The linkage hardware in a conventional control motor grader is somewhat complex and has several moving parts, including the knob, control handle, rod, rocker arm, springs, bushings, etc."
Finally, understand the specs of the machine you are purchasing, and don't make any assumptions. This is especially true with the moldboard.
Check the moldboard length and make sure it is the correct length for the model. For example, a Caterpillar 140 grader should have a 14-ft. moldboard, and the 12G and 12H are ordered with 14-ft. moldboards in most markets, Hendrix points out. If any of these models are being sold with a 12-ft. moldboard, it can result in a significant reduction in value in some cases, especially on the 140.
Motor wheel scraper inspection
"The most common wear items on tractor wheel scrapers are the bolt-on edges and tires," says Olive. "The most critical items to inspect on a used motor wheel scraper are the bowl, gooseneck and draft arms. Again, a complete walk-around inspection of the unit with a knowledgeable mechanic is well advised."
"Really, the most important wear item to look at on a motor wheel scraper is the neck," says Hendrix. Many motor wheel scrapers are pushed with a dozer. "There is a lot of horsepower being applied to that middle and a lot of stress. The neck has a lot of wear points. There is a suspension system there. The steering cylinders are there. There is a pivot for the front part of the tractor scraper.
"If those pins and those bushings are not changed out when they are starting to wear, then they will bang against each other," he continues. "If you have to take the tractor scraper neck apart and line bore all of those points, you could be looking at a tremendous amount of expense and downtime to get that repair done. You need to look very carefully at the neck area and all around the bowl for any kind of structural problems."
Check the torque tube in the front of the scraper for cracks and breaks in the weld. "I have seen more cracking and welding and plates in the neck than anywhere on a motor scraper," says Hendrix, "so you really have to examine that area very carefully."
Put the cutting edge in the ground, very carefully let the brakes off and engage the gears forward and backward. "Look at your horizontal and vertical pins and try to determine how much wear is there," advises Hendrix. "Quite often, those are caked with an inch of grease, so it's hard to watch. You really need to bring someone out there who understands that neck and all the wear points in it. They need to help you determine relative wear. The bigger the scraper and the more money you are talking about, the more crucial that is."
Finally, double check the brakes. "On older units, contractors tend to let the brakes go when they fail," Hendrix asserts. "You have a 20-yd. bowl that serves as a brake."
Brake jobs are not inexpensive. "On older scrapers, more often than not, they do not have brakes," says Hendrix. "I use that as the rule rather than the exception."