The first and most important issue is safety. I recommended that the circuit breakers for the drum drives and any related equipment be tripped OFF and locked out as per OSHA regulations. Once this is done, remove all trunnion guards and loosen all adjustment plate mount bolts. It is also a good idea at this time to make sure all adjusting bolts are free of corrosion and will turn in their respective threads.
Since the trunnions control ride height of the drum, I recommend that the drum be centered in the inlet and outlet breaching at this time. To raise the drum in the discharge breaching simply move the trunnions at that end of the drum closer together. To lower it move them apart. When the vertical height is correct, but the drum is off-center to one side or the other we must move both trunnions in the same direction while maintaining their spacing. We must do this at both ends of the drum to get it correctly centered in both the inlet and discharge breaching.
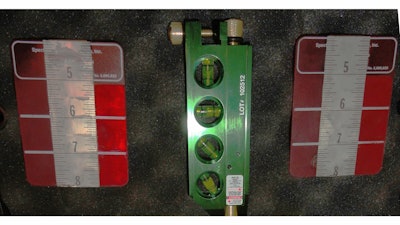
Once this is done we are ready to begin the adjusting process. The first thing to do is to set all four trunnions to the neutral position. This means that the centerline of the trunnion shaft is exactly parallel to the centerline of the drum, and that when the drum rotates the trunnions will exert no influence on the drum’s position with respect to its thrust control mechanism. This is a difficult job requiring some exacting measurements. I’ve manufactured a tool that greatly simplifies this process. This laser alignment tool utilizes an industrial ruby laser and a pair of indexing scales with magnetic bases.
To use this laser tool we must first clean the sides of the tires and trunnions so the magnetic bases will adhere. Attach the laser to one side of the trunnion, on one side of the shaft. Set the scales on a smooth part of the tire. As an example. If you stood inline with your drum and want to work on the left trunnion closest to you, you would put the laser on the trunnion face at 9 o’clock for your first measurement, then at 3 o’clock for your second measurement. You would then put the target scales at 9 o’clock and at 6 o’clock on the drum tire. By reading where the laser’s red dot lands on each of our indexing scales we are able to determine the amount of ‘skew’ in any particular trunnion. To set our trunnions to neutral, we would want both laser readings to land on the same number on their respective scales.
With all four trunnions set to neutral it is time to set them up so that they position our drum correctly between the thrust control rollers or flanges. Drums are set on a slope so that material will travel from the inlet to the outlet as the drum rotates. When our trunnions are set at neutral, gravity causes the drum to run to the lowest end, exerting considerable force on the lower thrust mechanism. In order to reduce the wear and tear on the thrust stop we must relieve this pressure. We do this by introducing a controlled amount of ‘skew’ into the trunnions. I like to set the drum so that when it is empty it just touches the lower thrust stop. At low rates of production it rides just off the bottom thrust stop and at high rates it rides up near the upper thrust stop.
In order to understand the process it is helpful to think of the trunnions as the front tires of a car. Stand so that you are facing in the direction that the drum tires roll over the trunnions. If you need to move the drum in a certain direction then you would steer the trunnion the same as the front tires on your car.
There are two very important rules that must be adhered to:
- All four trunnions must be set exactly the same in order to avoid abnormal wear patterns.
- Do not skew the trunnions any farther than absolutely necessary to keep the drum off the thrust stops.
I’ve never seen a set of trunnions that needed to skewed more than 1/8” from neutral and most drums only require about 1/16” of skew. When working on trunnion adjustments it is important to remember that, if things are not going right or something troubles you — start over! Reset everything back to neutral and begin again.
If you need any help using these lasers or instructions please do not hesitate to call us. Related phone consultations are free with the purchase of this tool.