This project is for another member of my family’s household menagerie.
Background:
Our one-year-old cat, Safiri (Sa-fear-ee), was born a runt of a kitten out at my grandparents’ farm. My mother and I found (or rather heard) him in the barn, abandoned by his mother and searching for food. Our hearts melted at once and, to no one’s surprise, we took him home to live with us.
As a kitten, Safiri was mild-mannered and docile, but he soon transformed into our resident Tasmanian devil. I will never understand how that much energy can be stored inside such a small creature. To alleviate some of this energy (and save some of our own), we decided to build him a cat tree. It was time to pull out the carpet squares and get creative!
Our Materials:
• 3-ft. round concrete forming tube
• Fourteen carpet squares
• One 16”W x 64”L plywood board
• Two 3-ft.-long wood rocking horse legs
• Two 3-ft.-long wood pieces
• One 24”x24” wood base
• One 16”x16” wood board
The Process:
This is the type of project that doesn’t require strict guidelines, so my partner Eric and I searched online for a general concept and then used our imagination. We drew the blueprints ourselves with all of my father’s spare building materials in mind. The wood pieces we used were found in my father’s shop. Seeing as that was the majority of what we needed, this project turned out pretty cheap. (Thanks Dad!) We bought the concrete forming tube at Menard’s and the carpet squares at JM Carpets.
We began by sawing the concrete forming tube to size so we could get a good sense of how much we would need to cut the support legs. To do this, we used a typical hand saw. Eric wanted to use a table saw and just rotate the cardboard tube around the blade but I immediately vetoed that idea and chose the safer option. Even DIY-ers like me occasionally try to avoid hazards.
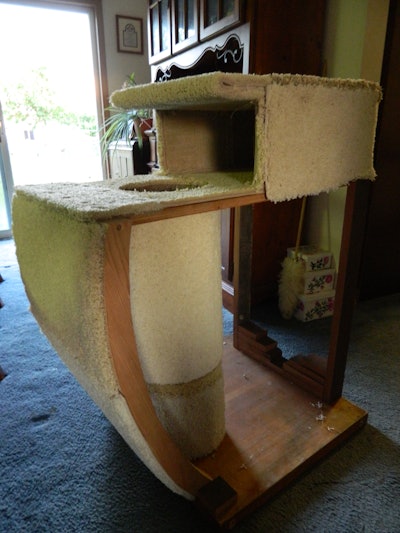
Once we had the tube cut to a 3-ft. length, we used a Craftsman 10-in. miter saw to cut the rocking horse leg supports to the same height. We wanted to save a little of the legs’ curves so they could act as a climbing and scratching area once we stretched the carpet squares across them. We cut the support beams that would sit underneath the box to 3 ft., as well.
We then used a table saw to cut the pieces for the box and upper platform. We cut the 16”W x 64”L plywood board into three 8” x 16” strips for the box sides and one 16” x 32” piece for the platform. We then trimmed a small amount from the 16” x 16” square board for use as the top of the box.
After cutting the plywood, we cut the hole in the platform where the concrete forming tube would be inserted. In our first attempt, we used a router. As an experienced builder could have guess, this did not go as planned. The router was cutting but the blade was not long enough to go entirely through the board so we were left with more of a circular indentation than a clean cut. Realizing our dilemma, we searched my father’s workshop and found a Craftsman jigsaw, which worked much better and was a lot easier to use. Lesson learned: the right tool for the right application equals greater efficiency and better results. We also used the jigsaw to cut the opening in the concrete forming tube so Safiri would be able to enter and climb the tube.
We finally finished the circular cutting and moved on to putting the box together. We used a Ryobi 18v drill driver to attach the pieces. The platform acted as the bottom of the box while the three 8” x 16” strips were attached around one end and the 16” x 16” board was attached to the top. We then carpeted the box using the carpet squares and an Ace utility staple gun with 3/8-in. staples. This was probably the hardest and most tedious part of the process. The carpet was too thick in places, the staples would fall out and we had nothing but a dull knife and our upper body strength to cut the carpet squares to size. Let’s just say, I wasn’t a happy camper.
After carpeting, we drilled the four supporting legs to the base of the cat tree and attached the finished box on top. The support legs were wiggly at first so we fixed this by attaching increasingly smaller pieces of wood up the inside of the legs (they kind of look like stairs). After making it a little sturdier, we moved on to carpeting the inside and outside of the concrete forming tube and rocking horse legs. Finally, the project was finished!
The Result:
When we first brought the cat tree into the house, Safiri immediately came over and started sniffing at it like he knew all along that this contraption was for him. He was a little hesitant to climb it at first, but Eric whipped out the laser pointer and all hesitancy flew out the window. He soon was climbing up the concrete forming tube, snuggling in the box and hanging from the rocking horse legs.
Now, every morning I wake up to find him perched on his new castle, surveying his kingdom and unafraid of clawing any trespassers. Hopefully, this cat tree will occupy him enough that he won’t have time for any more energetic escapades. Knowing Safiri, I’m not so certain but… fingers crossed!

