This final project was short, sweet and functional.
Background:
After the numerous projects we have recorded and others that have gone unmentioned, my project partner Eric and I had a lot of leftover materials. We were struggling to find ways of repurposing these materials when my mom mentioned her need for a stool. She had been looking to convert her desk at work into one of the trendy new standing desks and needed an inexpensive stool to go along with it. Seeing as we had the materials (and her birthday was only a week away), we took on the challenge. We also decided to continue this idea and use up some of our excess concrete from our last project (Internal Ramblings - Working With New Materials During Creation of Concrete Bedside Table) to make a couple simple stools for ourselves.
Materials:
30-35 lbs. Quikrete 5000 concrete
3 1 ¼” x 48” wooden dowels
1 4’ x 4’ sheet of plywood
30 1 ¼” wood screws
Process:
We found instructions for a simple plywood stool on the blog "A Beautiful Mess" that required nothing but some plywood and wood screws. We set to work using the extra plywood we had from the "Zipstitch Chair" project. We used a table saw to cut the legs of the stool into 13” x 30” and 13” x 30.5” pieces and a 12“ x 13“ piece for the seat. We used a circular saw to cut the top of the front leg at a 15° angle and to cut the support pieces to be inserted on the inner part of the stool. We then cut out the foot rest hole using a jigsaw. We pieced the whole thing together using a Ryobi 18V drill and the wood screws. To maintain accuracy and avoid splitting, we drilled holes into the boards first before inserting the screws. A lovely display of our newly developed foresight!
Once the stool was together, we sanded it like crazy to level out the slightly imperfect cuts that were making it wobble. We ended up using a Dremel tool to speed up this process. After this was done, we had a lovely new stool just waiting to be unveiled on my mother's birthday.
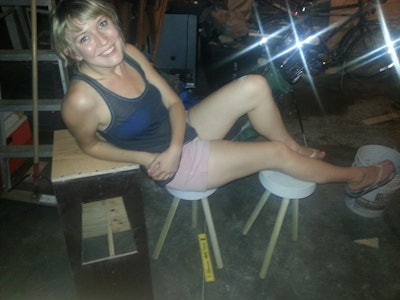
Seeing as this took only about a day to make, we decided to put our extra concrete to good use. We again looked to the ever-helpful homemade-modern.com. Ben had posted instructions for making a concrete “Bucket Stool.” This project was not only simple and cheap but it required the exact amount of concrete that we currently had in our garage. Talk about meant to be!
Eric and I bought 3 wooden dowels for about $3.00 each at Menards and used a miter saw to cut them into six 24” long pieces. We then mixed 3” of concrete into two buckets, placed the dowels into the concrete and let it sit for 48 hours. When dry, we removed the stool from the buckets and, voila, two cool new seats. It was honestly that simple.
Results:
These three new seats were fun, easy and look really cool. It was a nice way to end this DIY summer and use up remaining material. Thanks for following me on my crafty journey!